Is the latest PEN CSC more than just
an incremental upgrade?
While Panasonic’s G1 may have been the
first CSC, it was the Olympus PEN E-Pl that really sparked interest in this new
system among photographers, thanks to its blend of DSLR-like image quality and
handling characteristics in a smaller, stylish body. Since then, the PEN range
has grown to encompass three different lines, with the “Lite” model as the
mid-level offering.
With the previous Lite E-PL3 struggling to
stand out from the crowd, does the E-PL5 deliver enough new tricks to make a
case for itself?

OLYMPUS
PEN E-PL5
Features
Rather than sticking with the 12.3MP Live
MOS sensor found in the earlier generation of PEN CSCs, the E-PL5 features the
same 16.1MP Live MOS sensor as Olympus's flagship OM-D E-M5, along with the
TruePic VI image processor. This sees the E-PL5 capable of shooting at ISO
ranges from 200 to 25,600, improving on the E-PL3’s ISO ceiling of 12,800,
though a baseline ISO of 100 would have been welcome. As well as that, the
E-PL5’s burst mode has also been sharpened up, improving on the E-PL3’s 5.5fps
to an impressive, but not class-leading, 8fps.
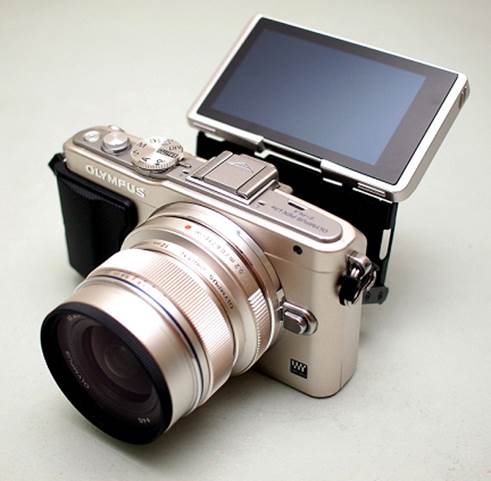
The screen has also been tinkered with. The
3in widescreen 16:9 aspect ratio display with a 460k-dct resolution remains the
same as the E-PL3, but touchscreen functionality has now been incorporated,
just like we’ve seen on the OM-D, though this benefits from OLED technology and
a higher resolution of 610k-dots. The amount by which the screen can be angled
has also been improved over the E-PL3, with the E-PL5's screen now able to
rotate 170° out from the camera body (improving on 85°) to face forward,
allowing easy composition for self-portraits if that’s your thing, while it can
face downwards 45° for shooting from up above and be positioned for waist-level
shooting also.
In an effort to keep its size down, the
E-PL5 doesn’t feature a built-in flash; instead, the E-PL5 is bundled with a
small flashgun that can be slotted on to the hotshoe, which may be considered a
bit of a nuisance.
The hotshoe also works in conjunction with
Olympus's Accessory Port 2 at the rear of the camera, allowing you to connect a
range of accessories, such as the very good VF-2 electronic viewfinder.

The
ability to vary the size of the AF point allows you to precisely focus or a
specific element.
Rather than the sophisticated 5-axis image
stabilization system employed by the OM-D, the E-PL5 sports a more conventional
2-axis system, though it being body-based does mean that it’s effective with
every lens attached, rather than the majority of systems that opt for
lens-based anti-shake systems. One such system is the Panasonic G-series, which
is based round the same Micro Four Thirds system as the PEN series. With the
same lens mount shared between the two brands, it’s natural to expect that some
image-stabilized Panasonic lenses will find their way on to an E-PL5. With this
in mind, the E-PL5 now features a Lens IS Priority mode in the menu, giving you
the option to set priority to whether you use the lens or the camera’s IS
system.
The E-PL5 builds on the 35-point AF system
that’s been on previous PEN cameras. The 35 points still cover the majority of
the frame, though not to the very edge of the image, but the E-PL5 now allows
you to refine the size of the AF frame. So as well as having a standard AF
point size, this can be increased to a single nine-point square, the entire
35-point area or an even smaller AF point for even greater precision.
As you’d expect for a PEN camera, the E-PL5
is loaded with 12 Art filters, and while the E-PL5 doesn’t feature built-in
Wi-Fi connectivity, images can be transferred from the camera via the
additional PENPAL accessory attachment or FlashAir SD cards.
Both
exposures and the dynamic range delivered was good, with well-balanced exposure
on the
Design
The E-PL5 is a compact little package and
with one of the growing selection of pancake prime lenses available for it,
quite a pocketable proposition. Even with the 14-42mm on the front, it's far
from cumbersome and smaller than comparable APS-C based CSCs with similar
optics.
The design is a subtle progression from the
E-PL3, and while it may not have the retro charm of the OM-D or the original
PEN E-PI, it still looks pretty sleek thanks to the curved edges and smooth
finish. For a camera in this sector, it’s pleasing to see a predominantly metal
exterior, while the shutter button and beveled Olympus badge add to the quality
feel. If we’re being picky, the rear screen feels like a bit of an afterthought
to the design, with it protruding from the rear somewhat, but then it is
tiltable.
To avoid some of the criticisms leveled at
the E-PL3, the E-PL5 does feature an attachable front grip like we saw with the
E-P3, producing a better grip than is possible with the camera’s smooth finish.
It does look a little ungainly from some angles however, though there's a
growing selection of third-party options on the market.
The E-PL5 is reasonably well catered for
when it comes to exterior controls. There's a mode dial along the top of the
camera, while running above the rear screen are controls for Playback. Delete,
zoom-out/Fn, zoom-in and video capture. Both the zoom-out/Fn and video capture
buttons can be programmed to access other settings should you wish in this
instance, we set the zoom-out to alter ISO, and video capture to AEL/AFL.
To the side of the screen is a scroll dial,
which is used to adjust a range of settings, with a four-way d-pad nestled
inside it to control exposure compensation, AF selection, flash and drive. Dead
in the center of that is the OK button to confirm adjustments as well as access
the Quick menu during shooting.