“It’s easy to rip and mount disk
images to keep the original optical discs safe and try out new operating
systems.”
Recently, I found myself on the move with a
few hours to spare. What about a nice session of my favorite game? The disc,
however, which must be in the drive on my laptop for the game to play was at
home in its jewel case. What I needed was a copy of the CD on my laptop’s hard
drive that would be treated as the real thing.
Keeping your discs as ISO images is
immensely useful, not just for the convenience of having your installation
media wherever you go. If something happens to your original media – a rogue child
decides to interface your keys with your copy of Microsoft Office, for example
– you’re covered, because you’ll have a carbon copy of the original ready to
burn to another disc or mount and run straight from your PC. Backing up
your media for personal use won’t get you into any legal trouble, but you
shouldn’t distribute ripped discs.
Step-by-step: Rip and mount disk images
- Download an ISO First, we need an ISO file to practice on. Let’s make it
something useful; the Ophcrack password recovery tool can help you out in
times of inadvertent lockout, and it comes in the form of an ISO image.
Download the Live CD for your system from http://ophcrack.sourceforge.net/
and save to a convenient folder. The ISO is 506MB in size, so make sure
you have enough space.
The
Ophcrack password recovery tool can help you out in times of inadvertent
lockout
- Prepare a DVD-RW Before we can sue a DVD-RW for the first time, we must prepare
it. This also goes for discs that have been written to. To get started,
put the disc in your computer’s DVD drive and right-click it in Windows
Explorer. If it’s new, select ‘Format’ and click ‘Start’ on the subsequent
window. If it has been used before, select ‘Erase this disc’ and click ‘Next’.
- Burn in Windows 7 If you’re running Windows 7, burning an ISO file to a bootable
disc is simplicity itself. Open Windows Explorer and right-click the ISO
file in the downloads folder. Select ‘Burn disk image’. Up pops the
Windows Disc Image Burner. Put the DVD in the drive and select ‘Verify
disc after burning > Burn.’
- Install InfraRecorder If you’re using either Windows XP or Windows Vista, download
Infrarecorder from Sourceforge (http://bit.ly/zS4p),
or find it on your free disc. Run the executable and select your language.
Click ‘Next’ and agree to the license, then click ‘Next’ again to accept a
full installation. Click ‘Install’.
- Burn in Windows XP or Vista To burn the ISO in a version of Windows earlier than 7, first
run Infrarecorder. Click ‘Actions > Burn image’ and select the ISO
file. The default settings should be fine, so simply click ‘OK’ to begin
burning the ISO to the disc. This will take about five minutes, after
which the disc drive should pop open.
- Boost the ISO You can now test the recording of the ISO file to make sure
that it has recorded correctly and will boot up. To do so, simply put the
disk in the drive and reboot the computer. Ophcrack should load and run,
eventually displaying its tools. After you’ve completed the boot, you can
simply switch the computer off, reboot and remove the disc to go back into
Windows.

You
can now test the recording of the ISO file to make sure that it has recorded
correctly and will boot up
- Reading an ISO Infrarecorder can rip the ISO image from a disc you own
to your computer’s hard drive, ready to be mounted later on. To do this,
click ‘Read disc’ icon. Now insert the disc to be read into your PC’s
optical drive and enter a path and name for the ISO in the ‘Image file
input’ box. Click ‘OK’ and if the disc is not copy protected,
Infrarecorder will create the ISO.
- Install Virtual CloneDrive To mount the ripped ISO so that it can be used as if the disc
were in the drive, we need Virtual CloneDrive, which you can find on your
free disc or download from http://bit.ly/zS4p.
Run the executable to install. Virtual CloneDrive will ask your permission
to install a virtual device driver as it installs. Click ‘OK’ to agree and
continue. When the installation is complete, click ‘OK’ to finish.
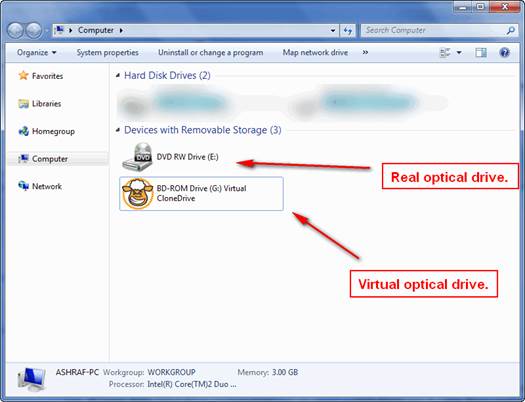
- Mount the ISO When you’re ready to mount an ISO using Virtual CloneDrive,
open the folder containing the ISO and right-click the file. Select ‘Mount
(Virtual CloneDrive E:)’. After a couple of seconds a new hard disk should
appear in Windows Explorer. If you expand this, you should be able to see
the files contained within the ISO as if they were stored on a real hard
drive.
- Extra virtual discs Virtual CloneDrive can handle more than one virtual disc at a
time. This is convenient if you have many discs that must be in the DVD
drive before their associated applications will work. Virtual CloneDrive
adds an icon to the system tray. Right-click this icon and select
‘Settings’. Use the pull-down list to select the number of drives you
need.
Virtual
CloneDrive can handle more than one virtual disc at a time