Before you tweet pictures you can now
add Instagram-style filters from within the Twitter app.
Work with: Android 4.0 and above
There are now hundreds of photo editing
apps available for download from the Google Play store, but many are clunky and
can be difficult to use. If you want to add basic edits to your photos before
sharing them with the world, then a recent update to the official Twitter app
might just be for you. The new update enables users to attach a photo to a
tweet they’re composing and carry out some edits to personalize the image.
Add
Instagram-style filters from within the Twitter app
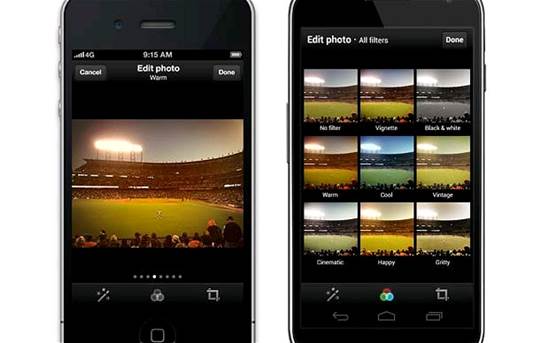
The main tool at your disposal is the
filter page, which enables you to add one of nine stylistic filters to your
image. Twitter has also included a nifty cropping tool and a wizard tool to
help eradicate any issues with the photo. In this tutorial we’ll take you
through all the new editing tools now available in Twitter.

Twitter
has also included a nifty cropping tool and a wizard tool to help eradicate any
issues with the photo.
Finalize your changes
Once you’ve added all your changes, press
on the Done button at the top-right of the app. You’ll then be taken back to
your tweet with your edited image attached to it. Finish off the tweet and
press Send to add it to your news feed.
Camera or photo?
As well as being able to use Twitter’s own
camera function to add an image to your editing suite, you can also choose a
saved image from within the Gallery app. As well as images you’ve personally
taken, you can also access images sent to you through messaging apps.
Quick scroll
Although the filter overview screen is
great to see the styles of what’s on offer, it can be hard to see all the
details. An alternative to this is to simply scroll left and right on the
screen to see what each filter adds to the image you chose to edit.
The perfect image
Sometimes no matter what edits you make,
you can never get it exactly how you want it. Although it isn’t a miracle cure,
the wizard tool at the bottom-left of the page can help make some minor tweaks
to improve the image’s overall quality.
Make additional edits
If you want to take your editing one step
further, you may consider applying all the small changes in Twitter, saving
them and then opening the image in a more thorough photo editing app. Apps like
Aviary and Instagram are the obvious choices to head to.
The photo editing process
Twitter’s new photo editing process can be
completed in just three simple steps that require no previous knowledge or
expertise.
Apply a filter
After importing your photo into Twitter,
the first menu you’ll come across is the filter one. Currently there are nine
different filters to choose from, all of which offer a different stylistic
element to your chosen photo. Press on any of the filters to see a preview.

After
importing your photo into Twitter, the first menu you’ll come across is the
filter one.
Move and scale
After applying a filter to the photo,
choose the frame symbol located on the editing screen. This will take you to
the Move & Scale page where you can reposition and crop your image to only
show what you want to show. This is a great tool if the image is an odd shape.

Move
& Scale page where you can reposition and crop your image to only show what
you want to show
Compose your tweet
Once you’ve applied both sets of changes,
go ahead and press the Done button located in the top-right. You’ll now be
taken back to the tweet you’re putting together. Add any text you need to
include and press the Send button to complete.

Add
any text you need to include and press the Send button to complete.