Speed up browsing with a faster DNS
Marco Chiapetta explains how the appropriate
DNS server can enhance your web connection
Most people agree that the highest bandwidth of internet
connection decides its overall performance. Wrong. There are many contributing
factors, including the speed of the server you are trying to connect, network
connection type (wireless or wired), router and network bandwidth, and latency.
One of the less well understood factors is server Domain Name System (DNS).
DNS translates restored domain names into IP addresses by
number. You can type into a browser pcadvisor.co.uk for example, but it needs
the IP address of 192.168.1.64 to take you to that website. If the address is
not stored in the DNS appliance solution, the system will request it from a DNS
server - and then from another server in case of no answers.
Definitely ISP assigned DNS servers for your connection.
But depending on ISP and your location, you can see that this system is weak or
unreliable. As a result, some sites take too long to load (if they are loaded),
and email can be broken.
Find fast DNS server
Instead, you can use the public DNS server. Download and
run the open source Namebench (tinyurl.com/yLr8m63) and GRC's DNS Benchmark
(tinyurl.com /mtxLzo) to see if they provide consistent results.
In Namebench, ensure the option "Include DNS global
providers" and "Include regional best available DNS services" is
selected, then confirm your location and click Start Benchmark. The tool will
run some tests on your system.
In DNS Benchmark, click Nameservers tab, then Add/Remove.
Click "Build Custom Nameserver List" in the "Edit DNS Server
IPs". Then in the window that appears, click "Build Custom
List". You will need to wait about 40 minutes to complete the process, and
then click Run Benchmark on Nameservers tab.
The server with the fastest response time will provide
the best performance. Please note top 3 IP address.
Configure your PC
To set up Windows 7 using your favorite DNS server, click
Start, type Network Connections in the Search box, and press Enter. You must
configure the DNS settings on the network activity of all systems (each working
network adapter will has a listed network name under its own name and there is
no red X in its icon). Right-click on each working adapter and select
Properties. On the Networking tab, highlight "Internet Protocol Version 4
(TCP/IPv4)", then click the Properties button.
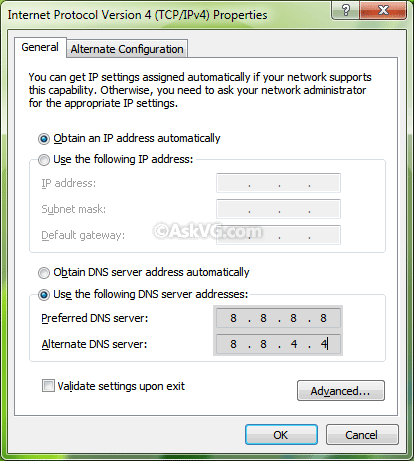
Select the General tab in the next window and click
"Use the Following DNS server addresses". Enter the fastest DNS’s IP
address in the Preferred field, and the second fastest DNS in the Alternate
field. Click OK in that window, and OK in the Network Properties window. Close
network connections list and restart the PC.
The router’s Configure
To make all of your networked systems (regardless of
operating system) use the same server, you have to change the settings of your
wireless router. This is basic stuff; review documentation to find specific
instructions.
Type 192.168.0.1 or 192.168.1.1 in the address bar of
your web browser. If none effect, select Control Panel, "Network and
Sharing Center", "Change adapter settings". Double-click the
network connection is active, click Details, and find the address in "IPv4
Default Gateway". Get that address, add http:// in front, and paste it
into your browser address bar.
Log into web interface of the wireless router. Click
Basic Setup or Network Setup, afterward, find the area called "Network
Address Server Settings (DHCP)" or something similar. Enter the IP address
for the fastest DNS servers in your area. Save your changes, then reboot the
router.
Edit your web browser
A common procedure of malware is to change the home page
or your browser's settings so that it can make your PC is infected again, display
ads and prevent the browser.
First, check the settings of the browser home page. In
Internet Explorer, click Start, Control Panel, Internet Options. Find Home Page
settings, and check if it was not the appropriate website..
Next, select the Connections tab and click LAN settings.
Surely you will want to select "Automatically detect settings",
unless the company's IT policies or ISP requires a proxy.