Tweak and organize your email
environment to suit you
1. Choose an appearance Although Mail has a
stripped down look, its interface isn’t all that customizable aside from the
ability to drag section borders. The one big thing that you can change though
is the way it’s laid out. Go into mail’s Preferences and find the Viewing tab.
At the top is the option to use the Classic layout. If you tick this box, Mail
uses a more traditional view with mailboxes down the left-hand side, a list of
all messages in the lower right. If you untick the box and choose to use the
newer view, you get a more iOS like setup, with mails shown in a central list
and the message viewer on the right. This adds an option to show contact photos
alongside emails in the message list.
2. Customize Mail’s columns Mail contains
lots of information about message, but much of it is hidden from view by default.
If you click on the header of any column in Classic view you can sort the
message list by sender, date received, subject and other criteria. You can also
resize columns by dragging their edges in the header. If you right-click on any
column header you can select more information to view, such as size, mailbox
name, attachments and more. These new columns also allow for sorting, so you
could for example quickly order a list by which mails had attachments. The new
view also allows sorting but using a ‘Sort By…’ drop-down menu.
Using
Mail’s viewing preferences you can switch to a Classic view, which places
message content underneath the list
3. Use the Mail Activity window At the
bottom left corner of Mail’s window is a small ‘arrow in a box’ icon that when
pressed reveals the Mail Activity window. This is a simple window that shows
progress bars when sending or receiving mail. It can be really useful to look
at because not only does it confirm that mails are sending successfully, it
also shows you the speed the mail is being sent or received at, which can help
with troubleshooting.
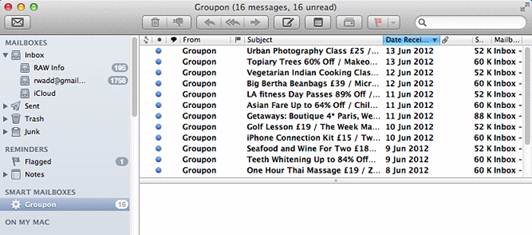
4. Manage your mailboxes Mail is quite
happy to work with multiple mailboxes. These can be made up of those on your
Mac and any others stored remotely on mail servers. At the bottom left of
Mail’s interface, click the tiny plus icon to add a new Mailbox or Smart
Mailbox. The Location option lets you choose where it will be stored. If you
have a web-based account like Gmail, Hotmail or Yahoo it will allow you to
create the mailbox on there and it will be visible to all linked devices like
iPhones and iPads. If you choose ‘On My Mac’, the mailbox will be stored
locally.
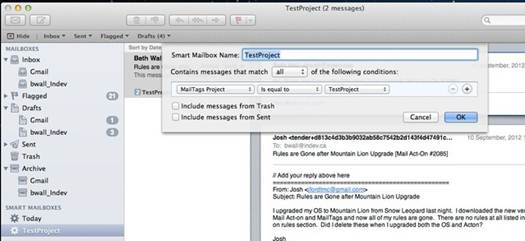
Add
new regular or Smart Mailboxes and choose to store them locally or on an IMAP
server, if supported
5. Back up your email Messages can be
easily dragged and dropped within Mail and between folders and mailboxes. You
can drag and drop individual mails out to the Desktop, and back up entire
Mailboxes by selecting them, right-clicking and choosing Export Mailbox. You can’t
drag threaded conversations to the Desktop, however.
6. Resize columns to suit As with most
apps, you can press the green Maximize button at the Mail window’s top
left-hand corner to make it fill the screen. And if you are running OS X 10.7
or 10.8, use Fullscreen mode by clicking the icon at the very top-right corner.
(A limitation with this mode is that you can’t open more than one individual
email to view it in its own window.) The Message Viewer section of Mail can be
resized in relation to the message list section. In Classic view this means
hovering the mouse over the dividing line and dragging up and down, and in new
view, dragging left or right.
Send better emails from your Mac
Make Mail your own with these handy tips
and tricks
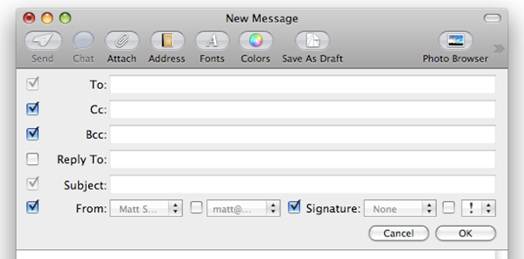
1. Send high priority email In a new
message window you can click the Customize button next to the ‘From’ field to
reveal extra options. One of these is the Priority Field, a small box that
appears on the right and lets you set a low, normal or high priority for a
message. This doesn’t affect the speed with which a message is sent, but will
show up in the email client of whoever receives it. It’s almost always used to
notify someone that your message is considered urgent.
2. Send better looking email Most emails
have dull presentation. What if you want to send something a little bit more
special? From any message window, you can reveal the Format Bar by clicking the
button marked with a letter ‘A’ at the top right corner. This reveals
formatting tools to help you spice up a message with different fonts, colours
and formatting like bold, italic and underline. There are also alignment tools,
the option to add bulleted or numbered lists and indent or out dent text. These
functions provide you with a much quicker way of formatting a mail than
composing it in a word processor then sending it to Mail.
The
Format Bar lets you quickly change all the important properties of text within
a new message
3. Send rich media email All email clients
can now handle HTML and pictures and many even also video and audio embedded in
emails. Click on the Photo Browser button at the top right of any new mail
window and you will get access to your iPhoto library complete with albums,
Faces, Places and even your FaceBook photos. These can be dragged into a new mail
and there’s even support for videos. Drag an image in and you can use the Image
Size box near the subject field to resize a picture before sending, since
iPhoto pictures tend to have large file sizes. Resizing works for pictures but
not audio or video files, so it’s best to compress these manually first.

Use
the iPhoto library browser to drop pictures straight into messages. Scale them
using the Image Size option
4. Send great looking messages Click on the
Stationery button at the top right of a mail compose window to reveal a list of
templates that can be used to send nice-looking and properly formatted
messages. These are grouped into birthdays, announcements, photos and so on and
as well as containing backgrounds and text formatting, many allow you to drag
and drop a new picture into the picture area to make it your own.
5. Get clever with HTML You can’t directly
compose messages using HTML in Mail, but you can copy and paste the content of
a web page or a page of HTML into a message by using Edit > Select All >
Copy in Safari, then Edit > Paste in Mail. This usually places an extra copy
of the page into the message, though it’s less consistent with interactive
content. Alternatively if you’re running OS X 10.7 or 10.8, use the Share
button in Safari and choose ‘Email This Page’. A new message opens in Mail with
a copy of the page; you can choose to send it as a functioning web page, a PDF
or a hyperlink.
6. Mail items directly from Finder If you
are running OS X 10.8, you can open a Finder window, select a file or folder
and then from the Share menu, choose Email. This creates a new message with the
item attached, though bear in mind it doesn’t do any file compression so larger
mails typically over 20MB will probably bounce back to you.
