Got an old computer gathering dust?
We show you how to turn it into a server for sharing files and making back-ups
If you’ve got an old PC that you’re not
doing anything with, you could turn it into a server. This is a computer that
sits on your network and stores data (such as photos, videos and music), which
it can share with other computers on your network. It can also be used as a
central location for keeping back-ups from your other PCs.
If
you’ve got an old PC that you’re not doing anything with, you could turn it
into a server.
Servers are designed to be left on all the
time, so they are always available on your network.
Hardware you need
You’ll need an old (but still working) PC
to act as your server. It doesn’t need to be very powerful, but it should have
at least 1GB of memory and a 1.6GHz processor if you want to be able to stream
video from it. Since the purpose of a server is to hold data, the one upgrade
you may need to consider is adding a larger hard drive. Your best bet is to
install an internal model you can add an external USB drive if you prefer.
However, this will make streaming slightly slower, especially if your aging
computer is restricted to low-speed USB 1.0 ports.
You can pick up a new internal 1 or 2TB
drive for around $90 to $120. If you’re happy to spend a little extra, and your
computer has spare hard-drive bays, you could buy a couple of hard drives and
devote them to different tasks: one for your videos, photos and music, and one
for back-ups. If you’re planning to use a laptop to act as a server, your
options for upgrading will be more limited.
You’ll need a router that uses DHCP
(Dynamic Host Configuration Protocol) to reserve IP addresses on your network,
because you’ll be connecting to the server via its IP address and you don’t
want this to keep changing. Most routers will be able to do this, but check
yours before you start; all routers will of it differently, so you may need to
refer to your documentation.
You’ll also need a way of connecting to
your router. You an use Wi-Fi, provided your PC has a Wi-Fi adapter, although a
direct Ethernet cable will give you a faster, more stable connection. You can
also use HomePlugs. The method you choose will depend on the options available,
but where you place the PC will also have an impact. If you’re going to stash
it in a cupboard, you’ll have to take into account that the door will reduce
your wireless signal’s strength; if you choose Ethernet, you’ll have to find a
way to avoid trailing wires everywhere.
You’ll need a keyboard, mouse and monitor
to set up the server, but you don’t need to keep these attached once it is up
and running. So, a laptop with a broken screen will work perfectly well as a
server, provided you can temporarily hook it up to a screen that works.
Get Ubuntu
Ubuntu is a friendly version of Linux. It’s
similar to Windows and very easy to get to grips with. There are two editions:
Ubuntu Desktop and Ubuntu Server (both are available for free from www.ubuntu.com/download).

Use
Ubuntu Desktop to set up a home server like the one in this project
Since we’re building a server, you might
expect us to recommend the latter version, but Ubuntu Desktop will suit our
particular needs better, and it’s easier to set up and configure. The operating
system only uses about 5GB, so it won’t eat into your storage space, unlike
Windows 7 which uses 16GB (32-bit version) or 20GB (64-bit edition).
If you’ve never installed Ubuntu before,
follow the instructions in our Mini Workshop, below.
Prepare your drives
Once you’ve installed Ubuntu you need to
format any extra hard drives and partitions as ‘ext4’, which is best for
Ubuntu. Any data you have on these drives will destroyed by the formatting
process, so make sure it’s all backed up before you begin.
Open the Dash by clicking the Ubuntu icon
in the launcher on the left and type GParted. Launch the GParted Partition
Editor, if it’s installed, otherwise you can install it through the Software
Center (the shopping bag icon). Select the drive or partition you want to
format, right-click it and select ‘Format to’ and choose ‘ext4’.
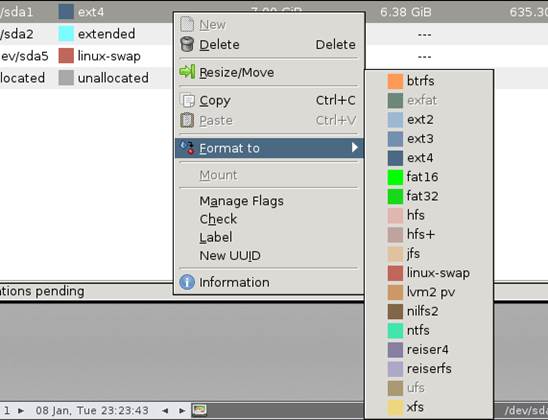
Format
spare hard-drive space as ‘ext4’ to ensure the best compatibility with Ubuntu
You can now share a folder or drive over
the network. Click the Home Folder button in the launcher, then right-click the
drive you want to share in the left sidebar. Select Properties. Go to the Share
tab and tick ‘Share this folder’. Install everything it asks you to and restart
your PC if prompted. Go back to the Share tab and tick ‘Allow others to create
and delete files in this folder’ and ‘Guest access’. Click the Create Share
button. When prompted, click the ‘Add the permissions automatically’ box.

Terminal
is the Ubuntu equivalent of Window’s Command Prompt
Finally, we’ll add a password to protect
the drive. Open the Dash and type terminal into the box. Launch Terminal (which
is the equivalent of Command Prompt in Windows) and type sudo smbpasswd – a
username (replacing ‘username’ with your Ubuntu username). Enter a password
when prompted.