Using your virtual machine
Once you’ve sorted out your OS installation
media, it’s finally time to “power on” your VM. Right click on its name in the
Virtual Machines pane and click “Connect…” to open a window view on your VM;
then select Action | Start to switch on the machine. You can now install your
operating system and interact with your VM in whatever way you wish. In the
menus of the Virtual Machine window you’ll also find options to create and revert
to snapshots of the state of your VM, as well as power options and the ability
to “insert” discs and images into your virtual drives. To change the size of
the window, simply adjust the screen resolution inside your virtual machine:
the window will automatically resize to fit.
If you’re using Windows as your guest
operating system then once you’re up and running you can take advantage of
Microsoft’s Integration Services. These provide useful background services such
as host-level backup and time synchronisation. In day-to-day use, the big
visible benefit is the ability to move the mouse freely in and out of a guest
OS window: without Integration Services, clicking within a Hyper-V window
“captures” the pointer, and you must press a special key combination to release
it and access the host OS. By default the combination is Ctrl-Alt-Left Arrow,
but you can change this: to access the relevant configuration options, click
Hyper-V Settings in the Actions pane.
If your guest OS is a recent edition of
Windows, there’s a good chance Integration Services will be enabled
automatically. If not, installing them is easy: select Action | Insert
Integration Services Setup Disk from the VM window to present a virtual
installation CD to the guest OS containing the installation files. Even if
Integration Services has been automatically installed, this virtual disc may
contain a more recent version of the software.
Integration Services makes it convenient to
use your VM in a window, but Hyper-V doesn’t actually need to run in a window
at all. When you click the Close button, your VM won’t stop: it will continue
to run, with CPU usage and status shown directly within the Virtual Machines
pane in the Hyper-V Manager. You can also start a VM in “headless” mode by
right-clicking on its name in this view and selecting “Start…” directly. In
this way you can have as many VMs as you like running simultaneously, without
cluttering your screen. To access power options for a headless VM, simply right
click on its name in the Hyper-V Manager.
Compacting and converting VHDs
When you create a dynamically expanding
disk image, it starts out small and grows as you save data. However, when you
delete files, the image doesn’t shrink: reducing the size of the image file is
a disk-intensive process that could severely affect performance, so the erased
data is only “virtually” deleted. This can lead to a lot of wasted physical
disk space.
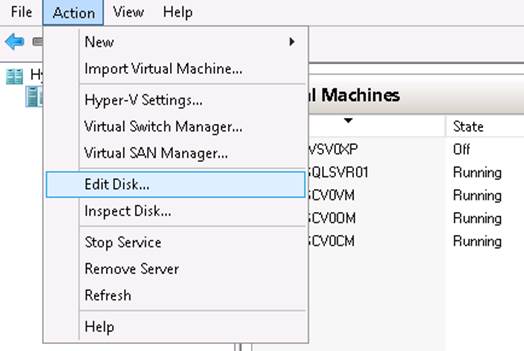
The solution is to manually compact your
dynamic disks at convenient times, to reduce their size to only what’s required
for their contents. To do this, click “Edit Disk…” in the Actions pane of the
Hyper-V Manager, then step through the wizard, select your disk image when
prompted, and accept “Compact” when asked to choose an action.
Compacting
and converting VHDs
You’ll also see the option to convert a
disk to a new format useful if, for example, you want to change a dynamic disk
image to one that’s of fixed size, or vice versa. You can also convert images
back and forth between VHD and VHDX formats, so you can for example use a new
image with an older version of the host, or with Virtual PC.
The final pair of options expand and shrink
speak for themselves. Here you can extend your virtual disks if things are
becoming tight, or reduce their size if you’re running low on physical storage.
Create and configure a virtual machine
in Hyper-V
1. Once you’ve installed Hyper-V and rebooted the system, the Hyper-V
Manager lets you configure and create virtual machines (VMs). To get started
with your first VM, click New in the Actions pane at the right of the window,
then select “Virtual Machine” in the submenu to launch the New Virtual Machine
wizard.
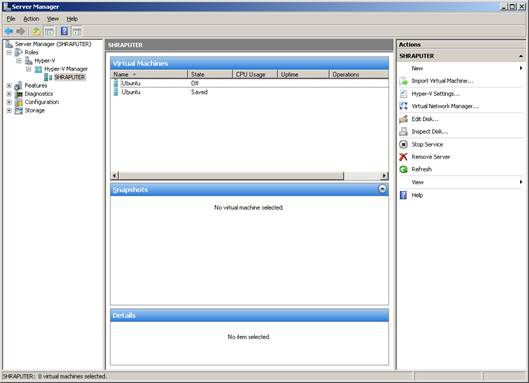
The
Hyper-V Manager lets you configure and create virtual machines (VMs)
2. Start by giving your new VM a name and choosing where you want to
store its configuration file. Then click Next and you’ll be asked to specify
how much memory you want to give the VM: if you enable Dynamic Memory, Hyper-V
will automatically divide memory between multiple VMs as needed.
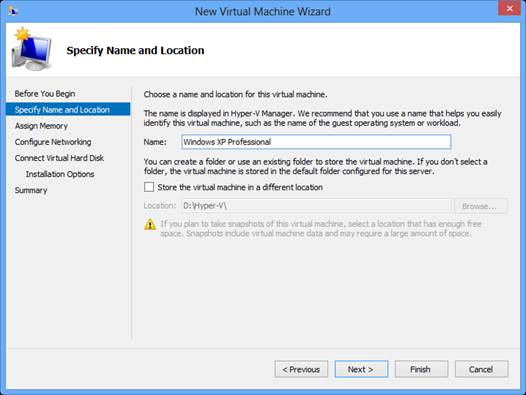
Start
by giving your new VM a name and choosing where you want to store its
configuration file.
3. If you’ve already created a virtual switch, you can connect it now.
Otherwise, you can create one later and attach it in the Settings view (see
main text). The default storage settings will create a disk image that’s fine
for experimenting; if you’d prefer to create a custom disk image, select
“Attach a virtual hard disk later”.
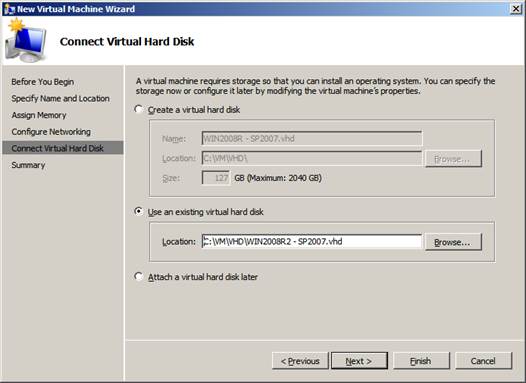
Connect
Virtual Hard Disk
4. The last step is to configure OS installation media. Here you can
set your new VM to boot from a physical CD or DVD, or from an ISO file.
Remember that you need a licence to install Windows in a VM: if you’re trying
out virtualisation for the first time, it might be a good idea to use a free OS
such as Ubuntu Linux instead.

Installation
Options
5. Your VM is now created. If you need to connect a hard disk or
configure a virtual switch, right-click on your VM’s name in the Hyper-V
Manager and select Settings. Here you can manage your VM’s virtual hardware,
and tweak settings such as where snapshots are saved and what happens when the
host PC shuts down.

Creating
VM
6. To open a window on your VM, right-click and select Connect. A
window opens showing an interactive view of your VM’s desktop. If you close
this window, the VM will continue to run in the background: to stop it running,
shut it down or “pause” it in the Hyper-V Manager.
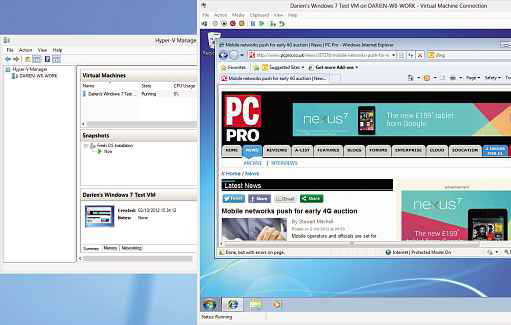
Opening
a window on your VM