BIOS function
In our previous review about the Asus product
we have discussed about ASUS EFI BIOS – a very successful implementation
overview of UEFI (Unified Extensible Firmware Interface) standard. So today we
will refresh your memory briefly about the main BIO parts and their specs and
settings.
By default, that’s "EZ Mode" which
is activated in BIOS. It performs the main function which is providing info,
because there’s hardly any configuration reading there. You can check the basic
system settings, some supervising data, choose a power-saving mode or
performance and set up the order of the start-up devices simply by dragging and
dropping them with the pointer.

BIOS
startup screen
You can quickly converse from "EZ
Mode" to “Advanced Mode” by pressing F7, or use the F3 hot key to jump
over one of the most used BIOS parts.

You
can quickly converse from "EZ Mode" to “Advanced Mode” by pressing F7
You can also change from "EZ
Mode" to “Advanced Mode” every time you enter BIOS, or press F3, it also
works if you hit right on it in any other BIOS part, but it can be much more
convenient if you’ve performed “Advanced Mode” as a default settings. In this
case, the first part you will see is the very familiar “Main” section, where
you can get some basic system info, change the interface language and set up
date and time. In the "Security" small section, you can set up users
and admin password.

Basic
system info
Most of the traditionally related
overclocking options are gathered in the "Ai Tweaker" part. The main
window allows you to change the frequencies, multipliers and voltages. You
don’t have to go through the “Monitoring” folder to check the current voltage,
as all of them are listed here next to each used readings to change the
voltage, which is very convenient. Voltages can be set higher or lower than
their nominal values.

Voltage
change
As usual, some readings are pointed out for
the separate components to remove the main part a little bit. The "OC
Tuner" parameter only looks like a sun section, but in fact it helps to
overclock the system automatically. Memory Timings can be configured on a
personal page. They’re actually a lot, but still incredibly easy to work with. You
can see all timings which the motherboard set up for each on the 2 memory
channels. And you can adjust just a few selected timings, such as the main
ones, for instance, leave all other settings at default.

"OC
Tuner" parameter
“CPU Power Management” sub section allows
you to configure the readings affecting the "Intel Turbo Boost" tech.
However, you don’t need to do so, as the motherboard will automatically adjust
everything so as to be suitable for you selected overclocking purpose.

“CPU
Power Management” subsection
You can’t realize many options that are
related to the power and power efficiency of the DIGI + digital voltage
regulator. you can configure the exclusive power-saving technologies of Asus which
allow you to change the number of operational sections in the
voltage-controlling circuitries based on the use of CPU right in BIOS. “CPU
Load-Line Calibration” tech in order to prevent CPU Vcores from falling down to
heavy load level can be activated or disabled, but can also be adjusted to
offer desired effect.

“CPU
Load-Line Calibration” tech
The functions of the readings in the
subsection of the “Advanced” part you can explain yourself.

“CPU
Configuration” sub section
“CPU Configuration” subsection reports the
basic info about the processor and allow managing some processing techs.

“CPU
Configuration” subsection
All readings related to power-saving are
listed out on a separate page called “CPU Power Management Configuration”.

“CPU
Power Management Configuration”
“Monitor” section lets us know the current
temperature, voltage and rotating speed of the fan, you can choose one of the
preset modes for the processor and 2 system fans from a pretty standard list
including “Standard”, “Silent” and “Turbo” mode. You can also choose the
readings manually. Unfortunately, both processor fans can only be adjusted if
they have 4-pin connection.

“Monitor”
section
"Boot" section allows you to
adjust the startup readings which will be applied on the startup system. By
this mean, this is the place you will have to replace the default "EZ
Mode" with “Advanced Mode”.

“Advanced
Mode”
Now let’s quickly refresh the functions of “Tools”
section

“Tools”
section
Integrating "EZ Flash 2" utility
for the BIOS re-flashing process is one of the most convenient and useful program
among all. Unfortunately, they have removed the options allowing saving the
current BIOS version before re-flashing a new one.

"EZ
Flash 2" utility
Asus motherboard allows saving and then
quickly loading 8 full BIOS configuration settings. each configuration can be
provided with a brief describing name that remind you of its contents. They
still haven’t fixed the problems considering not allowing you to save the
content that disable the startup images in the setting configuration, but they
deliver the ability to change the BIOS setting configuration with other users,
which has failed when moving to EFI BIOS. from now on, the configurations can
be saved on an external media mean and loaded from them.

Switching
to EFI BIOS
Like on motherboards from many other
makers, we can read the info in the SPD memory modules, including XMP (Extreme
Memory Profiles).
The last section
is called “Exit”. Here you can apply the changes, restore defaults or return to
“EZ Mode”.
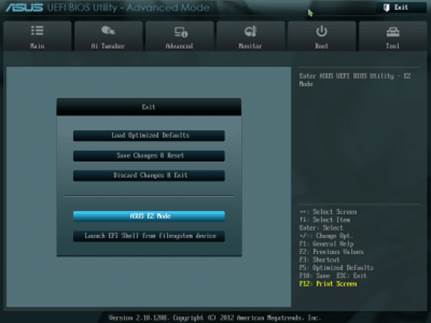
"Exit"
last section
Testing configuration
We perform all of our tests based on the
components as follows:
·
Asus P8Z77-V rev. 1.02 mainboard (LGA 1155,
Intel Z77 Express, BIOS version 1805);
·
Intel Core i5-3570K CPU (3.6-3.8 GHz, 4 cores,
Ivy Bridge rev.E1, 22nm, 77 W, 1.05 V, LGA 1155);
·
2 x 4 GB DDR3 SDRAM Corsair Vengeance
CMZ16GX3M4X1866C9R (1866 MHz, 9-10-9-27 timings, 1.5 V voltage);
·
Gigabyte GV-R797OC-3GD (AMD Radeon HD 7970,
Tahiti, 28 nm, 1000/5500 MHz, 384-bit GDDR5 3072 MB) graphics card;
·
Crucial m4 SSD (CT256M4SSD2, 256 GB, SATA 6
Gbps);
·
Noctua NH-D14 CPU cooler
·
ARCTIC MX-2 thermal surface
·
Enhance EPS-1280GA 800 W PSU;
·
Antec Skeleton cover
We use the Microsoft Windows 8 Enterprise
64 bit OS (Microsoft Windows, version 6.2, Build 9200), Intel Chipset Drivers version
9.3.0.1026, AMD Catalyst version 13.1 graphics driver card.