Turn off access to private information
You can turn off location services for
specific apps on your iPhone by going to Settings, Privacy, and Location
Services. With iOS you can also turn off application access to personal
information. Press the Settings icon and go to Privacy. You'll see a list of
applications that have access to your personal data. You can choose to turn off
each app's access to your information. Depending on the amount of information
an app is accessing, you may want to consider deleting it entirely.
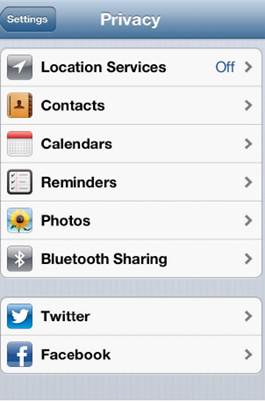
The
iPhone has many security and privacy settings to be aware of and this Privacy
menu, specifically, lets you see what types of information apps have access to
and then gives you the option to limit or completely deny access.
Use your iPhone as a mobile hotspot
If the office-wide Internet goes down
suddenly and you need a quick connection, or you simply want to connect
multiple devices to the Internet when you're away from a Wi-Fi network, it may
be beneficial to know that you can turn your iPhone into a mobile hotspot. For
most carriers, you'll need to invest in an additional data plan that allows mobile
hotspots, but if you have that plan in place, then providing Internet access to
multiple devices is relatively simple.
Tap the Settings icon and then select
General, Cellular, and Personal Hotspot. From here, you'll need to set up the
service and turn the feature on. After the hotspot is initiated, other devices
can find your iPhone as a Wi-Fi network and connect to it; you can attach your
iPhone to your computer via USB for access, or you can pair phones using
Bluetooth and gain Internet access that way. It's also a good idea to set up a
password for the hotspot, so go to Settings, Personal Hotspot, and Wi-Fi
Password to do so.
Customize the do not disturb feature
The newest iOS update added quite a few new
features to the iPhone, but one feature that wasn't widely spotlighted is Do
Not Disturb. This feature not only prevents calls from coming through, it also
stops all notifications except for alarms. Tap the Settings icon and look for
the Do Not Disturb setting. You can switch the setting on or off from here, but
there are additional features housed deeper in the menus that let you customize
your Do Not Disturb options.
Go to Settings, Notifications, and Do Not
Disturb. From here you can change the default settings to meet your specific
needs. You can set Do Not Disturb to automatically turn on during a certain
time period. So, for instance, if you eat dinner with your family from 6 p.m.
to 7 p.m. every evening, you can make sure your meal won't be interrupted. You
can also set it so that certain numbers ring through. Just add a few numbers to
your Favorites list, go the Do Not Disturb settings menu, and select Allow
Calls From. And if you're worried about emergency situations, you can choose to
Turn On Repeated Calls to make sure determined callers get through.
Set up your Microsoft exchange account
If you just bought a new iPhone or want to
use your personal smartphone for business, one of the first things you'll want
to do is add access to your Microsoft Exchange account, which is very simple to
do. Press the Settings icon on your home screen and then select Mail, Contacts,
Calendars. From here you can choose to set up your Microsoft Exchange account
as well as accounts associated with a variety of other email services,
including Gmail and Hotmail. There's a good chance you'll need to speak to your
IT department or network administrator to get all of the information you need,
but once everything is set up, you'll be able to use your Microsoft Exchange
account to check, send, and receive messages.
Windows Phone

Windows
Phone 8 features customizable tiles, so you can change the size and
configuration of Live Tiles based on your personal preference. Most tiles have
three different size options ranging from small to large.
Set up find my phone
Whether your Windows Phone 8 smartphone
falls between the seat cushions at home or gets lost or stolen while you're in
an airport, the newest version of the OS includes a Find My Phone feature that
has you covered. Rather than set this service up on your phone, you must visit
www.windowsphone.com, create an account (if you don't already have one), and
then follow the steps to activate the service.
When you visit the website, click the phone
icon in the upper right corner, and select Find My Phone. After you activate
the service, this is the same place you can go to make remote changes to your
device. You can map your phone's location, lock the phone and show a message
on the lock screen, or completely erase the data from your phone if you believe
the phone has become permanently lost or stolen. Regardless of how careful you
are with your Windows Phone 8 device, it's a good idea to set up Find My Phone
just in case.
Resize live tiles
With Windows Phone 8, as with the previous
Windows Phone 7 Mango update, you get Microsoft's Live Tiles, which are
customizable. Windows Phone 8 now gives you three sizing options for each tile.
All you have to do is press a tile and hold it for a moment. From here, you
will have two options; you can either resize the tile or unpin it from the
home screen. Also, similar as in iOS and Android, you can reposition tiles in
whatever configuration you prefer. And perhaps the most interesting feature of
resizable tiles is that the rest of the tiles on the Home screen will
automatically expand or contract based on the changes you make to fill the
screen properly.