Keep your phone up to date with
Android 4.2, and future versions as well
We’re all familiar with the process of
waiting (and waiting) for the manufacturers of our phones to see fit to release
an update to the latest version of Android. It can take months, and it’s almost
guaranteed that by the time the update is available you’re lusting after an
even newer one. Without question the easiest way of keeping your phone fully up
to date is through CyanogenMod.

Upgrade
to Android 4.2 with Cyanogenmod ROM
This popular ROM – the most famous and
well-established of all custom Android ROMs is based on the open source version
of Android, meaning that the moment the Android development team drops the code
for the latest OS release onto its servers, the CyanogenMod team immediately
sets about updating its own ROM with the in-demand new OS software.
You might be waiting four or six months for
HTC and Samsung to put out a new software update, but the CyanogenMod team can
have a relatively modest update, like the jump from 4.1 to 4.2, ready to go in
a matter of weeks. Better still, the latest versions of CM include an
over-the-air updater that keeps you informed about when new stable releases of
the ROM are put out, so you will no longer have to track down those 0.0.1
updates – you will automatically be alerted to their existence.
Android 4.2 via CyanogenMod
Which devices are compatible through
official builds?
·
Samsung Galaxy Note 10
·
Samsung Galaxy Note
·
Google Nexus 10
·
Google Nexus 4
·
Samsung Galaxy S III
·
Google Galaxy Nexus
·
Samsung Galaxy S II
·
Google Nexus 7
·
Samsung Galaxy S II
·
Samsung Galaxy S
·
Motorola Xoom
·
Acer Iconia A700
·
Asus Transformer Pad Infinity
·
Asus Transformer Pad
·
LG Optimus 2X
·
LG Optimus Black
·
Plus dozens of unofficial builds available via
forum.xda-developers.com
1. Back up your data
As part of the flashing process you will
need to wipe your smartphone, so download Titanium Backup from the Play store
to back up all your data first. Tap the tick icon in the top-right corner and
select Backup all user apps + system data. This will create a full backup of
your phone’s contents.

Back
up your data
2.
Download CyanogenMod
Go to www.cyanogenmod.org
and locate your specific device. You can now download the latest version of the
CyanogenMod ROM – we’d recommend choosing a stable build rather than a Nightly.
Version 10.1 is based on Android 4.2, but not all devices will have a build of
this available for them. Check the list on the previous page as a guide.

Download
CyanogenMod
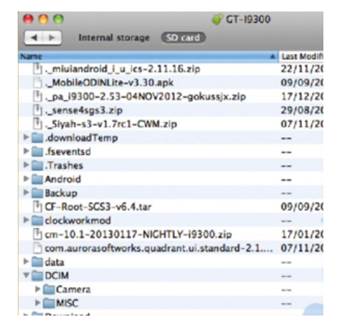
3.
Move it to your card
Copy the CyanogenMod ROM to your memory
card by connecting your Android smartphone to your desktop computer and
dragging the ROM into the window for your card. The ROM will be in the form of
a zip file, but don’t unzip it. You could alternatively download the ROM
straight to your storage card via your device’s browser.
Move
it to your card
4.
Boot to Recovery
Shut down your phone and reboot into
Recovery mode. You do this through a combination of key presses, such as
holding the volume down and power buttons at the same time. A simple check online
will quickly bring up the correct combination for your particular handset.
Boot
to Recovery
5.
Second backup
Now you must back up your current ROM, in
order that you will have something to roll back to in the event of encountering
any problems with your new one. You can restore your phone from this in future.
Go to Backup and restore>backup and it will start straight away.

Second
backup
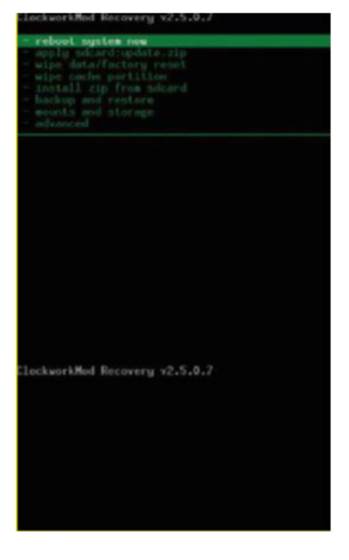
6.
Wipe your data
From the main Recovery menu select Wipe
data/ factory reset. Scroll down a few times to confirm, then your Android
phone will begin resetting. Note, that it won’t affect your external memory
card, so your data backup and Nandroid backup will both be safe if you need to
restore them at a later date.

Wipe
your data
7.
Flash & confirm
Now select install zip from SDcard and then
pick the location where you saved the ROM. Scroll down to the ROM, and keep
scrolling if it’s not on the first page. Click on the ROM and confirm when
prompted. Flashing will begin straight away and will take a few minutes to
complete.

Flash
& confirm
8.
Install apps
When the ROM has finished flashing you may
need to install Google’s standard apps separately. If you downloaded them
alongside CyanogenMod in step 2 then repeat step 7 now, only choosing the
Google Apps zip instead of the yanogenMod one. Flashing these should be much
quicker.

Install
apps
9.
Restore
Now boot your phone and enter your Google
account details when prompted. Your first task will be to go to the Play store
and re-download Titanium Backup. Once you’ve done this, use the app to restore
your backup from step 1. This will take some time to complete so be patient.

Restore
10.
Set up updates
Finally go into your Settings panel and
locate the CM Updater. You can use this feature to alert you to new builds of
the ROM, and you can choose between stable builds only or Night lies, which are
more experimental ROMs. Choose how often you want CM to check for new updates
to proceed.

Set
up updates