Give your movies distinctive impact
using custom color grading
The process of color correction may sound
like it’s something you use to fix things in your video, but it can be much
more creative than that. Also known as color grading, it involves creating a
look for your final video that helps add to the tone and message you’re trying
to convey.
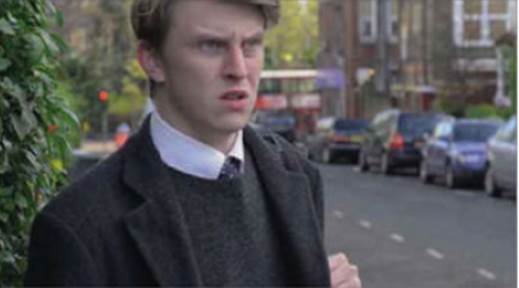
Beyond
the pale: This footage has been shot with a flat color profile to increase its
dynamic range, and as a result it looks washed out before color correction is
applied
Color grading is used in Hollywood movies
all the time, but it can be used in smaller-budget projects as well as to help
raise the production values and create a more polished and professional-looking
final product.
Traditionally, color correction occurs in
two stages. Primary color correction is applied to the whole frame, while
secondary color correction only affects certain colors in an image. Primary
color correction if used to ensure that shots are consistent across a
production and make use of the full color space available – so blacks appear
black, whites appear white and human skin tones look lifelike.
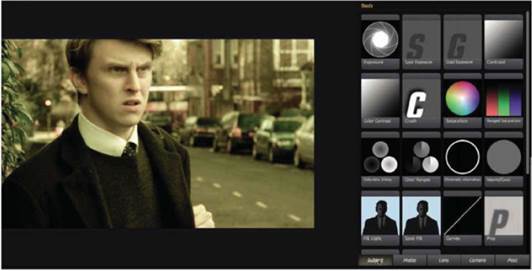
It’s
logical, captain: The Tool Chain in Magic Bullet Looks runs from left to right
and is sensibly broken down into five sections that correspond to the video
production process
Secondary color correction is more creative
and is used to give the footage a distinct look. It’s generally applied to
specific color ranges so, for example, you can change the background in a shot
to make it bluer, without making your star look like they’re extremely cold.
You can also apply vignettes, film grain and other analogue artifacts to make
the final result look less digital.
If you know the exact look you want from
your footage before you start shooting, then it’s best to try to recreate your
final look as much as possible in camera – adjusting the settings to tweak the
image as its being recorded. This is because very few camera images, but frames
every second). Even if they can, the amount of data required to store it is
huge.
Digital videos cameras use compression to
keep data rates reasonable, and so this puts a limit on the amount of tweaking
you can do in post-production before the digital manipulation starts to become
obvious. This is especially true of DSLR cameras, as they generally store video
in H.264 format, which is heavily compressed, so a lot of the original color
data is discarded during the recording process.
If you want more flexibility when it comes
to crafting a look for your film later, the next best thing is to shoot using
what’s called a flat profile. This increases the dynamic range of the material,
which gives you more latitude for tweaking later on, although it can result in
noisier footage if you’re not careful. Tweaking the settings of digital cameras
is all about trade-offs basically, what you gain with one setting generally
loses you something elsewhere.

Punch
drunk: The same footage with primary color correction applied results in a
punchier image, where the blacks are black and the whites are while
There are many ways to shoot flat in
camera, from choosing a neutral picture profile and dialing down the
saturation, to using bespoke picture styles designed for color grading, such as
Technocolor Cinestyle (technicolorcinestyle.com) for Canon DSLRs or Flaat
Picture Styles (similaar.com/foto/flaat-picture-styles), which are available
for both Canon and Nikon models.
Once you’ve shot your footage and imported
it into your editing program, you can start tweaking it to get the look you
want. You can perform primary color correction using just the built-in tools in
either Final Cut Pro X or Premiere CS6. In Final Cut, the color adjustment
tools are in the inspector; in Premiere, the Fast Color Corrector effect
includes everything you’ll need.
The built in tools are a great place to
start and provide everything you need to get your footage up to scratch and
even start building a look for your final production. However, using these
tools beyond the basics can be complicated and fairly unintuitive.
An easier way to quickly experiment with
different styles for your final video is to use a dedicated plug-in, such as
Magic Bullet Looks (from regiantsoftware.com). This is a standalone application
that hooks into Premiere or Final Cut, so you can apply effects directly to
clips on your timeline. It comes with more than 100 pre-built looks included,
which not only gives you an idea of what you can achieve, but can also be used
as a starting point for creating your own look.
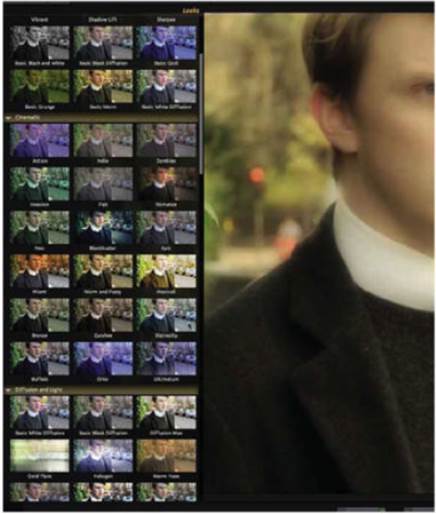
Endless
possibilities: There are more than 100 presets in Look to get you started,
which show what you can achieve and can be used as a starting point for your
own look
It’s not cheap – the full version costs
$399 – but it should pay for itself on even a modest project in terms of the
time its saves. It’s an incredibly powerful application, but it’s pretty easy
to pick up and use. There’s a free version available as well
(redgiantsoftware.com/products/all/quick-looks-free), but it only includes 20
preset styles and – more importantly – you can craft your own style for the
video you’re creating. If you just use one of the presets as is, then you’re
missing out on a huge part of color grading.
The presets are a useful starting point,
however, when it comes to crafting a look for your final piece. There’s a
thumbnail preview of each one in the gallery, so you can see the final look at
a glance. Once it’s applied to your clip, you can see the different components
that make up the look and how they’ve been applied.
Perhaps the most useful thing about Looks
is what it terms the tool chain. This splits effects into five sections, based
on the video production process subject, matte, lens, camera and post.
Everything is applied left to right and in an order that makes sense and is
quick to grasp. For example, the Fill Light effect emulates a spotlight on your
subject and this is applied before something like a vignette, which would occur
in the camera lens.
This approach makes the process of deciding
what to apply to a shot to create the look you want much easier, as it breaks
down the process and lets you concentrate on what you’re trying to achieve at each
stage. Once you’re happy with how the effect looks, you can save it as a preset
and easily apply it to other footage in your project.
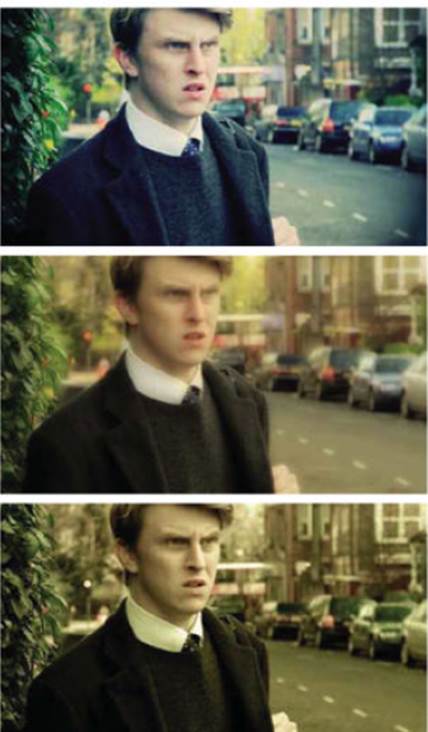
Get
the look: Here are three examples from the presets Magic Bullet Looks offers –
they are all drastically different, but have been applied to the same starting
image
Color grading is an extremely powerful
tool, but you still need to shoot good footage to begin with – it won’t make
bad acting or a poorly framed, out-of-focus interview magically become usable.
It’s also best used sparingly until you know what you’re doing – extreme looks
have their place, but unless they’re used for a reason, they’ll quickly look
out of place or distracting, which is the opposite of what color grading is
meant to achieve.
Remember, too, that tweaking colors won’t
be suitable for all projects, especially those with very short turnaround
times. Manipulating colors is a very processor-intensive process, and you can
expect exports to take between five and ten times as long. This is fine if you
have weeks before you need to deliver the final edit, but if you need to get a
video online within hours of it being shot, then this extra render time will seriously
cut into your production time.
Other than making sure the same shots in a
scene match, there are no rights or wrongs to color correction – it’s a
creative process, so the key thing is to play around to get a feel for what you
can achieve. The more practice you get, the more creative you can be when it’s
called for on a specific project.