iPhoto for iPad gives you a whole new way to
share your photos
Create
and share your first photo journal
The new iPhoto app is great for editing
your snaps on your iPad or iPhone, but there’s a whole lot more to iPhoto than
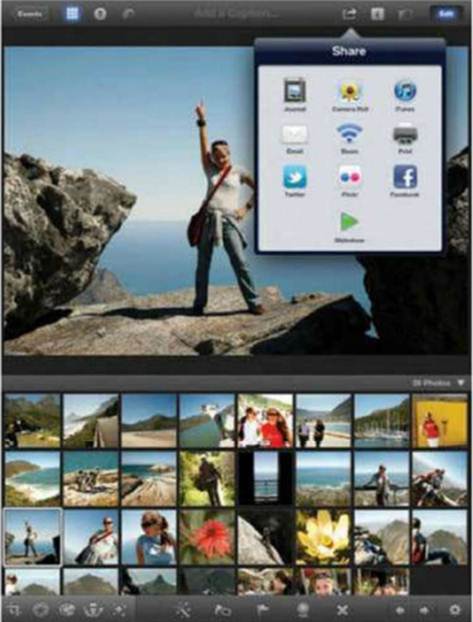
just being a simple editing suite. In fact, some of the sharing options
included are really impressive. Functions like Twitter, Facebook and Flickr
sharing are built into the app, as well as the ability to export your shots to
iTunes, your Camera Roll, or send them via email. Beam even allows you to share
photos through Wi-Fi with other iOS users nearby.
However, the best-looking of all of the new
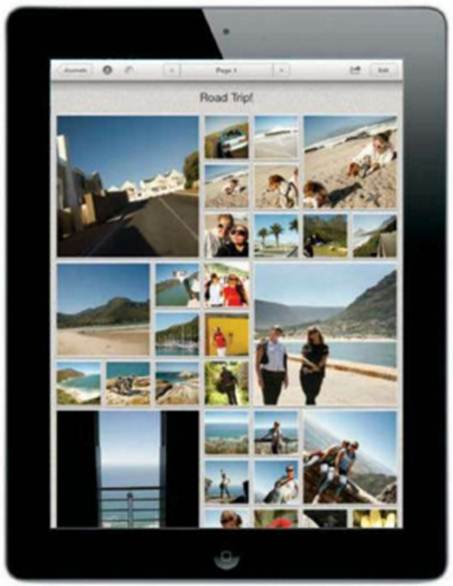
sharing features is without doubt the Photo Journals option. At any time you
can create a journal form whichever photos you like, and see it in instantly
set out your snaps in a beautiful grid. The grid will, at its most basic, just
contain the photos you’ve chosen, but iPhoto gives you the ability to add
things like maps, notes and even restaurants you visited so that you have a
photo album bursting with memories all in one place.
With a range of designs and full
customization options for where you want your shots to sit in your journal,
this is arguably the best way to share your photos with friends and family from
the comfort of your iPad.
iPhoto
Put together a diary of photo memories
1.
Get ready
First choose an Album, event or selection
of images you’d like to put in a Journal and hit the Menu button at the top of
the screen. Choose Journal and select your shots.
Get
ready
2.
Choose the design
Now you need to name your Journal, and
choose to either create a new one or add to an existing project. You’ll also
have a choice of designs. When ready, tap Create Journal.

Choose
the design
3.
Add to the grid
Your images will automatically be set out
in a grid. Tap Edit, then Plus button and you can add thing like a date, a map,
a note and even the weather as a tile in your grid.

Add
to the grid
4.
Write captions
To add a caption, tap the shot while in
Edit mode. You should see an Add a Caption option at the bottom of the image,
so tap it to bring up the on-screen keyboard and type away.

Write
captions
5.
Edit the grid
Not all your shots will the grid perfectly,
but they can be altered. Tap an image to see the resizing buttons appear, and
you can then drag the image to a smaller or large size.

Edit
the grid
6.
Share your journal
Once you’ve finished, tap Edit again to
exit editing mode and then tap the Menu button. You will be able to view a
Slideshow, or upload your creation to iCloud or iTunes.

Share
your journal
Share photos online
This is a cool new way to show off your
favourite photos
What
you’ll need…
·
iPhoto app
·
Album of images
We
used…
·
iPhoto on the New iPad
You
could try…
·
A Journal photobook on iPhoto for Mac
What
you’ll learn…
·
How to create a photo journal
Share
photos online
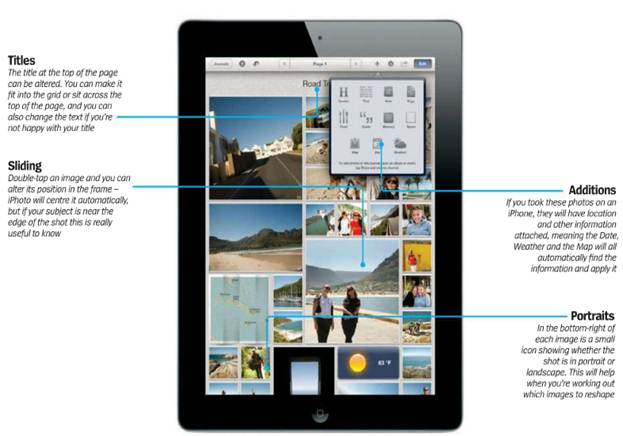
Titles
The title at the top of the page can be
altered. You can make it fit into the grid or sit across the top of the page,
and you can also change the next if you’re not happy with your title.
Sliding
Double-tap an image and you can alter its
position in the frame- iPhoto will centre it automatically, but if your subject
is near the edge of the shot this is really useful to know.
Additions
If you took these photos on an iPhone, they
will have information attached, meaning the Date, Weather and the Map will all
automatically find the information and apply it.
Portraits
In the bottom-right of each image is a
small icon showing whether the shot is in portrait or landscape. This will help
when you’re working out which images to reshape.