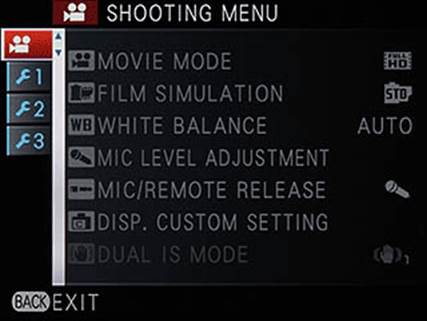
Movie mode shooting menu
The Shooting Menu turns out much shorter
when the drive mode is set to Movie, because of video options limited by the
X-E1. Another interesting point is that the Display Custom Setting option here
does not depend on that as for still images, for example, you can choose to
display the different recording information for each.

Movie
mode shooting menu
Option - Value
·
Movie Mode: Full HD 1920 24fps, HD 1280 24fps:
Select movie resolution
·
Film Simulation: Provia / Standard, Velvia /
Vivid, Astia / Soft, Pro Neg Hi, Pro Neg Std, Monochrome, Monochrome + Yellow
filter, Monochrome + Red filter, Monochrome + Green filter, Sepia: Imitate the
looks of many slide and print films of Fujifilm, or mono film shot using color
filters.
·
White Balance: Auto, Kelvin, Fine, Shade,
Fluorescent Light-1, Fluorescent Light-2, Fluorescent Light-3, Incandescent,
Underwater: Each setting can be separately adjusted + / - 9 steps red / green
and blue / gold. Kelvin setting includes 10000 - 2500K. Note that the white
balance is not available for shooting movies.
·
Mic Level Adjustment: 4.3, 2.1: Four mic levels
are adjusted with the up and down arrows. The VU level appears at the top right
of the screen.
·
Mic/ Remote Release: Mic, Remote: Switch the
purpose of 2.5mm port between microphone and remote control.
·
Disp. Custom Setting: Framing Guideline,
Electronic Level, Histogram, Exp. Compensation, White balance, Film Simulation,
Battery level: Priorities of EVF / LCD are set and stored separately for
shooting and stills modes.
·
Dual IS Mode: Continuous (1): The option turns
to be grayed out and cannot choose that is due to the only constant IS available
in Movie mode.
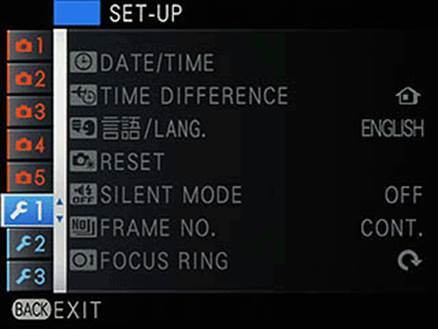
Setup menu
Some of the most useful Set-up menu
settings can be accessed from the external controls (such as Silent Mode and
LCD brightness), which means you will not need to deeply investigate more often
except to reformat your SD card or start cleaning sensor.

Setup
menu
Set-up Menu Tab 1
·
Date/ Time (Set, Cancel): Set the date and
format display.
·
Time Difference: Home, Local: Set to different
time zones when traveling long distances.
·
Lang: (Select a language) 35 languages
·
Reset: OK, Cancel: Re-set the camera to default
settings
·
Silent Mode: On, Off: turn the flash on and off,
all operational sounds and AF illuminator lamp.
·
Frame No: Continuous, Renew: Define file-naming
convention on changing/ re-formatting SD card.
·
Focus ring: Clockwise, Counterclockwise: Define
the direction of focusing operations by the wire ring to focus manually.
Set-up Menu
Tab 2
·
LCD Brightness: 11 levels, -5 to +5
·
Quick start mode: On, Off: Reduces time taken
for the camera to turn on from 2.2 sec to 0.7 sec.
·
Auto Power Off: 5 minutes, 2 minutes, 30
seconds, Off: Set to the "idle time" before the camera turns itself
off – the shorter the settings are, the more economical the battery life is.
·
Operation Vol.: Level 3, Level 2, Level 1, Off:
Control the levels for operational sounds (AF confirmation, self-timer and beep
menu operation beeps).
·
Image Disp.: Continuous, 3 sec, 1.5 sec, Off:
Set the time interval for review image to be displayed after shooting.
·
Sensor Cleaning: OK, When switched on (On, Off)
When switched off (On, Off): Delete immediately the Sensor
·
Color Space: SRGB, Adobe RGB: Set the color
range of the JPEG files.
Set-up Menu
Tab 3
·
Guidance Display: On, Off: Select whether to
display tool tips
·
Focus scale units: Meters, Feet: Choose units
for focus distance/DOF scale shown in the viewfinder
·
Background Color: Silver, Gold, Blue, White,
Yellow, Green: Change the colors of the menu
·
Format: OK, Cancel: Format SD card.
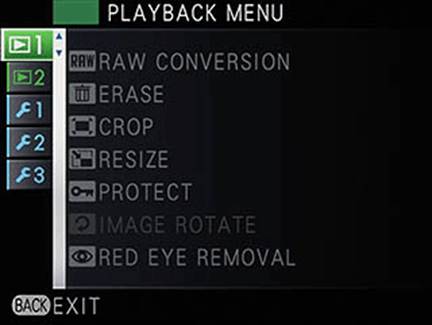
Playback
Menu
The menu playback of X-E1 contains
virtually the same items as the X-Pro1’s. Converting RAW in the camera is most
important at the top of the list, which partly compensates for the lack of the
RAW button, with that the other useful playback functions (protecting, deleting
multiple frames, etc.) are available on the first page. Facebook and You Tube
addicts should not be frustrated by the "Mark for upload", which can
still be installed. Phew!

Playback
menu
Playback Menu Tab 1
·
Raw conversion: (In raw conversion mode): See
"Playback Display"
·
Erase: Back; Frame; Selected frames, All frames:
The 'Selected frames' option makes it easy to delete multiple photos.
·
Crop: Select the picture to crop: Crop the
images.
·
Resize: M, S, 640: Resize image file in camera
for sharing.
·
Protect: Frame, Set all, Reset all: Protect the
images from being accidentally erased
·
Image rotate: Select a photo to rotate: manually
rotate images.
·
Red-eye removal: Select a photo to process:
Image processing to remove red-eye.
Playback
Menu Tab 2
·
Slideshow: Normal, face detect, Normal, Fade-in,
face detect, Fade-in, Multiple: Allow playback of images as slideshows via the
HDMI port, with multi-options.
·
Photobook Support (Access sub-menu Photobook
Assist): Allow you to select photos and set up photo books
·
Mark for upload to: YouTube, Facebook, Reset
all: In harmony with the provided software, set images for upload to social
networks.
·
Image search: By date (select date), by face
(all photos, close-ups, couples, groups), By favorites (5 stars, 4 stars, 3
stars, 2 stars, 1 star, no stars), by type of data (Still, film, continuous, RAW),
by upload mark (YouTube, Facebook): Allow you to view photos by date taken, or
search using other criteria (including the number of faces is found in the
images).
·
Printing (DPOF) (With time, no time, Reinstall):
Mark images for printing
·
Display rate: 4:3, 16:9: To display the images
with the camera connected to the TV
·
Playback Vol: 0-10: Set volume for playback.