Contributing to our comment in a recent
research about Nero Multi Trigger,
the chaps who rebuilt the entire utilities and now we’re looking for a much
smarter and extensively improved device which is used to shoot fast-moving
subjects using the sound, laser or light sensor, as well as improved timelapse
feature and new HDR mode.
Nero
Trigger
Features
The same to the prior Nero Multi Trigger
models, the new Nero Trigger is compatible to most of the camera systems
including Nikon (MC-30), Nikon (MC-DC1), Nikon (MC-DC2), Sony (A Series), Canon
(RS-80N3) and Canon (2.5 mm), the testing process here uses SLR Pentax and
Olympus cameras together with an adaptor.
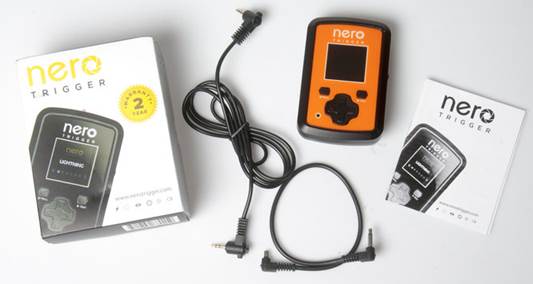
Accompanying
accessories
The trigger here goes with a flash cable
and a camera cable for your selection. The container has been redesigned and
the instruction leaflet is even easier to follow than the previous Multi
Trigger models. And now you have a
right to choose colors. When I wrote this review, I was accidentally put
in an orange color having the shape which was very similar to the product, and
that’s an incidental coincidence. You won’t force me to wear a pink one, but
considering the colors, there will be red, green, black and blue versions as
other choices for you.
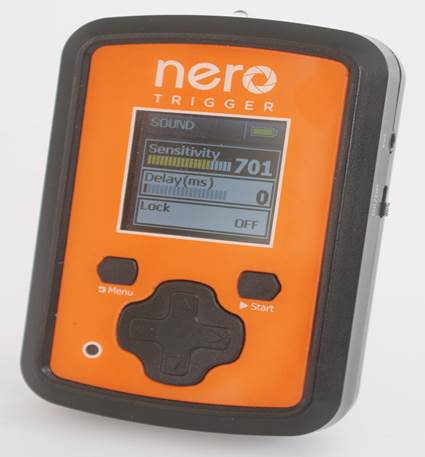
The front control panel has 2 obvious
marked buttons for menu and rebooting process, along with 4 separate
controlling buttons. Here will be setting mode and fine-tuning adjustment that
is performed. The small LCD displaying the modes and different settings is
adjustable.
Surrounding one side is an on/off switch
and a socket for the external cable when using at DIY mode.
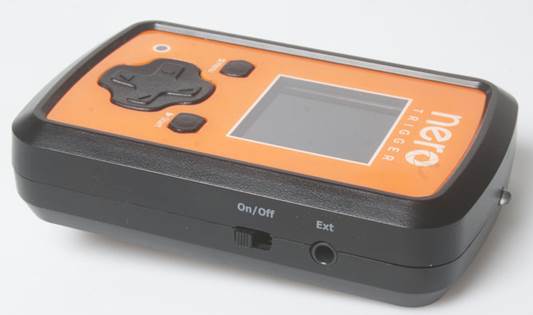
Adjusting
button on the sides
On the opposite side, there’re connectors for
Flash and Camera cable. All are marked clearly.

Cable
connector
Main
features
·
Light trigger (1-99 sensitivity)
·
Sound trigger (1-99 sensitivity, 0-999 ms
latency)
·
Time Lapse (exposure time from 1 second to 59
minutes 59 seconds – no frame limitation)
·
Laser trigger (1-99 sensitivity, 0-999 ms
latency)
·
HDR (High Dynamic Range) mode
·
DIY mode
·
Energy-saving
·
Packing with AAA 2x
Manipulations
When turning the device on, at first you
will see the flash of the screen control panel and a few minutes later it
begins to function, with the same graphic quality as an old Nintendo Game Boy
screen, despite smaller.
The screen lists the modes, with Lightning
as the default one, and then you can move through the sound, Timelapse, Laser,
HDR folders and DIY modes, using the, left or right button. Pressing up or down
(or the start button)and you will step into the process of mode setting, here
you will have to move up or down to choose and adjust the value using left or
right options.
It’s actually easy to know how to do it,
unlike the previous Nero Multi Trigger models
or the recent Photo Trigger model, both need manual
instruction. The screen will be off after 30 seconds if there’s no operation as
a feature helping to save the battery. Though, the battery is still being on
duty, so it’s better to turn it off if you don’t use in a longer time.
If you press and hold the down button, it
starts to make the speed-adjusting value slower and increase the speed when you
hold it longer.
The support allows you to mount it to the
camera support conveniently. It’s small enough to fit in a pocket but the frame
that attaches it in seems to be bulky. A tripod may be useful, especially when
using laser trigger where you can activate the camera remotely with 90 degree
angle. Using in a longer time, removing the tripod will make it more flexible.
Unlike the Photo Trigger, there’s no pasta-like cables
form the bundled sensors. All are mounted from the inside, except for the laser
mode, which you will need to buy to take advantages of. A standard laser pen
will work. This makes it actually neat for using, but less flexible if you want
to place sound or light sensor at strategic location.