“Windows 8 gives you a whole new way
to work with your PC, but it’s easy to master the new operating system with our
help.”
The Start screen
1. Lock screen When you start Windows 8,
the first thing you see is its Lock screen. Just tap [Space], spin the mouse
wheel or swipe up on a touchscreen to reveal a login screen with the user name
you created during installation. Enter your password to get started.
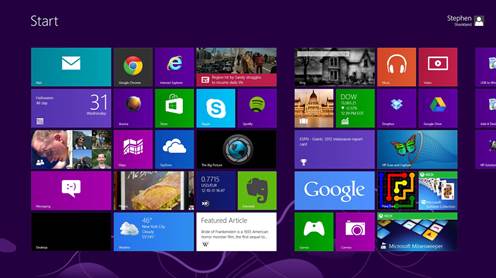
2. Basic navigation Windows 8 launches with
its new Start screen interface, and if you’re using a tablet, it’s all very
straightforward; just swipe left or right to scroll the screen, and tap any
tile that takes your fancy.
If you’re using
a desktop PC or laptop, you can spin the mouse wheel to scroll backwards and
forwards. You can also use the keyboard. Press the [Home] or [End] keys to jump
from one end of your Start screen to the other, for instance, then use the
cursor keys to move between tiles. Tap [Enter] to select one. Press the
[Windows] key to return to the Start screen. Right-click (or swipe down on)
apps you don’t need and select ‘Unpin’ to remove them, and drag and drop tiles
to organize them.

Windows
8 launches with its new Start screen interface
3. App groups It’s easy to sort your Start
screen apps into custom groups. You might drag People, Mail, Messaging and
Calendar to the left, for instance, to form a separate ‘People’ group. Click
the magnifying glass icon in the bottom-right corner of the screen to carry out
a semantic zoom, and you’ll find you can drag and drop the new group around as
a block. Right-click within the block while in the semantic zoom view and you
can also give the group a name. This makes it much easier to find if you go on
to add another 20 or 30 apps to your Start screen which you probably will!
4. Quick access menu Right-click in the
bottom-left corner (or hold down the [Windows] key and press ]X]) for a
text-based menu that provides easy access to lots of useful Windows applets and
features, including Device Manager, Control Panel, Explorer, the Search dialog
and more.
5. Find your applications The [Win] + [X]
menu is useful, but no substitute for the old Start menu because it doesn’t
provide access to your applications. To find these, hold down the [Windows] key
and press [Q], or right-click an empty part of the Start screen, or swipe your
finger up from the bottom, and select ‘All Apps’ to reveal a scrolling list of
all your programs. Browse through the tiles to find what you need and click the
relevant one to launch it.

With
a simple trick you can bypass the lock screen and password together
6. Easy access If there’s an application
you use all the time, you don’t have to access it via the search system. Pin it
to the Start screen and it’ll be available at a click whenever you want it.
Start by typing
part of the name of your application. To access Control Panel, for instance,
type ‘Control’. Right-click the ‘Control Panel’ tile on the Apps Search screen,
and click ‘Pin to Start’. If you’re using a touchscreen, press and hold the
icon, then flick down and select ‘Pin to Start’. Now press the [Windows] key,
scroll to the right and you’ll see the Control Panel tile at the far end. Drag
and drop this to the left if you’d like it more easily accessible, then click
the tile to open the desktop along with the Control Panel window. Press the
[Windows] key to return to the Start screen when you’ve finished.
7. Shutting down To shut down Windows 8,
move the cursor to the bottom right, click the Settings icon – or hold down the
[Windows] key and press [I] and you’ll see a power button. Click this and
choose ‘Shut down’ or ‘Restart’.
Some of the
tricks from previous versions of Windows still apply in Windows 8. Press [Ctrl[
+ [Alt] + [Del], for instance, click the power button in the bottom-right, and
you’re presented with the same ‘Shut down’ and ‘Restart’ options. If you’re
using the desktop view, press [Alt] + [F4] and you can choose ‘Shut Down’,
‘Restart’, ‘Sign Out’ or ‘Switch User’.