8. App bar Windows 8 apps aim to be simpler
than old-style Windows applets, so it’s goodbye to menus, complex toolbars, and
many interface standards. There are usually a few options on the App bar
though, so if you’re unsure what to do, either right-click an empty part of the
screen, press [Windows] + [Z] or flick your finger up from the bottom to take a
closer look.

Windows
8 apps aim to be simpler than old-style Windows applets, so it’s goodbye to
menus, complex toolbars, and many interface standards
9. What’s running? If you launch a Windows
8 app, you can play with it for a while then press the [Windows] key to return
to the Start screen while the app remains running in the background.
Holding down the
[Windows] key and pressing [Tab] displays, a pane on the left containing your
running apps. To see this with the mouse, move your cursor to the top-left,
wait until the thumbnail of one app appears, then drag down. For touchscreens,
drag your finger from the left then back again quickly.
Of course, you
can always press [Ctrl] + [Shift] + [Esc] to see all your running apps in the
Task Manager, if you don’t mind the extra detail.
10. Closing an app Windows 8 apps don’t have
close buttons, but this isn’t an issue. Apps are suspended when you switch to
something else, so they’re only a minimal drain on your system, and if you need
the system resources, they’re automatically shut down. Their context is saved,
of course, so when you re-launch one, it will carry on where you left off.
If you want to
close an app anyway, move the cursor to the top of the screen. When it turns
from the regular mouse pointer to the icon of a hand, hold down the left mouse
button and drag it down the screen. Your app should shrink to a thumbnail,
which you can drag off the screen to close it.
If that’s too
much hassle, pressing [Alt] + [F4] still works. And when all else fails, press
[Ctrl] + [Shift] + [Esc] to launch Task Manger, right-click something in the
Apps list and select ‘End Task’. But beware – close something you shouldn’t and
it’s easy to crash or lock up your PC.

Windows
8 apps don’t have close buttons, but this isn’t an issue
11. Internet Explorer Click the Internet
Explorer tile from the Start menu and your PC will launch a full-screen version
without toolbars, menus or sidebars, which may leave you feeling lost.
Right-click an
empty part of the page or flick your finger down from the top, though, and
you’ll find options to create and switch between tabs, as well as a Refresh
button, a Find tool and the ability to pin an Internet shortcut to the Start
screen. Click the spanner icon and select ‘View on the desktop’ to open the
full desktop version of Internet Explorer.
12. Run apps side by side Windows 8 apps are
immersive applications, which means they run full-screen, but there is a way to
view two at once if you prefer. Swipe from the left and the last app you were
using turns into a thumbnail; drop this and one app displays in a sidebar pane
while your current app takes the rest of the screen. You can swap by swiping
again.
13. Run as Administrator Some programs need
you to run them with Administrator rights before they work properly. The old
context menu isn’t available for a pinned Stat screen app, but right-click one,
and if it’s appropriate for this app, you’ll see a ‘Run As Administrator’ option.
14. Make a tile smaller Some Windows 8 apps
have small live tiles, while others have larger tiles that take up the space of
two regular ones. Right-clicking on a Windows 8 apps’ tile displays a few
relevant options. If it’s one of the larger tiles, choosing ‘Smaller’ cuts it
down to half the size, freeing up space on your Start screen.
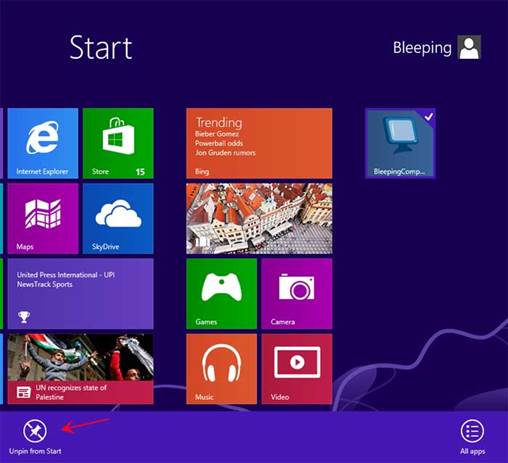
15. Uninstall easily If you want to hide an
unused app, select ‘Unpin from Start’. The tile disappears, but you can add it
again later. (Search for the app, right-click it, select ‘Pin to Start’.) If
you’re sure you’ll never want to use an app again, select ‘Uninstall’ to remove
it entirely.

Quickly
remove an app by-right-click it and selecting ‘Unpin from Start’
16. Apps and privacy By default, Windows 8
apps can use your name, location and account picture. If you’re not happy with
that, press [Win] + [I], click ‘Change PC Settings’, select ‘Privacy’ and click
the relevant buttons to disable any details you’d rather not share.
Customize Lock Screen
17. Start background If you’re like to change
your Lock screen, user tile or Start screen images, press [Win] [I], click
‘Change PC settings’ then ‘Personalize’. You can choose new images in a click
or two. You can also define apps that display their status on the Lock screen,
although the app must support this before it’s accessible from the
‘Personalize’ settings.

You
can also define apps that display their status on the Lock screen, although the
app must support this before it’s accessible from the ‘Personalize’ settings
18. Picture password Windows 8 allows you to
create a picture password, where you choose an image, then draw on it using a
combination of taps, lines and circles. Only someone who can reproduce this
pattern can log on. Select [Win] + [I] then ‘Change PC Settings > Users >
Create a Picture Password’ to try this.
19. Sync and privacy One useful Windows 8
feature is its ability to synchronize your settings with other Windows devices.
So if you’ve set up your new Windows Phone mobile with your contacts, email
details and so on, use the same Live account on Windows 8 and it imports them
for you.
Of course, that
may not always be a good idea. If several people use a device, you may not want
your website passwords to be synced, for instance. Hold down [Win] + [I], then
click ‘More PC Settings > Sync Your Settings’ and disable anything you’d
rather not share.