Need to undo changes to a file? Use
DocShield to do rollback to previous versions
DocShield is a fantastically useful program
that will allow you to restore earlier versions of the same file in seconds.
Never again will you have to painstakingly reverse all changes made to a
document, or try to remember the original draft and undo your botched rewrite.
Now, you can pick an earlier revision of the file and either restore it over
the current version or save it as a separate file and work on it independently.
The idea of backing up multiple revisions
of a file certainly isn’t new – it’s even built into Windows 7 in the form of
feature Shadow Copy. Many online backup tools make it possible to restore
earlier versions of a file too but the key advantage of DocShield is that
you’re in complete control of when backups are taken, and exactly which files and
folders get backed up. Read on to discover how this versatile program can help
protect your data in the future.
Step-by-step: Protect your data with DocShield
Re-rewind, when the crowd say “Bo selecta”
1.
Check requirements DocShield requires that Microsoft.NET Framework 2.0 or later is
installed – it’s included in Windows 7 and Vista, but Windows XP users should
check the Add or Remove Programs Control Panel. If it’s not there, click ‘Start
> All Programs > Windows Update’ and perform a custom scan to download
and install it. Once it’s in place, install DocShield from your free disc.

DocShield
requires that Microsoft .NET Framework 2.0 or later is installed
2.
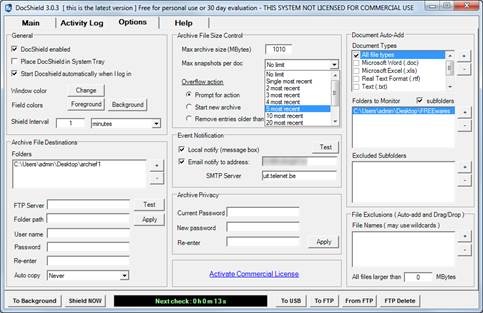
Set backup location Once it’s installed, double-click the DocShield desktop icon and
click ‘Yes’ or ‘Continue’ when prompted. Read the warning about setting up your
backup device. Click ‘OK’ and switch to the Options tab, then click the ‘+’
button under Archive File Destinations, followed by ‘Browse’. Select or create
a suitable folder on your backup drive, the click ‘OK’ followed by ‘Save’.
3.
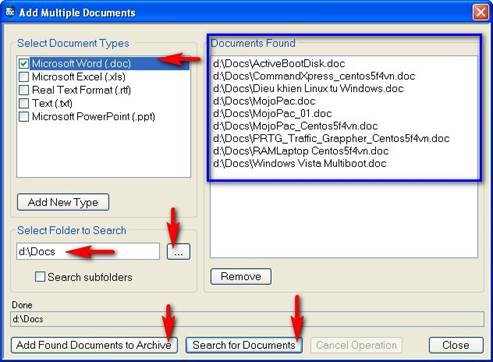
Monitor document types Use the Document Add-On section to pick specific file types to
protect. To protect them, you can either tick an existing document type such as
.doc or .txt, or click the ‘+’ button to add your own. If adding your own,
enter a suitable description and the file extension (minus the full stop before
it) and click ‘OK’ – it will appear at the bottom of the list, pre-selected.
4.
Select folders to watch One folder – C:\Documents and Settings – is selected by default in
the ‘Folders to monitor’ box. This may cause error messages in later versions
of Windows, so select it and click the ‘-‘ button to select the folders
containing documents with versions you wish to back up. Tick ‘Subfolders’ to
ensure everything inside the folder is protected.
5.
Increase archive size By default, DocShield limits the total backup size to just 10Mb,
which means it’ll probably be full within seconds of launching. An Archive Size
Limit Reached windows will appear with a number of options to choose from, the
best idea is to increase the size of the backup archive. Add as much space as
you can spare – start with an extra gigabyte or two.
6.
Tweak backup settings By default, DocShield scans for file changes every five minutes,
backing up any files that have been modified in that time adjust the Shield
Interval setting to make this scan more or less frequent. Also consider
limiting the number of version backups kept for each file by clicking the ‘Max
snapshots per doc’ drop-down menu and choosing the number to keep.

By
default, DocShield scans for file changes every five minutes, backing up any
files that have been modified in that time
7.
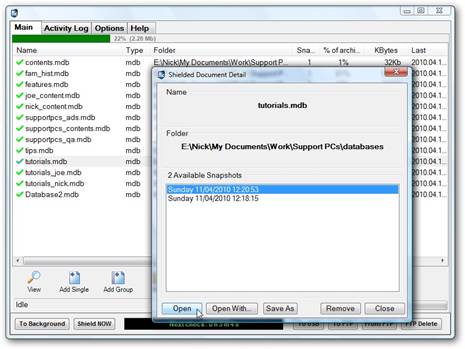
Restore an earlier version When you want to restore a previous version of a file, switch to
the Main tab. Locate the file’s entry in the list and double-click it – a
window will open listing all versions of the file that have been backed up.
Select the one closest to the date or time you want to roll back to and click
‘Open’ to preview it in Microsoft Word or whatever its default application is.
8.
Review another file Open you’ve checked the file, click ‘Close’. If it’s not the right
version, try another until you find the version you want, or a version close to
what you’re looking for. With this version selected, click the ‘Save as’
button. To replace the current version with this earlier revision, simply
double-click its file name in the list and click ‘Yes’ when prompted.
9.
Save a copy
Alternatively, you can give the file you wish to restore a new name so it will
be saved as a copy alongside the current version. Make sure you include the
file extension when typing its name – filename_v2.doc for example before
clicking ‘Save’. Once the file has been restored, you can click ‘Close’ to
return to the main DocShield screen.

You
can give the file you wish to restore a new name so it will be saved as a copy
alongside the current version
10. Your file revisions, backed up Well done
– you’ve successfully configured DocShield to not only back up critical
documents and files you own, but different versions of the same file too. That
means you can happily edit a file knowing that should the need arise, you can
easily revert to an earlier copy, without having to spend precious time
painstakingly undoing all your recent changes.