There must be a lot of people out
there who love trying out things with Android, and who spend a lot of time
experimenting with it. Here is something for those who love creating things
with FOSS and electronic prototyping boards.
Arduino is an Open Source,
single-microcontroller electronics prototyping board with easy-to-use hardware
and software. It was developed in 2005 by Massimo Banzi and David Cuartielles.
Arduino is capable of interacting with the environment by receiving inputs
from a broad range of sensors and responding by sending outputs to various
actuators.
Android
with Arduino
The Arduino board consists of 8-bit Atmel
AVR microcontrollers. In addition, the board has a standard way of connecting
the CPU with various other complementary components to increase its
functionality through a number of add-ons called shields. You can either
assemble an Arduino board yourself or purchase it (pre-assembled) from
http://arduino.cc/en/Main depending on your needs.
Installing and working with Arduino
The microcontroller on the Arduino board is
programmed via Arduino Programming Language (based on Wiring) and Arduino
Development Environment (based on Processing). The Open Source Arduino
environment can be downloaded for Windows, Linux or Mac OS X from
http://arduino.cc/en/Main/Software and extracted. This makes writing the code
and uploading it to the board very easy. As the environment is written in
Java, make sure you have Java installed.
When you are finished with installation,
start off with Arduino programming. When working with electronic prototyping
boards, all programmers must be familiar with 'Hello World' sample of physical
computing - for microcontrollers that don't have a display device, an LED is
added. So just start the Arduino software, select your board model and enter
the following code:
int ledPin = 13; // LED connected to
digital pin 13
void setup() {pinMode(ledPin, OUTPUT);//
sets the digital pin as output}
void loop() {digitalWrite(ledPin, HIGH); //
sets the LED on delay(1000); // waits for a second digitalWrite(ledPin, LOW);
// sets the LED off delay(1000); // waits for a second
Once you've typed in the code, connect your
board via USB, and upload the program to it. As the LED has polarity, you need
to fix it onto the board carefully. The long leg, typically positive, should be
connected to pin 13, and the short leg to GND (i.e., ground). The LED starts
turning 'on' and 'off' at intervals of one second, as shown in Fig. 1.
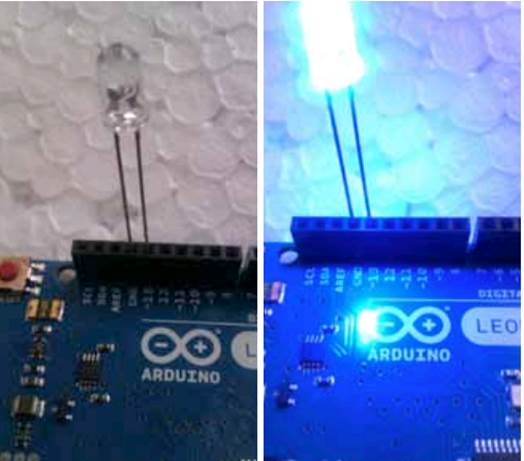
The
Arduino LED shown blinking
Connecting Arduino to Android
To connect your Arduino board to an Android
device, you need an Amarino toolkit. Amarino is a project developed at MIT to
connect Arduino and Android via Bluetooth. It has been released under GNU GPL
v3.
The Amarino toolkit consists of three main
components:
- Android application called Amarino
- Arduino library called MeetAndroid
- Amarino plug-in bundle (optional)
You can download these toolkit components
from http://code.google. com/p/amarino/downloads/list. Moving on, if you want
to work with Amarino, you need an Android- powered device running version 2.x,
though it supports version 1.6 too. Moving on to the Arduino board, you can
have a Lilypad or Duemilanove, with a Bluetooth shield such as BlueSMiRF Gold
and Bluetooth Mate, or an Arduino BT, which comes with Bluetooth attached to it
already.
Installing Amarino is simple. After you've
downloaded 'MeetAndroid' library, extract and copy it to 'Arduino Libraries'
directory. Install 'Amarino.apk' package to your Android device by downloading
directly to it or by calling 'adb install Amarino.apk.' Make sure your device
is connected to the computer via USB, and the PATH is set correctly for
'Android SDK Tools' directory.
Now follow these steps to get the Arduino
board connected to Android:
Authentication
Open the installed Amarino application and
click 'Add BT Device' to search for your Arduino BT device. Make sure that it
is turned on. But before the two can talk to each other, they must be authenticated.
Select the device and confirm pairing with it from the
notification bar. Typically, the pin number is 1234, 12345 or 0000. Once your
Arduino BT device is authenticated, it's ready to go. See Fig. 2.
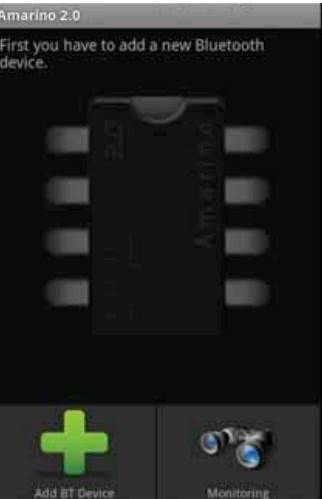
Amarino
app homescreen
Creating events
Next, install the plug-in bundle (AmarinoPluginBundle.apk)
from http://code.google.com/p/amarino/ downloads/list. Thereafter you can head
to event creation. Start the Amarino application and launch 'Event Manager' of
your Arduino BT device. Click 'Add Event → Test Event.' This is a test event -
a demo that sends a random number (0-255) every three seconds. Now your Android
device is ready to communicate with the Arduino board, so set up the latter.
Setting up Arduino
Open your Arduino software and select
'File^ Examples → MeetAndroid → Test.' When the project opens, change the baud
rate of your Bluetooth module from 57600 to 9600, as highlighted in Fig. 3.
Upload the sketch to the board. If there is no LED on the board, you can attach
one to pin 13.
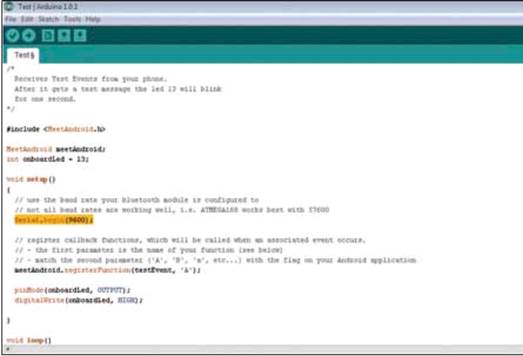
Arduino
'test' program code
Running the test program
Now your Android device and Arduino board
are ready to talk to each other. In the Amarino application on your Android
device, click 'Connect' to communicate with the Arduino board. As soon as
Android connects to Arduino, it starts sending a random number every three
seconds, and that lights the LED for one second. You can monitor the process by
pressing 'Monitoring' on the main screen of the application.
Applications
This concept of connecting Android to
Arduino can be very handy in making electronics projects more useful by
increasing their flexibility. It can easily be used in home automation
controls, power consumption meters, Bluetooth-controlled robots, managing
devices from the computer and much more. There is little doubt that Amarino brings
us more power by helping us connect Arduino with Android.