Who needs
Photoshop and Illustrator to create polished final artwork when you’re armed with an iPad and Inkpad?
You’ll need
·
An iPad
·
iOS 5 or later
·
Inkpad
It’s all too easy, as we’ve repeatedly
noted, to dismiss the iPad as a cute gadget but ultimately a device for passive
consumption rather than content creation. Sure, the argument goes, there are
apps for music and art and so on, but can you really do anything serious with
a drawing program that only costs a few pounds, on a screen the size of a
paperback, with no input device except your finger? And this is one of those
arguments where the questions are strictly rhetorical.
Well, recently I had the chance to find an
answer. I was asked to produce a logo in a hurry for the jazz nightclub singer
Zeeteah Massiah (and if you want to see what the logo is trying to convey, you
could listen to her on YouTube while you read this). It was a weekend, and I
was away from my desk with just my iPad. Could the $5 Inkpad app possibly be up
to the job of creating finished vector artwork?
The answer is yes. Inkpad’s extended
feature set and ingenious approach to interface design meant it proved more
than capable of enabling me to complete the job, from initial sketches to
complete printable artwork. Not so passive.
In this tutorial, we’ll follow the creative
process as it took place on the iPad. What there isn’t room for here is the
preliminary sketches, which led to the decision to concentrate on a
diamond-studded pianoblack letter
‘Z’ with two cross bars (Zeeteah has spent many years working in Germany, where
the ‘Z’ is crossed) marked by a shocking pink ribbon. It was only after
doodling at this for a while that I moved to the iPad and began the sequence of
steps you see here.
It’s worth pointing out that since all
iPads now have cameras built in, you can import sketches into apps that permit
them to be displayed behind your artwork simply by taking a picture of them,
being careful to align yourself with the surface so that the image isn’t
distorted. Who needs a Mac, flatbed scanner and graphics tablet anyway?
The initial sketch
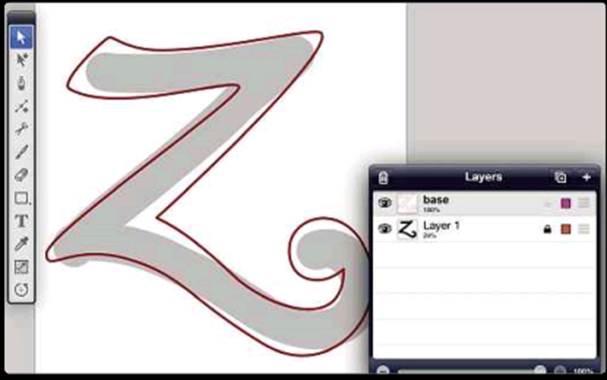
I drew the base sketch with the Brush tool,
as this produces thick strokes and made it easy to swoosh shapely curves.
Reduce the layer’s opacity to around 25% using the Layers palette, and redraw
and reshape the shape on a new layer using the Pen tool. This tool behaves just
like its counterpart in any serious desktop graphics program.
Add the ribbons
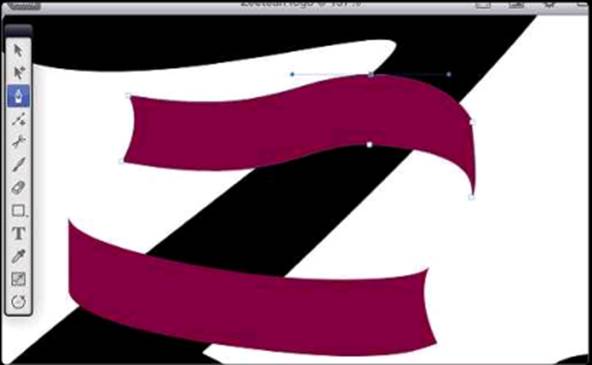
Draw the ribbons using the Pen tool. The idea is that the ribbon will start on the left, cross the ‘Z’, then
turn under itself and wrap behind the letter, before turning once more to cross
back in front of the ‘Z’. For this reason, it’s necessary to create it on two
separate layers; the first layer holds the two front sections of the ribbon.
The back ribbon

The rear piece of the ribbon needs to be
created on a separate layer. This is easily made by pressing the + button in
the Layers palette to add the layer, then dragging it down. The initial sketch
layer is no longer needed, so clicking the eye icon hides it from view. It’s
also possible to lock the other ribbon layer to prevent points from being moved
accidentally.
Add the texture
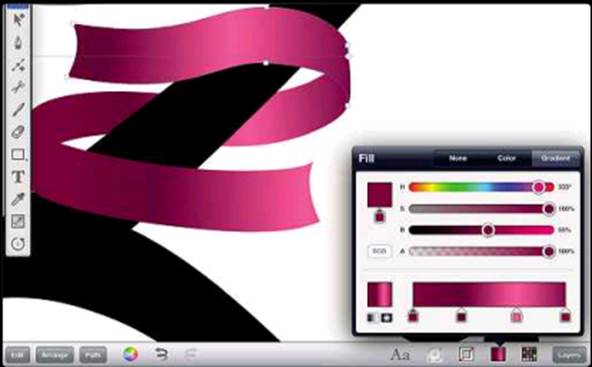
To make the silk look less flat, add a texture
by changing the Fill type from Colour to Gradient. All the gradient stops have
the same 333° Hue setting and 100% Saturation; only the Brightness is varied to
achieve light and dark tones. Initially, apply the same gradient to all three
pieces of ribbon to give them all the same basic appearance.
Adjust the gradients

To make the rear ribbon appear to wrap
behind the front sections, you need to adjust the gradient. When just this
ribbon is selected, any changes won’t affect the other two ribbon layers, so by
adding shadows at either end, you can make it look as if the upper ribbon
sections are casting shadows on this one, which enhances the 3D effect.
Add the diamond
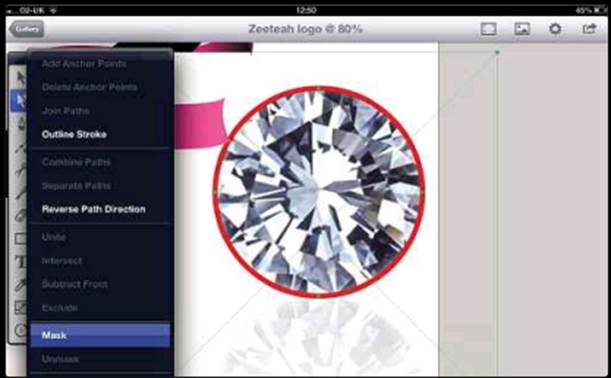
Find a stock image of a diamond and import
it into the artwork using the button on the top menu bar. Use the Ellipse tool
to draw a circle that covers the diamond itself, and choose the Mask option
from the pop-up Path menu. This masks the underlying object with the upper one
so that the diamond photo will only be visible through the ellipse.
Resize the diamond

Use the Scale tool to resize the diamond
so it fits in the curl of the terminus of the letter ‘Z’. By default, the Scale
tool scales around the centre of the selected object, but it’s possible to drag
this centre marker to any other position in the artwork and scale from there.
Add more diamonds
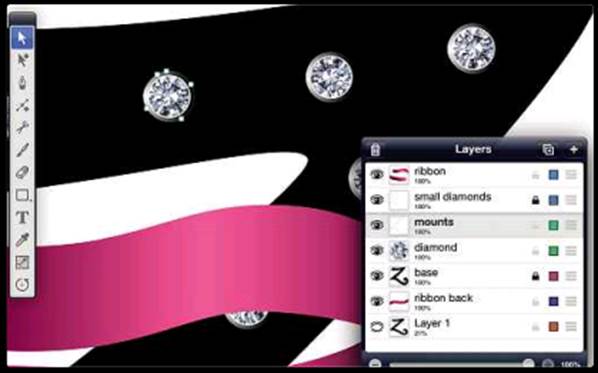
Duplicate the diamond layer, and reduce the
diamond and copy it to multiple locations around the
‘Z’. Rotate them by different amounts to make them look less identical. Make a
stroke around each, on a new layer, and give it a gradient fill to create the
mount.


