Discover the wealth of features in Adobe
Camera
Adobe Camera RAW is the first port of call
for RAW files, but it’s far more than just a quick stop off for converting your
images. There’s surprising depth to the features on offer. You can’t make
composite images, graphic designs or text, but you can make exactly the kind of
edits photographers need to make, such as tonal adjustments, lens correction
and sharpening. Many of these controls are accessed via the panels on the right
of the interface. There are 10 different panels to play with, housing hundreds
of options for changing colour, exposure, detail and more. And, of course, it’s
far better to make these changes in ACR rather than in Photoshop, because
you’ll retain the maximum amount of image data and quality available from the RAW
file.
Basic panel

The Basic tab opens by default when you
first open a file in ACR, and with good reason. It’s the ideal place to begin
editing your image. Start at the top with White Balance, then work your way
down the list of sliders. You can check for clipped pixels by holding down Alt
while dragging the Exposure, Highlights, Shadows, Whites or Blacks sliders. The
Clarity and Contrast sliders can give your image extra punch, but be careful
not go too far. Saturation will intensify the colours universally, while
Vibrance will target and boost only the less-saturated colours.
Tone curve

The Tone Curve allows you to improve tones
and contrast by making certain parts of the tonal range lighter or darker. The
darker tones are to the left of the box, and the lighter tones to the right.
The Curve line can be moved up or down to lighten or darken certain points
along the scale.
This is easier to understand when using the
Parametric settings, which allow you to control the line with sliders for
different tonal ranges: Highlights, Lights, Darks and Shadows. The Point tab
enables you to add up to 14 anchor points along the line and drag them up or
down.
Detail
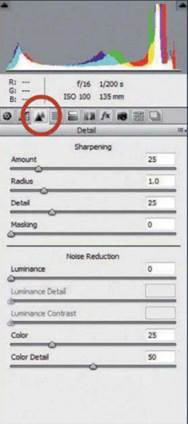
The detail tab houses Sharpening and Noise
Reduction sliders. Both work very well. It’s best to reduce noise at the
beginning of the editing process, as further adjustments later on may amplify
the noise. You’ll need to zoom in close to see the result – double – click the
Zoom tool to view at 100%, and the Hand tool to go back to full screen. When
sharpening, use the Amount and Radius sliders to control the Masking sliders to
control the areas in which the sharpening is applied. Hold down Alt while
dragging to see the effect.
HSL/Grayscale

HSL stands for Hue, Saturation and
Luminosity, accessed through the three tabs at the top. With control over eight
colour ranges, the HSL/Grayscale panel is the best place to make colour tweaks.
You can use the sliders, or use the Targeted Adjustment tool from the Tools
Panel and drag left or right over points within the image to zone in on
particular colours.
The Convert to Grayscale check box at the
top will render the image in black and white while giving you control over the
brightness of the colour ranges. So it’s a great place to apply a range of
black and white effects.
Split toning

The Split Toning Panel allows you to change
the hue of the highlight or shadow tones independently of one another. So it’s
useful if you need to correct an image with a noticeable colour cast in the
highlights or shadows. Used at higher Saturation levels, it can also
dramatically alter colours for creative results or retro colour shifts. If
you’ve converted the image to monochrome with the HSL/ Grayscale panel,
split-toning will help you introduce colour tints to the highlights and
shadows, which enables a range of mono effects such as sepia or selenium
toning.
Lens correction

ACR has a large database of common lenses,
so it can automatically detect and correct problems such as distortion and
vignetting. The list of lenses is regularly expanded and updated, so the
chances are high that the lens you used to shoot the photo will show up, but if
not then you can correct lens problems manually. Chromatic Aberration usually
occurs around areas of high contrast, such as on the outlines of trees or
buildings against a bright sky, and can crop up even with quality lenses. It’s
easy to correct under the Color tab in the Lens Correction Panel.
Effects

ACR isn’t the best place to apply lots of
whizz-bang effects, hence the limited options available in the extravagantly
named Effects Panel. Here you can choose to add grain or a vignette.
Sometimes a vignette can improve a
composition by drawing the eye into the frame, so you may want to try darkening
or lightening the corners with the Post Crop Vignetting sliders. It’s also
possible to create a range of border and spotlight effects by experimenting
with the sliders. The Grain settings can be useful on mono images for getting
an authentic film look.
Camera Calibration
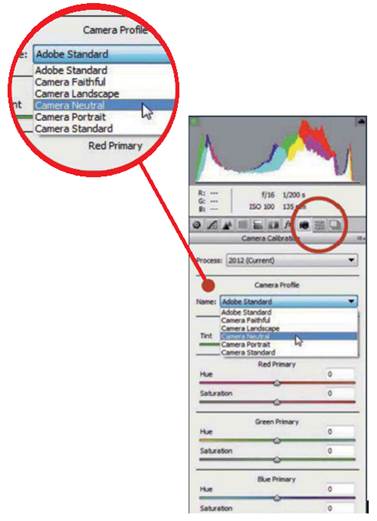
This is one of the biggest reasons to shoot
in RAW. By default, the Camera Profile is set to ‘Adobe Standard’, but often
this doesn’t give the best results. By selecting one of the other camera
profiles from the menu, you’ll get much more pleasing tones.
Preset & snapshots
The Preset Panel allows you to save
settings to be used on other images. You can also apply these Presets in Bridge
by right-clicking a file and choosing Develop Settings. The Snapshot Panel lets
you save certain points in your ACR workflow.
“You’ll retain the maximum amount of image
quality”