Advice to create an excellent black-white photo
Creating excellent black-white photos begins with the
exposure and successful process but it does not end there. This’s art and
science in creating an impressive copy, and to have the best result, you need
to perform tests with all kinds of photo.
Master black-white
copying
Choose the material
The quality of the black-white copy will be improved a lot
if you work with printer, ink and paper which are optimized for black-white copying.
But that doesn’t mean you have to buy a new one immediately, but if you’re
going to make multiple black-white photos, you will get benefits from choosing
an inkjet printer with the expanded black and neutral range – both Canon and
Epson provide models with many black and gray ink.
The kind of paper you choose is also important. Prefer
glossy or anti-glare paper partly is a personal preference, but we lean to
choosing anti-glare surface or pearl color rather than glossy paper to reduce surface
reflection that can cause neglect of the subtle tone changes which is in a
well-printed black-white photo.
Being equally important is the paper whiteness. Paper
whiteness is rated on 100-point scale; the higher the point is, the whiter the
paper becomes. Unless you are looking for a vintage style, we suggest choosing
the paper with over 90 ratings to have clear highlights.
A safe bet is to use the paper from your printer
manufacturer, but there are some excellent choices from companies specialized
in photo paper that you should discover. Most of the companies supply their
samples so that you can try to see what kind you like.
Printer settings
This is what you have ignored. Set up the printer driver may
be not the peak of excitement about photography, but it’s really important,
especially when your printer provides special settings for black-white photos.
At the most basic level, you should check if you have set up
the printer at highest quality setting and chosen the most suitable paper as
compared with the paper you’re using. The photo printers designed for professionals
and those who love taking photos will have more adjustment to refine the
output. You need to spend time checking over the printer documentation to make
sure that you’re taking full advantages of the printer.
Perform copying test
Even to a well-aligned system, what you can see on the
screen is different from what you see in the copy. The backlit screen will
always be more vivid than the copy. The adjustments you make for the photos to
prepare for printing - brightness, contrast, glossy, bright and etc… can look
amazing on the screen, but not as good when shown in the printed image.
Make some test copies. One of our favorite techniques is to
devide the image into areas, apply different adjustment for each area and
compare the result in the last copy. This creates one more step for the
workflow but it is worth. Actually, it can save time, as well as ink and paper
for you. You will want to do this to all the combination of images, paper and
ink.
Digging deep into printer settings may give you some big
advantages, especially when the printer provides specific black-white mode. Driver
of Epson Stylus Pro 3880, as presented here, has many settings to provide
excellent black-white printed picture.
1. For example,
choosing anti-glare paper will automatically choose Matte Black ink. We also
choose Advanced B&W Photo mode to take full advantages of printer expanded inkjet.
2. Here,
we choose glossy paper which changes the ink system into Photo Black. You can
also see the options available in Color Toning menu.
3. Tab Advanced
Color Settings gives you some adjustment to refine the copy more.

Digging deep into
printer driver can give you some big advantages.
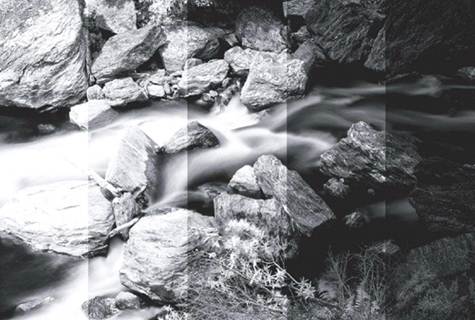
This is an example about basic yet useful copying technique.
We divide the image into 5 equal areas. We choose the straight stripes instead
of horizontal ones so that each area will have the same content and can be
compared (to some images, depended on the subject and the lay-out, the horizontal
stripes could be better). Then, we adjust the Brightness of each area as
followed, from left to right: +150, +75, 0, -75, -150. This image printing
allows us to see how the final result is going to be with the combination of
ink and paper. You can carry out this technique in the slope-shape, which means
that if you prefer -75 brightness more, but you think that it may be a little
too dark, repeat this process with settings such as -25, -35, -45, -55, and -65
until you feel that you have a proper setting.