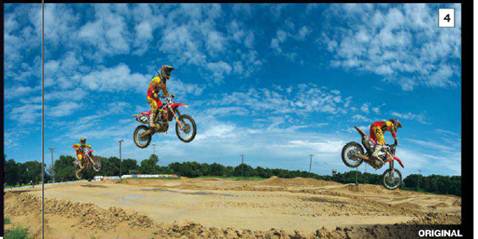
Try Photomerge of Photoshop to create panoramic miracle.
Though I had used Adobe Photoshop in about 10 years, and
taught this program in conferences about 10 years, I was still surprised by its
ability. The opening image for this column is an example.
I created it from 6 images taken with Canon EOS 5D Mark III and
Canon 24-105mm IS lens. I combined them together in Photomerge of Photoshop, then
cut and pasted a person who rode a motorbike from the series of my taken
pictures into a panorama. For the last step, I changed the color and contrast
to have amazing effects in overall - all in about 10 minutes.
Here is the process for you to follow. You can use it for
many kinds of different action pictures.
However, firstly, I want to thank a student for giving me
the idea. He used this technique to have a panorama about the fearful white
eagle.
Step 1
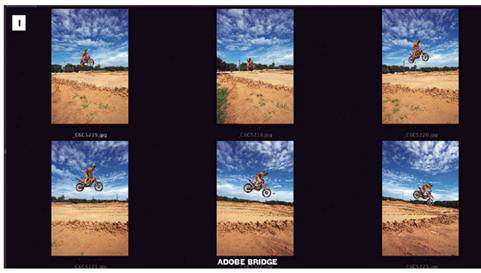
This Adobe Bridge screenshot display 6 of my original
pictures. Well, almost. I really convert RAW file into JPEG by using Image
Processor of Photoshop (Bridge > Select All Images > Photoshop > Tools
> Image Processor) to speed up the processing time of panorama. Processing a
series of JPEG images is faster than that of a series of RAW file.
The first step is having a good panorama. Like all
panoramas, you need to set up exposure mode into Manual mode and choose the
exposure for the brightest part of the scene. In case you have shot in
automatic mode, your exposure will be different from each exposure, which will
lead to the troublesome light or dark bands in the sky.
You also need to set up the balance for the current light
condition such as Sunny and Cloud. An automatic setting may lead to different
colored picture.
The next step of having a nice panorama is to overlay images
on 1/3 of the frame. You also need to hold the camera vertically because the
parts of the top and the underneath of the panorama will finally be cropped in
the combination process. Finally, try to keep the horizon as balanced as
possible. A tripod will be helpful, but you can capture the panorama by hands
as illustrated by my panorama of motocross.
Step 1
Step 2
After your photo shoot, it’s time to create a panorama. In Photoshop,
choose File > Automate > Photomerge. Once you are in Photomerge, choose
the file like you are going to choose any file on the computer. Set Layout to
Auto
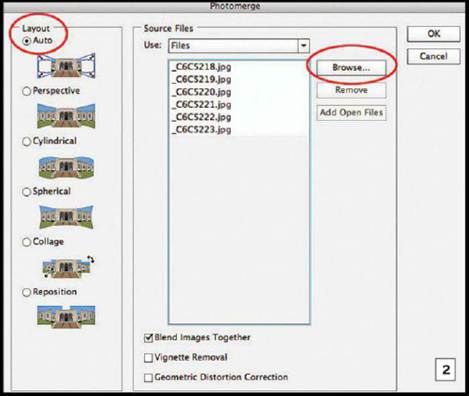
Step 2
Step 3
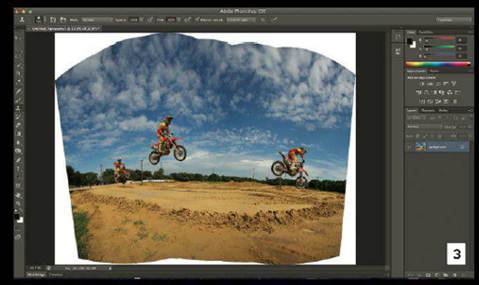
In Photomerge dialog box, click OK and wait for a while,
then you will see your attached panorama. How magical it is! You can see some
small vertical aliasing in the picture. Don’t worry, it’s a normal thing. When
you flatten the layer, they will disappear. After you flatten file (Layer >
Flatten Image), it’s time to crop.
Besides, you will realize that in most cases, it will look
like all unused picture frames. It’s also normal because Photoshop likes to
stick and mix rather than use all the components of your images.
As you will see, the parts of the original image will be
cropped. Yes, that’s normal. You can use Content-Aware Fill feature in Photoshop
CS5 and CS6 to try to fill these areas. It may be efficient. However, as you
know that you will lose the components of the image, it’s a good idea to take a
wide shoot, like illustrated by my files that you have seen in the screenshot
of the panorama series.
Step 3
Step 4
This is the cropped image, but it lacks some upcoming
excellent things.
Step 4
Step 5
This is the screenshot of Levels dialog box for my panorama.
As can be seen, my picture lacks of suitable highlights, as illustrated by the
empty space on the right of histogram. Moving highlight slider to the left,
right inside “mountain range”, will be a fast processing way. However, because
you will add another image from the image series into your panorama, it’s time
to ferine it. If you did that, the color, brightness and contrast won’t be
matched.
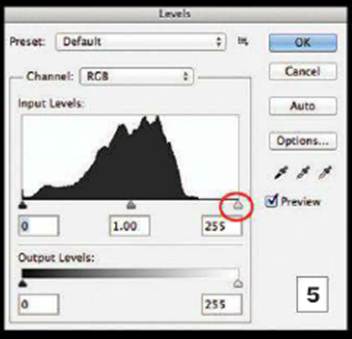
Step 5
Step 6
You can make the panorama look more amazing by adding other
images. Go back to the series and find an image, or sometimes several ones
which will “bridge the gap” in your panorama.
Crop the subject as close as possible and copy it. Then,
stick it to the panorama. Use Move tool to move the subject into position. As
you haven’t resized any image and your panorama, the ratio of the images will
be matched.
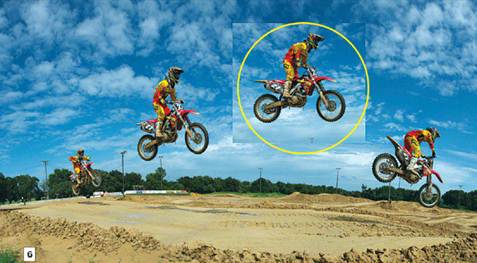
Step 6
Step 7
The next step is to remove the background from your inserted
cut-and-pasted image. As it’s on one new layer, you can use Eraser tool to
erase the area around the subject to have and overall look on bottom layer. Other
options include using Magic Wand or Quick Select tool.
Throughout this progress, zoom into the pasted images and
turn off bottom layer (by pressing Eye icon) in Layers panel to see how good
you are doing with the erasing.
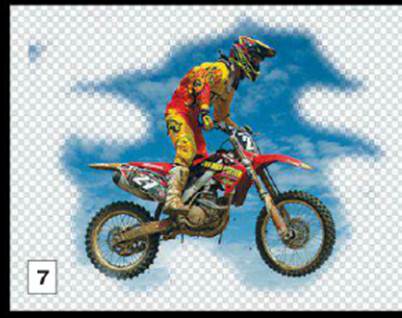
Step 7
Step 8
After flattening the image, you’ve almost finish your job.
However, as I noted, images might need some refinements. In my case, I adjust Levels
then increase Color and Contrast.
Have fun in the test and create your panoramic action
images!
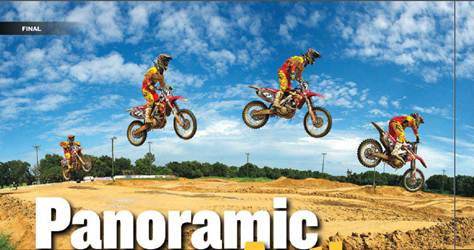
Step 8