Photographic opportunities arise in the
unlikeliest of places and at the least expected of times, don't they? You might
be sitting at a traffic light as Santa zips across the intersection on a
Harley, or spot a couple going at it in a glass elevator, oblivious to the fact
that their amorous coupling is seen by all. So what do you do? You got it -
grab your iPhone and start shooting. Whatever it is, shoot it. Your mentality
should be: shoot now, and edit later. Every moment is a photo waiting to be
taken. The convenience of the iPhone means that capturing fleeting moments is
easier than ever. This is true even in a movie theater, which is where I found
this issue's magical moment.
Inception
While watching the previews, I sat
mesmerized by the size of the actors projected on the massive movie screen. I
thought it was fitting that the larger-than-life images on the screen matched
the larger-than-life egos of many actors. With that idea in mind, I used Camera
Plus Pro ($1.99, www.app2.me/316) to grab various screen captures as
the previews were running, two of which are shown here (see Images 1 and 2).
After reviewing my vast array of shots, I decided that these two images would
be the starting point for my preconceived final image.
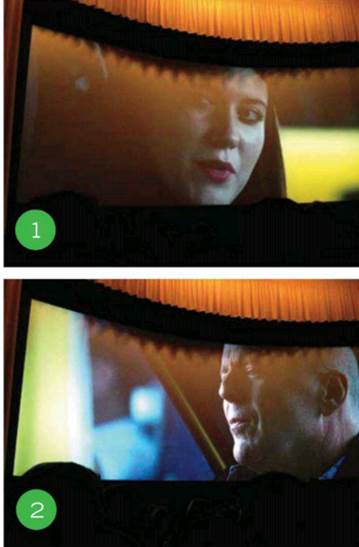
Images
1 and 2
Creation
First things first: the crop. If you've
been following my column for any length of time, you know that aside from the
original shot, I consider the cropping stage to be the most important part of
the process. I opened the two original images in PhotoForge ($0.99,
www.app2.me/328) and cropped them square, knowing that I wanted the subjects'
faces to eventually line up in some way (see Images 3 and 4). While still in
PhotoForge, I used the Levels setting to ensure I had my black and white points
defined, Curves to add my usual subtle contrast curve, and Sharpen to, well,
sharpen it just a tad.
I love Image Blender ($2.99,
www.app2.me/4217). The next step of the process is where the magic happens, and
Image Blender is the app that brings it all together. As you can see in Image
5, I first brought in the two shots I wanted to blend, but I noticed quickly
that the shots weren't quite lined up the way I wanted them. Fortunately, Image
Blender has a feature called Arrange (see Image 6) that lets you move the
images around to create the blend you want. In order to make it the best it
could be, I tried to line up the shots in such a way that the subjects' mouths
would overlap. Bingo! I nailed it with the Screen blend style (one of 18
different blend styles to choose from) and then saved the image.
Once the image was blended exactly as I
envisioned it, it was time to use some artistic freedom to decide how to best
present the image in its final form. I decided to open the image in PhotoToaster
($1.99, www.app2.me/5339) and process it with the Lomo mode (see Image 7)
found under the Supreme options in the app. Then I added a small vignette, and
finally, the Black Strokes frame (see Image 8).
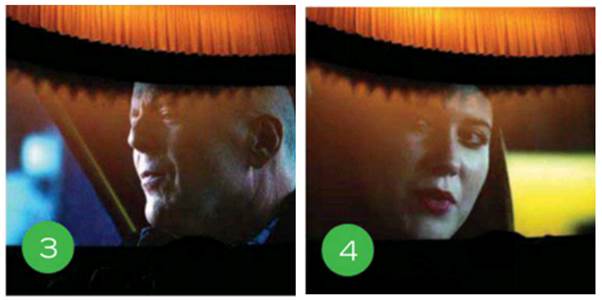
Images
3 and 4
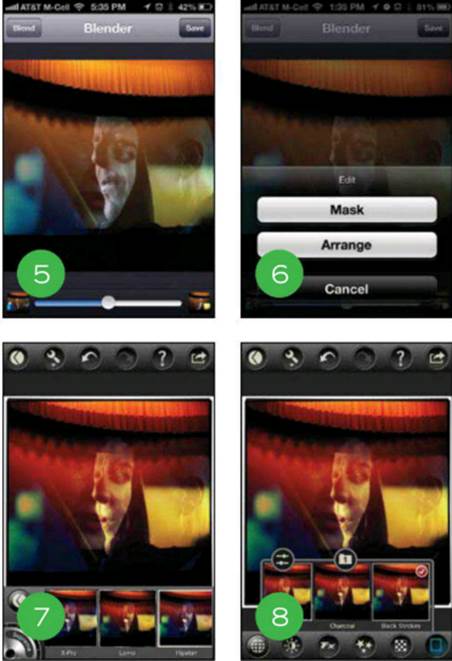
Images
5, 6, 7 and 8
Presentation
With that last finishing touch, the image
was complete (see Image 9). When I first saw it in its raw form in the theater,
I wondered how it would turn out, and it ended up better than I had imagined.
My goal with iPhone photography is to
inspire you to see the world differently. I enjoy the daily challenge of
finding that perfect, fleeting moment and sharing it with the world. I've been
at it for nearly three years, and the whole time I've committed to posting a
"before" and an "after" image every single day on my Tumblr
blog (www.jonathanmarksfineart.tumblr.com).
If you have any questions about iPhone
photography or wish to speak to me about representing my work in your gallery,
please feel free to contact me at jonathan@jonathanmarksfineart.com. You can
also see me at this year's Macworld/iWorld 2013 event, where I'm scheduled to
speak on Feb 1st at 5 p.m. Please come find me and say hi!
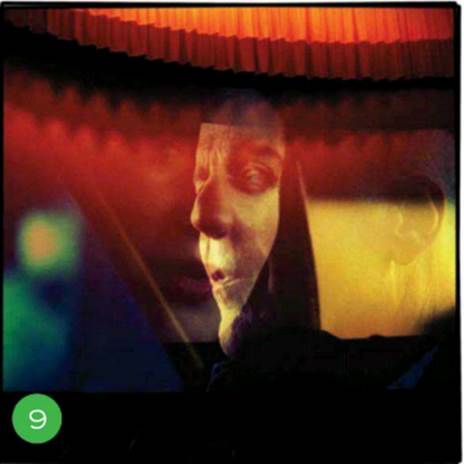
Images
9