NEX-6 menus
The menu system of the NEX-6 is basically the same as the
more expensive NEX-7’s menu, with a few minor changes. The NEX-6 features a
physical mode dial currently; there is no need to have a virtual dial, so that
option has been killed off. The new addition is to access what Sony calls
PlayMemories Camera applications, which are utilities that you are likely to
download to the camera via Wi-fi or USB

Pressing the
'Menu' button first yields the initial screen like this. The menus are divided
into six parts, but it may take you a little time to familiarize yourself with
where each option sits - the ordering is not completely intuitive.

By default, the
NEX offers descriptions of most items in the menu.
The most annoying feature of the NEX family is the interdependence
like labyrinth of available menu options. Depending on your current settings,
the options will inevitably appear gray and unavailable- for instance, you are
not allowed to configure for maximum focus in the Custom menu unless the focus
is set to MF in the camera menu.
The NEX-6 will generally show you why the options are grayed
out (assuming that you have the Help Guide switched on), but you are still
obliged to look for the opposite option, adjust it, then move to the setting
you wanted to change from the beginning. And, in some cases, it will dolefully
notify you of that 'This function is currently disabled', bringing no reason as
to why. In a gracious way, as soon as you realize how you want to set up the
camera in order to take pictures every day, and have configured the effective
solutions to your satisfaction, you can skip the menus almost entirely.
Another problem with the menu system is that a lot of
movements are involved. Combine the long list of options and a large font and
you will rotate the dial plates on the NEX-6 a little.
Camera menu
Most of the options set via the camera menu use a 'virtual
dial plate' on the direct-view screen, with options set using the soft keys.
Escaping these will lead you directly back to live view, without to the menu
itself, which some users may feel uncomfortable

The camera menu
Options
·
Drive mode: Single, Continuous, Speed priority continuous,
Self-timer (2 sec, 10 sec), Self-timer (cont.) (10 sec / 3 images, 10 sec / 5
images); Bracket: Cont. (0.3 EV, 0.7 EV, 1.0 EV, 2.0 EV, 3.0 EV); Remote
Commander
·
Flash mode: Fill-flash, Slow Sync., Rear Sync, Wireless, Flash
Off; auto flash (Wireless Controller without using the built-in flash, only
with external flash. Auto and flash off options only available automatic
shooting modes.
·
AF / MF select: Autofocus, Direct Manual Focus, (DMF), Manual
Focus (DMF mode is autofocus, but also allows you to adjust the focus manually)
·
Auto Focus area: Flexible Spot, Multi, Center
·
Auto Focus Mode: Single Shot AF, Continuous AF
·
Object tracking: Off, On
·
Zoom: Off, On (Allows you to adjust the amount and Clear Image
digital zoom (described later) that is used, use the rear dial plate)
·
Face Detection: Off, On, On (Registered faces); (Face Detection
can be set to operate with the remembered faces, and with the camera ignoring
strangers)
·
Face Registration: New Registration; Order exchanging, Delete,
Delete All (Add a new person on face recognition data of the camera, change the
"rank", delete any or all of the faces)
·
Smile Shutter: Off, On (Normal Smile, Big Smile, Slight Smile)
(Smile shutter function can be installed based on the habitual expression of
your friends and acquaintances)
·
Automatic Portrait Framing: Auto, Off
·
Soft Skin Effect: Off, On (Low, Middle, High)
·
Shooting Tip List: Basic Techniques, Portraits, Landscapes, Night
Scenes, Shooting close-up with Macro; Shooting a subject in motion (Most of the
NEX-6’s Shooting Tips are contextual. If you wish to browse all of them, then
select this option)
·
LCD Display (DISP): Graphic Display, Display All Info, Big Font
Size Disp; No. Disp. Info; Level; Histogram; For Viewfinder (The options
available here depend on the selected items in the ' DISP Button (display)'
Menu (see below)
·
Finder Display (DISP): Display Basic Info; Level; Histogram
·
DISP button (display): Graphic Display, Display All Info, Big
Font Size Disp; No Disp. Info; Level; Histogram; For Viewfinder (Allows you to
opt for the display modes that are available on the rear screen)
Image size menu
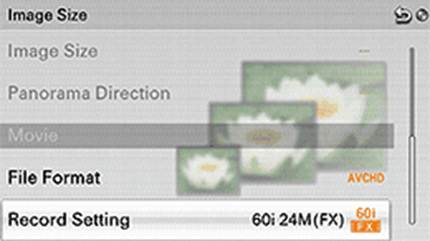
Image size menu
·
Still: Image Size: L: 16M (3:2), 14M (16:9) M: 8.4 Mil Euro
(3:2), 7.1M (16:9) S: 4.0m (3:2 ) 3.4M (16:9) Aspect ratio: 3:2, 16:9, Quality:
RAW, RAW + JPEG, Fine, Standard (JPEG quality is set to "fine" when
shooting RAW + JPEG)
·
Panorama: image size: Standard, Wide, Panorama Direction: Right,
Left, Up, Down
·
Movie: File Format: AVCHD, MP4, DVR Set: 60i 24M (FX) 60i 17M
(FH); 60p 28M (PS); 24p 24M (FX); 24p 17M (FH)
Brightness / color menu

Brightness / color
menu
Options
·
Exposure Compensation: + / - 3 EV in 0.3 EV steps
·
ISO: Auto, 100 to 25,600
·
White Balance: Auto, Daylight, Shade, Cloudy, Incandescent,
Fluorescent - Warm White, Fluorescent - Cool White, Fluorescent - White Day;
Fluorescent - Daylight, Flash, Color Temp / Filter, Custom, Custom Set (Each WB
setup can be independently tweaked in + / - 7 steps through the Blue-Amber and
Green – Magenta axes)
·
Metering Mode: Multi, Center, Spot
·
Flash Compensation: + / - 2 EV in 0.3 EV steps
·
DRO / Auto HDR: Off, DRO (Auto, Level 1, Level 2, Level 3, Level
4, Level 5), Auto HDR, Auto (1.0 EV, 2.0 EV, 3.0 EV, 4.0 EV, 5.0 EV, 6.0 EV )
·
Image Effect: Toy Camera (Normal Cool, Warm, Green, Magenta), Pop
Color, posterization (Color, Black & White), Retro Photo, Soft High-key,
Partial Color (Yellow, Red, Green, Blue) , High Contrast Mono, Soft Focus (Low,
Mid, High); HDR Painting (Low, Mid, High) Rich Tone Mono, Miniature (Auto, Top,
Middle (Horizontal), Bottom, Left, Middle (Vertical), Right) , Off (The visual
effects cannot be used when shooting RAW files)
·
Creative Style: Standard, Vivid, Portrait, Landscape, Sunset,
Black & White (Each creative style can be adjusted independently: -
Contrast +/- 3; - Saturation +/- 3; - sharpness +/- 3)
Playback menu

Playback menu
Options
·
Delete: Multiple Img; All in Folder (Select images for deletion)
·
Still/Movie Select: Folder View (Still); Folder View (MP4), AVCHD
View (Like its siblings, the NEX-6 is unlikely to display images and movies
simultaneously in playback mode)
·
Slide show: Repeat (On, Off); Interval (1 sec, 3 sec, 5 sec, 10
sec, 30 sec); Image Type (All, Display 3D Only)
·
View on Smartphone: This Image, All Images on This Date; All
Images on The Device (For use with the PlayMemories Mobile application on iOS
and Android)
·
Send to computer: Send pictures (Will send all of the pictures
and videos to your Mac or PC via Wi-fi network)
·
Watch on TV: Playback Selection (All Images in The Device, All in
Folder); Interval (Short, Long); Effects (On, Off) (for watching photos on a
DLNA-compatible HDTV. The effects are only available on Sony’s Bravia
televisions; Movies cannot be played via Wi-Fi)
·
Specify Printing: DPOF Setup (Multiple Img, Cancel All); Date
Imprint (On, Off)
·
Image Index: 6 Images; 12 Images (A number of the images are
displayed in thumbnail view)
·
Rotate: select and rotate images
·
Protect: Multiple Images; Cancel All Images (Opt for images to
protect)
·
Enlarge image: Enters the magnified view
·
Volume settings: 0-7
·
Display Contents: Display Info, Histogram, No Disp Info