Features
Overall, the feature suite of the NEX-6 will be relatively
similar to anyone who used to use a Sony interchangeable lens camera. Of
course, the camera has a full suite of manual controls, including white balance
fine-tuning, bracketing (but only for exposure function), and RAW support. A
dual-axis electronic level will help keep your horizons lined up.
The two completely new features are Wi-Fi and Hybrid AF;
both of these functions have been discussed in detail on the previous pages. On
the next two pages, we will quickly go through the other remarkable aspects of
the feature suite of the NEX-6.
D-Range Optimizer
D-Range Optimizer (DRO) is the NEX's automatic contrast
system. By default, it is installed to 'Auto', though you are able to adjust
its effect in five steps (1-5, plus Auto) or simply switch it off. This feature
operates by evaluating each part of the scene and adjusting the brightness for
each individual scene, to balance the color tones in the scenes with a wide
range of tones like the one below. The major effect of DRO is to raise shadows,
which you will see in the next example.
The major effect
of DRO is to raise shadows.
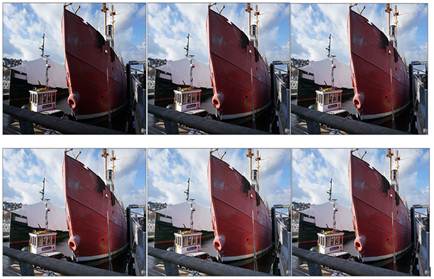
In this example, the DRO Auto option has offered a very
similar result to manually setup at the level 4, which shows a nice central
location – brightening the dark half of the ship without an unnaturally 'HDR'
effect. In the other lighting cases, the DRO Auto option might opt for
something higher, or have little to no effect.
HDR
The NEX-6's HDR (high dynamic range) feature also aims to
drag a wide range of color tones into a single image, but it does this job in a
very different way from the D-Range Optimizer. In HDR mode, the camera shoots
three images in a row, each image with a different exposure level, and then
arranges them together. The commitment is to perform cropping the lower light
and dark areas more accurately.
The NEX-6 features an automatic HDR mode; and it also allows
you to choose the exposure interval manually, with a range of +/-1 to +/-6EV.
The wider the interval, the more obvious the effect will be. The camera will
automatically layer the three images and shoots them fast enough (less than
half a second) but generally does not need a tripod. It should be noted that
you are unable to capture RAW images using the HDR feature.

You are unable to
capture RAW images using the HDR feature.
Above are the very contrast scenes, captured with the DRO
and HDR switched off, and then at each HDR setup including Auto. The path to
the garage on the left and the right side wall are pretty dark, while the
titled roof on the building in the distance are beginning to crop. The HDR Auto
mode will certainly lighten the dark areas, although some of the lighting areas
still need cropping. Thus, in this case, the selection of HDR 6.0 EV option
would probably be a better choice, since it offers only a little brighter
detail.
Aside from automatically layering the photos, the Sony
implementation of HDR also tries to identify the changes between the three
images and will work to avoid duplicating objects that have moved during the
three exposure modes. This allows its use beyond the static objects - an
extraordinary and useful aspect.
Intelligent Auto / Superior Auto modes
While most of the potential NEX-6 buyers are camera
enthusiasts, Sony has not forgotten about the beginners. The NEX brings up two
automatic modes: Intelligent and Superior. Both bring up automatic scene
selection, with Superior Auto mode supplementing automatic multi-image
recording (HDR or multi-image noise reduction)

The gold flower
icon at the top left points out that the NEX-6 has precisely opted for the
macro mode in Intelligent Auto mode. Here you are also able to see how the
NEX-6 can display the Phase Detect AF area.
The Auto mode performs well in real world shooting, and
during our shooting time with the NEX-6 we realized that they can be relied
upon to choose the modes appropriately such as portrait, macro, landscape, and
backlight HDR depending on the shooting situation.