A bargain microcontroller that's ideal for
adventurous PC madders
Microcontrollers- small computing devices
that can be programmed to control sensors, motors, lights and more-provide
madders with almost unlimited possibilities, but they're also often a pain to
program, requiring the learning of near-incomprehensible programming languages.
The Arduino project, launched in 2005, changed all that, taking the cheap
ATmega family of microcontrollers and adding a library-Wiring - which was easy
for beginners to learn. Since then, Arduino devices have only become more
powerful - and the latest release, the Arduino Leonardo, is no exception.
Designed to take over from the
last-generation Arduino Uno, the Leonardo has a Spartan board design. While
previous Arduino models-including the Uno and its predecessor, the Duemilanove
- have used two integrated circuits, the Leonardo uses just one. The Atmel
ATmega32U4, a small surface-mount package located in the center of the board,
takes on the responsibility of handling both the microcontroller and the USB
connection.

Arduino
Lenoardo
The result is a sparse board that's both
cheaper to manufacture and more flexible. Unlike previous Arduino models, which
forced those looking to link the devices with a computer to write back-end
daemons to listen for communications over a serial port, the Leonardo can act
as a human interface device, emulating a keyboard or mouse at the programmer's
discretion.
For people looking to add sensing to their
PC, it's nothing short of a revelation: suddenly the Arduino can send key
combinations to control a PC's operation with no back-end programming required.
If you're a gamer, this means that it's perfectly possible to use the Leonardo
to create a custom-made macro keypad; for over clockers, the same feature could
be used to send a shutdown hotkey combination if the Arduino detects a rise in
temperatures.
Speaking of sensors, the Leonardo's new
chip gives it extra capabilities here too. While the Uno and its predecessors
had six 10-bit analogue inputs, the Leonardo boasts double the number by
borrowing some of the 20 digital I/O pins. As before, all pins can also be used
as digital inputs or outputs on demand.
Sadly, the move to a new chip isn’t always
smooth. Switching from an FTDIIC to the ATmega16U2 for USB-to-serial conversion
in the Uno brought some problems, and the move from an ATmega328PU to the
Leonardo's ATmega32U4 continues that trend.

A
move to the ATmega32U4 means new features, but brings some compatibility issues
The Arduino's USB connection - and
associated serial connection - now resets itself when the main processor
resets, which can cause problems if a program listening to the serial port
isn't programmed to reconnect following a connection reset. Sketches -
Arduino-speak for programs written with the boards in mind - also no longer
restart when a new serial connection is detected.
The biggest change, however, is in the way
that several of the pins operate. While the serial connection was previously
accessible over both the USB connection, and the RX and TX pins on the Arduino
board itself, this is no longer the case: the USB connection is now addressed
as Serial, while the physical pins are addressed as Serial1. Sketches that
expect to address the physical pins will need to be rewritten, and they'll lose
compatibility with previous Arduino models in the process. Meanwhile, the
process of creating designs that rely on simultaneous USB and physical serial
port access has become much more complicated.
Certain shields-add-on boards that
piggyback onto the Arduino to add features-are also incompatible with the
Leonardo, in particular those based on the Serial Peripheral Interconnect (SPI)
standard, which is now only available via the 6-pin In-System Programmer (ISP)
header at the end of the board.

Most
shields work with the Leonardo, but some SPI-based shields are incompatible
Another backwards step for the Leonardo is
the amount of flash memory available for the uploading sketches or storing of
data. While the ATmega32U4 has the same32KB flash region as the Uno's
ATmega328PU, the new keyboard and mouse emulation features and USB-to-serial
conversion takes its toll in the size of the bootloader-4KB compared to just
0.5KB on the Uno. As a result, sketches and data are limited to 28KB before
external storage is required, although if your Arduino sketch compiles to more
than 28KB, you're probably using the wrong tool for the job. However, the new
chip boosts the RAM from 2KB to 2.5KB. The vast majority of shields and sketches
should operate just fine on the Leonardo though.
During testing, we encountered few problems
with the chip's changed feature set. Shields designed for the old Duemilanove
board worked first time, with the exception of a Burnduino flasher board that
requires the ability to remove a socketed microcontroller for pass-through
sketch uploading-something that the surface-mount chip used in the Leonardo
can't offer.
Some older sketches also needed some
rewriting before being fully operational with the Leonardo. In particular,
sketches that used serial communications needed a few delays here and there to
prevent the more efficient new system from flooding the connection and crashing
the Arduino IDE software. Otherwise, however, using the Leonardo with the latest
Arduino lDE release was a sheer joy.
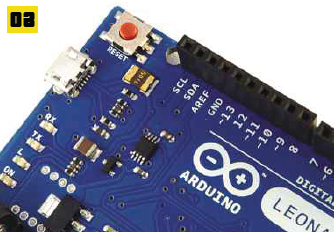
The
Leonardo now uses micro-USB for power and data, rather than mini-USB
Conclusion
Of course, the main reason to recommend the
Arduino Leonardo is the price. Switching to a new chip may have introduced a
few compatibility problems, but it's added plenty of exciting new features to
make up for that, while removing one of the board's most expensive components
has reduced the bill of materials.
This is reflected in the price. While the
Arduino Uno costs $33, the Leonardo sells for just $28.5. Although still priced
way above less beginner-friendly microcontroller prototyping systems such as
Texas Instruments' remarkable $7.5 MSP430 LaunchPad and Arduino-compatible
clones such as Oomlout's $17.5 Breadboard Arduino Compatible Kit, it's a great
price for an official Arduino board.
Price aside, the Leonardo is a madder’s
dream. Thanks to its keyboard emulation capabilities, you can set up the
Leonardo to control a PC without writing any back-end code - this was only
possible through a great deal of effort using the Uno and prior models.
Whether it's worth upgrading from an
existing Arduino or compatible board depends on the individual project. If the
new human interface device emulation sounds tempting, it's a small price to
pay. However, if you're already stretching the limits of the Arduino's 32KB of
flash memory, the Leonardo's bulky 4KB boot loader may rule it out.
Look out for next month's issue, in which
we'll show you how to use this $28.5 board to create a temperature- sensitive
lighting system for your PC.
Pros and
cons
Da Vinci: Cheap; keyboard and mouse
emulation is handy; 12 analogue inputs
Da Vinci code: Some compatibility problems
with Uno-based sketches
How
much?
Price: $28.5 inc VAT
In
detail
Microcontroller: Atmel ATmega32U4
RAM: 2.5KB
Flash: 32KB (28KB available to Arduino
IDE)
EEPROM: 1KB
Clock speed: 16MHz
Operating voltage: 5V (input 6-20V)
Size (mm): 68.6 x 53.3
PC connectivity: Micro-USB, ISP or SPI
UART Serial
Pins: 20, including 12 analogue inputs, 7
PWM outputs
Extras: Stickers
Scores
Features: 36/40
Flexibility: 25/30
Value: 29/30
Overall: 90%
|