Compatibility and Installation
It is good when there is less CPU coolers
having limited compatibility with one foundation current, and there are no such
coolers in the top segment that Black Edition belongs. However, the latest
models can be installed on any morden foundations without any exceptions.
Guidelines of installation can be downloaded from official website. We will
introduce them quickly by using using our experiment on LGA2011 CPU
All of the procedures cross through four
simple steps. First of all, you insert two-side pins into the mounting holes of
socket.

Picture
of installing procedures
Then you install safely two steels on them.

Picture
of installing procedures
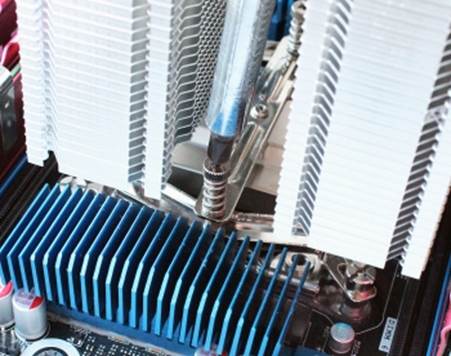
In the third step, you install heatsink as
in the guidelines.
Picture
of installing procedures
Don’t forget insert a little thermal glue
in CPU in advance. Finally, you just attach fans with wire frame on cooler. The
fans are connected with motherboard by a Y-shaped splitter. It has done.
Distance between the bottoms of cooler with
motherboard is 50 mm, but some fans are a bit lower, reducing that figure by
5-7 mm.
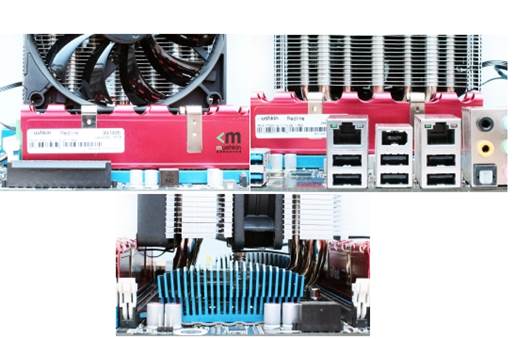
When
it is done
As you can see, GELID Black Edition can
contrast with RAM memory with high heatsink installed in the closest slots.
Here are the pictures of our new cooler
when looked into the system:

When
installed into the computer
Configuration and Testing methodology
We test all coolers inside a closed case
with these specifications below:
·
Motherboard: Intel Sliler DX79SI (Intel X79
Express, LGA 2011, BIOS 0537 from 07/23/2012);
·
CPU: Intel Core i7-3960X Extreme Edition, 3.3
GHz, 1.2 V, 6x256 KB L2, 15 MB L3 (Sandy Bridge-E, C1, 32 nm)
·
Heatsink surface: ARCTIC MX-4;
·
Graphics card: Gigabyte GeForce GTX 650 Ti 2 GB
(GV-N65TOC-2GI);
·
System memory: DDR3 4x4GB Mushkin Redline (Spec:
2133 MHz/ 9-11-10-28/ 1.65 V);
·
System hardware: Crucial m4 256 GB SSD;
·
Drive for programs and games: Western Digital
VelociRaptor (300GB, SATA-II, 10000 RPM, 16MB cache, NCQ) inside Scythe Quiet
Drive 3.5’’ HDD silencer and cooler;
·
Backup drive: Samsung Ecogreen F4 HD204UI
?(SATA-II, 2 TB, 5400 RPM, 32 MB, NCQ);
·
Case: Antec Twelvw Hundred (front: three
Noiseblocker NB-Multiframe S-Series MF 12-S2 fans with speed of 1020 RPM;
behind: two Noiseblocker NB-BlackSilent PRO PL-1 fans with speed of 1020 RPM;
top: standard 200 mm fan with speed of 400 RPM);
·
Control panel: Zalman ZM-MFC3;
·
Source: Seasonic SS-1000XP Active PFC F13 1000 W
(with default 120 mm fan);
To prepare for today’s test, we has
overclocked the six-core processor with operating speed of clock set at 125 MHz,
multiple at 34x and allowed “Load line calibration” at 4.375 GHz. Nominal Vcore
of processor was increased up to 1.385 V in BIOS of motherboard. “Turbo Boost”
technology was disabled during testing, and Hyper-Threading technology was used
to increase the thermal process. Monory voltage was in 1.65 V and its frequency
was 2,000 MHz with timing parameters were 9-11-10-28. All other parameters are
available as in BIOS of motherboard and concerned to overcloking process of CPU
or unchanged memory.
All tests were conducted in Windows 7
Ultimate x64 SP1 operating system. We used the following softwares for the
tests:
·
LinX AVX Edition version 0.6.4 – to open the
processor (memory - 4500 MB, Problem Size -24234, two 11-minute rounds);
·
Real Temp GT version 3.70 – to control
temperature of core of processor;
·
Intel Extreme Tuning Utility version 3.1.201.5 –
to control and observe parameters of system during overclocking process.
So, the complete
image during testing looked like as following:

Image
of testing progress
CPU was opened by LinX AVX twice
continuously with setting parametes as above. The time that temperature of CPU
was stable between 2 tests was 8-10 minutes. We used the highest temperature of
CPU’s core to put on result chart. Moreover, we also gave a diagram of
temperature indexes for all cores including their average indexes. Around
temperatures were checked through case by electric themormeters with the
accuracy of 0.10C allowing to keep track of hourly the change of
temperature during 6 hours. Room temperature during the test fluctuated from
24.0 to 24.2oC.
Noise level of cooler was measured from
1:00 to 3:00 AM in a 20-square-meter closed room by using CENTER-321 electronic
noise meter. Noise level of each cooler was tested outside system case when the
main noise sources in the body part were cooler and its fans. Noise meter was
installed on a tripod, and 150mm far from rotor of the fans. Tested cooling
system was put right on the table edge on the polyurethane paper. The lowest
noise parameters that the clock can read was 29.8 dBA and subjectively the
noise level in this experiment condition was 36 dBA (do not mix up with low
noise level). Rotor speed was adjusted in whole allowed level of inhouse
controller by changing voltage with 0.5 V.
Accounting to MSRP of GELID The Black
Edition cooler costs $75.00, we decided to not unhinge every thing, and just
simply compared it to the best current coolers - Phanteks PH-TC14PE (MSRP $
75.00), with two default Phanteks PH-F140 mm fans replaced by Corsair AF140
quite fans:

Phanteks
PH-TC14PE

Phanteks
PH-TC14PE and thermal glue
As we mentioned before, this innovation did
not affect cooling performance, as we indicated in our previous review, but it
reduced considerably level of noise. However, we also consisted of results of
Phanteks coolers in its default structure. I want to say something more that
rotation speed of all fans was controlled by our set of inhousing controller
with ± 10 RPM accuracy and 200 RPM increments.