iPhoto for iOS is one of the most powerful
photo-editing apps available for the iPhone and iPad, writes ALEXANDRA CHANG

iPhoto
is one of the most packed and powerful iOS photo apps out there
Half the fun of iPhone photography (also
known as iPhoneography) is editing your photos in various photo apps. And with
iPhoto for the iPhone and iPad, users have a great all-in-one photo-editing
tool at their fingertips.
iPhoto is one of the most packed and
powerful iOS photo apps out there, so there’s a slight learning curve when
you’re using it to spruce up your photos. Here’s how to use some of the app’s
tools to make basic edits. Instructions are based on the iPad version of iPhoto
for iOS, but it’s easy to extrapolate the same techniques to the iPhone 4 or
4S.
Navigate the edit toolbar
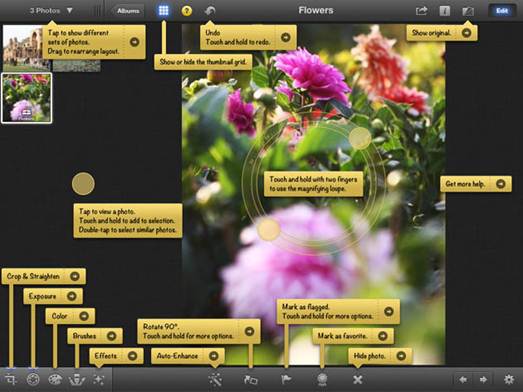
Tap
the Help icon to see tips for all controls
To enter Edit mode, tap the Edit button in
the top right corner while viewing a photo. An editing toolbar appears on the
bottom of the screen. To remove the thumbnails and get a full-screen view of
the image you’re editing, tap the thumbnail icon (which looks like a grid) in
the top left corner. This makes the screen less cluttered so you have more
space to work.
All of the tools you need to make basic
edits are in the editing toolbar below your photo. In the center, you find
basic editing tools and a few buttons that allow you to label your photos for
organizational purposes.
On the left of the toolbar are iPhoto’s
Multi-Touch editing tools. You can crop and straighten photos, adjust exposure,
change color balance and more. These tools are organized in an intuitive order.
When you tap a tool, the middle of the
editing menu changes depending on what tool you select. For instance, if you
tap the Crop & Straighten button, you’ll see a dial that you can tap and
drag to straighten your photo interactively.
After you apply an edit, a blue glow
appears above that tool, showing that you’ve used it to make an edit. To go
back to the original editing menu, double-tap the button of the tool you’re
currently using.
At any point, you can tap the gear icon in
the lower right corner to adjust tool settings. When you’re not using a
specific tool, you can tap the gear icon to find the following controls: Select
Multiple; Copy Exposure, Color And Effect; Paste Exposure; Color And Effect;
and Revert To Original. If you forget what a certain iPhoto button does, tap
the Help button (the question mark in the main menu at the top left) at any
point and the app reveals labels and tool instructions.
Quick fixes
Most photos don’t need heavy editing before
you can share them with others, post them to Instagram or use them in an iPhoto
journal. The fastest way to give your photo an all-over edit is to use the
tools available in the middle of the editing toolbar. iPhoto for iOS features
two quick-fix edits: Rotate and Auto-Enhance.

Auto-Enhance
lets the app do all of the editing magic
Rotate does exactly what its name states:
It rotates your image in 90-degree increments. By default, the Rotate tool
turns your photo clockwise. To rotate your photo counterclockwise, tap and hold
the Rotate button until a menu opens and then tap Rotate Counter-Clockwise.
This changes the default rotation to counterclockwise.
Auto-Enhance lets the app do all of the
editing magic. Tapping the button automatically adjusts the exposure and colors
of your image. Most of the time the results are great. But if you don’t like
what Auto-Enhance has done, you can always tap the Undo button in the top
(main) menu. To see exactly what iPhoto has done, tap the Exposure and Colors
tools (using Auto-Enhance makes the buttons on both of these tools glow blue).