Drag
the dial left or right with your finger to straighten the image and then crop
or make other edits to the photo
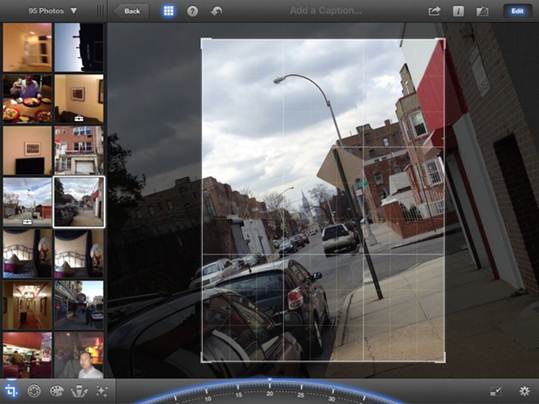
When you use the Crop & Straighten
tool, you’ll see a straighten dial at the bottom and a grid overlay for
applying the rule of thirds.
You can crop and straighten your photo with
Multi-Touch gestures, using the Crop & Straighten tool on the far left of
the editing toolbar. When you launch the tool, a dial appears in the centre of the
toolbar. Swipe left or right to straighten a photo. You can also activate your
iOS device’s gyroscope by tapping the dial and then straighten your photo by
rotating your device. To crop an image, use the pinch-to-zoom gesture.
Adjust exposure
If you used the Auto-Enhance tool but
aren’t totally satisfied with the results, you can make changes by going to the
Exposure tool in the editing menu. This tool lets you adjust shadows, contrast,
brightness and highlights.
When you tap the Exposure button, a slider
appears in the middle of the toolbar. There are two ways to adjust the image:
You can use Multi-Touch gestures directly on the image or you can adjust using
the slider.
Tap and hold on an area of your image and
the corresponding exposure controls appear. For instance, if you tap and hold
on a shadow part of your image, you’ll see arrows pointing up and down for
adjusting contrast. Swipe your finger up and down or left and right, to adjust
these controls.
It’s often hard to find the exact spot in a
photo that will reveal specific controls when you’re using Multi-Touch
gestures. This is where the slider can be of more help.
You can adjust highlights just by sliding
the far right control to the left or right. Moving the slider more to the left
darkens the highlights in your photo. Sliding the contrast circles further away
from each other creates more contrast. Sliding the brightness control more to
the right makes your photo brighter. And sliding the shadows control to the
right lightens the shadows in your photo.
The right color
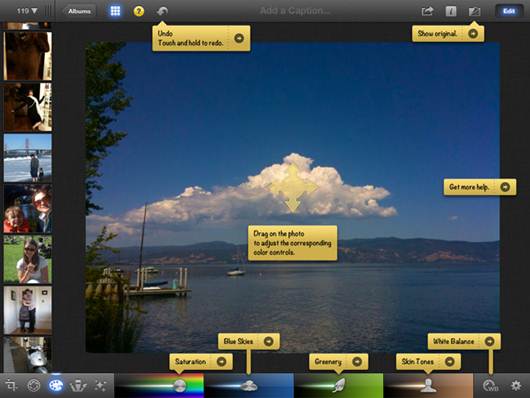
Drag
on the icon horizontally to adjust hue, vertically for saturation
The Color tool makes it possible to adjust
the color balance in your photo. As with the Exposure tool, you can alter the color
by using Multi-Touch gestures or by simply sliding the four sliders –
Saturation, Blue Skies, Greenery and Warmth – in the editing menu. For basic
edits, Saturation is probably the only adjustment you need to make.
You can change the white balance of your
photo with the White Balance button. Once you tap that button, nine icons
appear, each representing a different lighting environment. The first option is
to keep the photo’s original white balance. Other options are Sun, Cloudy,
Flash, Shade, Incandescent, Fluorescent, Face Balance and Custom.
The latter brings up a magnifying loupe
that lets you select a part of the photo that should be while or neutral grey,
and the app adjusts the rest of the color accordingly. Under the Gear icon, you
can switch the Preserve Skin Tones button on or off to adjust colors without
affecting skin tones.
View the result
Once you’ve made basic edits and are
satisfied with the results, you can exit Edit mode by tapping the Edit button
at the top right. The editing toolbar disappears and you’re back in Viewing mode,
with your newly edited photo on the screen.