Bypass Phone Activation
If you’re like many Android users, you’ve
built up a collection of older Android phones. You could pass them on to family
or friends. You could resell them. Or you could continue to use them, without
paying for a phone plan.
We’re not suggesting some nefarious scheme
that will let you make free phone calls. Instead, we’re suggesting that you
dedicate a cast-off phone to one of its many other functions. Use the apps you
have loaded on it, use it as a music player, or use it for Internet access if
it has Wi-Fi capabilities.

If
you’re like many Android users, you’ve built up a collection of older Android
phones.
You probably don’t want the phone to be
active on your account. The easiest way to deal with that issue is to reset the
phone to factory conditions. There’s only one little problem. Once you perform
the reset, every time you turn on the phone it will prompt you to activate it,
preventing you from accessing any other capabilities the phone may have.
Fortunately, the fix is simple, if
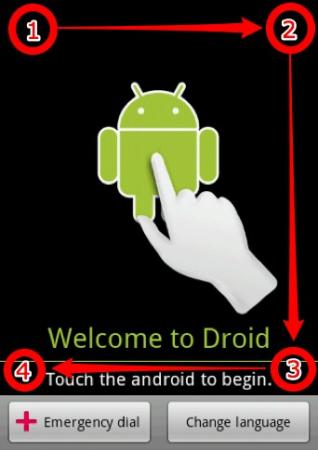
temporary. When you see the activation screen, instead of tapping the Android
icon to begin the activation process, follow these steps: Tap the top left
corner. Tap the top right corner. Tap the bottom right corner. Tap the bottom
left corner.
When you tap the corners in the proper
sequence, you’ll bypass the activation phase. You can then use the phone for
anything that doesn’t require a cellular or data plan.
The activation bypass isn’t permanent, so
every time you power on the phone, you’ll have to perform the corner tapping
routine to bypass the activation process, but it’s a small price to pay to get
extra mileage out of an old phone.
Blackberry
Control Roaming Costs
Roaming, the ability of a phone to stay
connected even when you’re outside of the service area offered by your mobile
provider is a handy option but it can also be an expensive one. In many cases,
roaming can incur additional costs, especially if you use data services when
you’re outside of your carrier’s coverage area.

In
many cases, roaming can incur additional costs, especially if you use data
services when you’re outside of your carrier’s coverage area.
You can control the services that are
available when you’re roaming, and either have your BlackBerry turn data
services off automatically or ask you what to do when you start roaming.
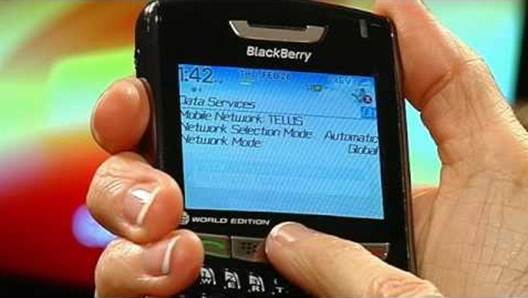
From your BlackBerry’s Home screen, select
Manage Connections. Select Networks And Connections, and then select Mobile
Network. In the While Roaming field, turn data services on or off. If you want
your phone to ask you what to do when you start roaming, select the Prompt
option in the While Roaming field. Press the Menu key, and select Close to save
your settings.
Battery Saving Mode
BlackBerry OS 7.1 added a handy feature
that benefits everyone. Battery Saving Mode works by monitoring your
BlackBerry’s battery. When the battery reaches a user-defined threshold, such
as 30% remaining, Battery Saving Mode automatically invokes battery saving
features, such as dimming the screen or turning off the screen sooner than
usual.
To enable this handy feature, select
Options, Devices, and Battery Saving Mode. Tap to toggle between disable and
enable.
iOS
Use Custom
Vibrations To Identify Callers Setting your
iPhone to vibrate is the considerate thing to do when you’re in an environment
where ringtones would be distracting or disruptive. But in doing so, you lose
any unique ringtones you may have set up to identify certain callers.
That doesn’t have to be the case. Your
iPhone allows you to set up custom vibration patterns keyed to your contact
list. To turn on this feature, open Settings and tap General. Scroll down and
select Accessibility. Scroll down and tap to turn on Custom Vibrations. With
Custom Vibrations enabled, you can turn to your Contacts app to set the
vibration pattern to use for selected individuals.

Locate an individual in the Contacts app.
Tap the Edit button and scroll until you see Vibrations. You will find a list
of standard vibrations you can assign by tapping them. You can also create a
new vibration pattern by tap-ping Create New Vibration. To record your new
vibration, simply start tap-ping the iPhone’s screen with the pat-tern you want
to use. When you’re happy with the pattern, tap the Stop button. You’ll be
asked to give the new pattern a name. Once it has a name, the pattern will be
added to the list of available vibrations and automatically assigned to the
individual you were editing. You can repeat this process for any additional
contacts for whom you want to assign custom vibrations.
Disable Push Email For Better Battery
Life
Push email may be one of the most overrated
technologies around; it also sucks the life out of batteries. Having your
iPhone constantly waiting for in-coming messages can quickly deplete your
battery. Turn the Push service off and set your iPhone to check for email at
scheduled intervals instead. You can even set email to manual if you want the
best battery performance.
Tap Settings, Mail, Contacts, Calendars.
Select Fetch New Data. In the Push section of the display, tap the button to
the Off position. In the Fetch section of the display, tap the time period you
would like to use: 15 minutes, 30 minutes, every hour, or manually.
Manage Location Services For Security
And Battery Life
Your iPhone is happy to keep tabs on you,
remembering your location at all times. Location services are useful for many
reasons, including using the Maps app to find out where you are and how to get
to where you want to go. Location services can also bail you out when you
realize you’ve misplaced your iPhone, and you need to figure out where you left
it.
But location services have a dark side.
Having a device keep track of our location is a security concern for many of
us. And don’t forget that the phone uses Wi-Fi, GPS, and cell towers to
pinpoint your location; that’s a lot of drag on your battery just to help you
find the nearest pizzeria.
If you want to curtail the iPhone’s ability
to track your movements, you can simply turn off location services. This will
also boost your battery’s run time. Tap Settings and then Location Services.
Tap the On/Off button to toggle the service to Off.
There is another, perhaps better
alternative to managing location services than turning the feature off
entirely. You can control which apps are al-lowed to use the service instead.
This may not save much in the way of battery life, but it does let you get a
handle on the security side of the issue.
Tap Settings and then Location Services.
Below the Location Services On/Off switch is a list of apps that can use
location services. Each app will have its own On/Off toggle switch that
controls the app’s access rights to location services. Tap the toggle switch to
enable or disable the ability of an app to use location services.
For the extra-security-conscious among us,
you can also control what system functions can use location services. Tap
Settings, Location Services, System Services. Just like the apps list, you will
see a list of system services that use location services. Toggle off any
services that you don’t want to access your location information.
Windows Phone
Add Web Page Bookmarks
To Your Start Menu Windows Phone 7 has a
handy feature that lets you pin items to the Start menu, similar to pinning
items to your desktop computer’s Start menu. What seems to have escaped the notice
of many Windows Phone 7 users is that you’re not limited to adding apps to the
Start menu; you can also add URLs.
If you routinely visit certain web-sites,
it can be a lot easier to get there from the Start menu than to launch your
browser and then select the links from your browser bookmarks.

What
seems to have escaped the notice of many Windows Phone 7 users is that you’re
not limited to adding apps to the Start menu; you can also add URLs.
To add a Web page to the Start menu, launch
your browser and navigate to the Web page you wish to add. Drag the menu into
view by using the ellipses (. . .), and select the Pin To Start option. You can
give the Web page a name or use the name provided.
The next time you access your Start menu,
you’ll find the Web page listed for quick access.
Conserve Battery Power Automatically
In the Mango update for Windows Phone 7,
Microsoft added an improved battery management system. Whenever your battery
gets low, you’ll be asked if you want to enter a special battery saver mode.
But what if you don’t see the message?
That’s okay, because you can configure your Windows Phone de-vice to always
enter battery saver mode, without asking you each time. Select Start, Settings.
Select Battery Save. Place a checkmark in the “Always turn on battery save when
battery is low” box.
Whenever your battery meter gets down to
the last bar, your phone will stop automatically checking for email, stop
updating live tiles, and disable background apps.