MOBILE

Create The Ultimate Tracking Device (Part 3) - Getting the most from Google Latitude

10/15/2012 2:31:50 PM

1.    Log in everywhere

Google Latitude comes with every Android phone and tablet, as it ships in the same package as Google Maps. Interestingly, you can also use Google Latitude from your desktop – log into your Google account at www.googlr.com/latitude - although recording your location from your desktop can be a little inaccurate.

Description: Log in everywhere

2.    Starting out

When you first run Google Latitude, you’re presented with a list of friends who you could your location with – anyone in your friends list who has a Google account. Find someone who you want to share your location with, and hit the “+person” icon next to their name, or remove them from your list by hitting the big red “x”


Description: Starting out

3.    Find yourself

Check that your location has been picked up correctly. If you’re on a phone, select the Latitude icon in the top-left and select “Map” from the drop-down list. This displays your Google avatar on top of the Google map. The blue circle surrounding your location is the margin of error of your location, which can be quite large for Wi-Fi positioning.

Description: Find yourself

4.    Active member

Tap the icon for your avatar, then select the tag about it. You’re presented with a list of actions you can make from your location. Selection “Check in” to set your location to a shop, restaurant or other such establishment – you’re presented with a list of possibilities. This is particularly useful if you’re meeting up with family and friends.
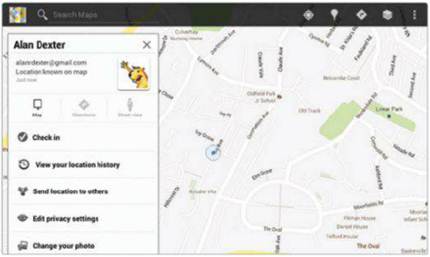
Description: Active member

5.    History repeating itself

The next option gives you the chance to “View your location history”. If it’s the first time you’ve selected the option, you’re taken to a screen where you can “Enable location history.” This isn’t something other people can see, it’s purely for your own information, but enabling it can give you some interesting stats on how you spend your time.

Description: History repeating itself

6.    Share alike

The final action of interest enables you to “Send location to others,” which is useful if you’re trying to meet up with people who aren’t on Latitude, using Bluetooth, Gmail or Facebook (the Bluetooth option seems a little odd in this context). The resultant email or post contains a link to Google Maps and your location.

Description: Share alike

Other  
 
Most View
How Hackable Are You?
The New 19" LED TV From AOC - Almost Life Like
Windows 7 : Programming KMDF Hardware Driver - Support Device Interrupts (part 2) - Post-Interrupt Enable and Pre-Interrupt Disable Processing
Nikon Coolpix A – An Appealing Camera For Sharp Images (Part 2)
Ultimate Guide To Nexus (Part 1)
Choosing The Right Components (Part 2)
Business Connectivity Services in SharePoint 2013 : Adding a Business Data Connectivity Model to Office 365 SharePoint Online
Linux vs Windows 8 (Part 2)
Apple iPhone 5 - The World’s Best Smartphone? (Part 1)
Big Data & Storage (Part 1)
Top 10
Microsoft Exchange Server 2010 : Configuring Anti-Spam and Message Filtering Options (part 4) - Preventing Internal Servers from Being Filtered
Microsoft Exchange Server 2010 : Configuring Anti-Spam and Message Filtering Options (part 3) - Defining Block List Exceptions and Global Allow/Block Lists
Microsoft Exchange Server 2010 : Configuring Anti-Spam and Message Filtering Options (part 2) - Filtering Connections with IP Block Lists
Microsoft Exchange Server 2010 : Configuring Anti-Spam and Message Filtering Options (part 1) - Filtering Spam and Other Unwanted E-Mail by Sender, Filtering Spam and Other Unwanted E-Mail by Recipien
Microsoft Exchange Server 2010 : Creating and Managing Remote Domains (part 3) - Configuring Messaging Options for Remote Domains , Removing Remote Domains
Microsoft Exchange Server 2010 : Creating and Managing Remote Domains (part 2) - Creating Remote Domains
Microsoft Exchange Server 2010 : Creating and Managing Remote Domains (part 1) - Viewing Remote Domains
Microsoft Exchange Server 2010 : Creating and Managing E-Mail Address Policies (part 3) - Editing and Applying E-Mail Address Policies , Removing E-Mail Address Policies
Microsoft Exchange Server 2010 : Creating and Managing E-Mail Address Policies (part 2) - Creating E-Mail Address Policies
Microsoft Exchange Server 2010 : Creating and Managing E-Mail Address Policies (part 1) - Viewing E-Mail Address Policies