What you’ll need: Photoshop Elements 9 or above
What you’ll learn: How to convert a colour image to black and white, and then apply
brush tips to Layer Masks to selectively reveal colours from specific areas
It only takes: 30 minutes

Keep
selective colour in mono conversions
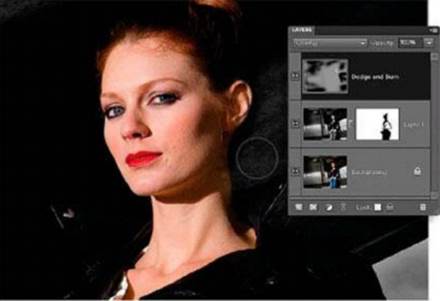
When taking photographs in certain lighting
conditions, such as on a dull, overcast day, your location’s colours may be
less than striking in your final image. In our start image, for example, a
burst of flash has brought out the colours of our model’s clothing, make-up and
skin tones, but the rest of the shot’s colours are rather drab and desaturated.
The location’s flat-lit colours - like the boring brown brickwork in the
background - may be weaker, but they still distract the eye from our main
subject. There is a solution.
In this walkthrough we’ll show you how to
use Photoshop Elements to desaturate the shot’s weaker (and largely irrelevant)
background colours to create a more moody monochrome urban scene. You’ll then
discover how to apply brush strokes to a Layer Mask to restore the model’s
vibrant colours so that she stands out more effectively against the monochrome
environment. By making selective colour adjustments in this way you can emphasise
the shot’s strengths such as the attractive colours of the flash-lit model
while desaturating the location’s weaker colours.
We’ll also show you how to make selective
tonal adjustments so that the brighter model stands out even more against the
darker background. By using the Burn tool to darken specific tones you can also
hide some of the room’s busy and distracting details and add a sense of mood
and mystery to the simplified scene.
To add a gritty texture to our urban
location we’ll also demonstrate how to use filters, layers and Blending Modes
to give our clean, digitally-sourced start image a film-style grain. This
analogue look helps make the shot look more ‘street’!
1. Open the start file

Open
the start file
Click on the link (below) to download the
Basic folder. Go to File>Open, browse to selective_start. jpg and click
Open. The photo will open in Photoshop Elements' Full Edit workspace. Go to
Window>Layers to make the Layers palette visible, then click on the
Background layer and press Cmd/Ctrl+J to duplicate it.
2. Make it mono

Make
it mono
In the Layers palette, click on the new
Layer 1 thumbnail. Go to Enhance>Remove Colour. This creates a
black-and-white version of the image. To reveal some of the girl's colours from
the Background layer below, click on the Add Layer Mask icon at the bottom of
the Layers palette.
3. Brush tool options

Brush
tool options
Use the Zoom tool to get a closer look at
the model's face. Choose the Brush tool, then click on the Brush Preset picker
at the left of the options bar and choose a soft round tip with a Size of 100
pixels. Click on Layer 1’s white mask. Press X to toggle the Tools palette's
foreground colour to black.
4. Paint on the mask

Paint
on the mask
Spray the black brush on the white mask to
poke a hole through the monochrome layer and reveal the girl's colours on the
Background layer below. If you reveal unwanted background colours by mistake,
press X to toggle to a white foreground colour and spray to restore these areas
to monochrome.
5. Re-colour the girl

Re-colour
the girl
Keep spraying a black brush over the model
to reveal her skin and clothing colours - don't worn/ too much about editing
all of her jacket, because it only has a hint of colour in the leather's shiny
specular highlights. Using this technique you can restore the rest of the model
to full colour.
6.
Fill with grey

Fill
with grey
Choose Layer>New>Layer. In the New Layer
window's Name field, type 'Dodge and Burn'. Click OK. This creates a new
transparent layer called Dodge and Burn. Go to Edit>Fill Layer. Select 50%
Grey and then click OK. Set the Dodge and Burn layer's Blending Mode to
Overlay.
7. Darken the shadows

Darken
the shadows
Choose the Burn tool from the Tools
palette. Grab a soft-edged tip from the Brush Preset Picker and set the Size
option to 600. Set Range to Shadows and drop Exposure to 15%. Spray around the
edges of the frame to darken the shadows and hide the interior's distracting
architectural details.
8. Add drama

Add
drama
To tease out more detail in the clouds, set
the Burn tool's Range option to Midtones. Keep the Exposure option set to 15%
so you can edit the clouds in gentle and controllable increments. Spray the
Burn tool over the clouds to darken the midtones and make the cloud texture
look more prominent.
9. Lighten the midtones
Lighten
the midtones
The girl's dark jacket blends too much with
the shadows, so to help her stand out from the background choose the Dodge tool
from the Tools palette. Set Size to 125 and Range to Midtones. Keep Exposure at
15%. Spray behind her head and jacket collar to lighten the midtones of the
roof a little.
10.
Copy and Paste a mask
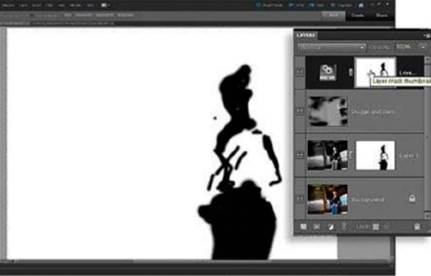
Copy
and Paste a mask
Choose Layer>New>Adjustment
Layer>Levels. Click OK. Alt-click on Layer 1's mask to see the girl-shaped
black brush strokes you created in step 4. Choose Select>AII then
Edit>Copy. Click on the Levels Adjustment Layer's mask and choose
Edit>Paste to add the same brush strokes to the new mask.