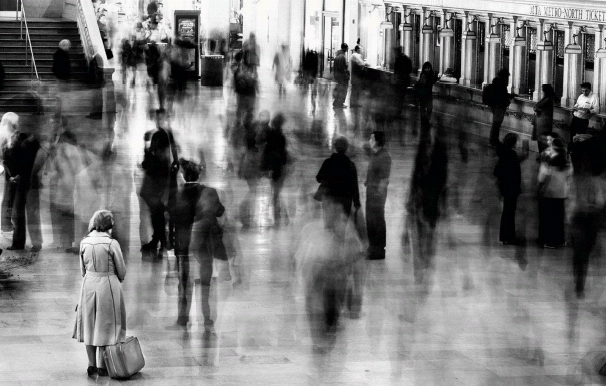
Use slow shutter speeds to freeze a moment
in time.
Street photographer James Maher took this
shot in the Grand Central Terminal, New York, from a high perspective. "I
wanted to get a shot with a solitary person stood amidst a fast-moving sea of
travellers, and Grand Central seemed the perfect place," he says.
"Technically, it was an easy shot to set up. The camera was mounted on a
tripod and I experimented to find that a shutter speed of six seconds was
perfect for capturing motion in the crowd. I set the aperture to f/8, which
created enough depth of field for the entire shot to be sharp. The ISO was set
to 100."

Capture
the hustle and bustle of a railway station using slow shutter speeds to create
motion blur.
James found the secret to getting this shot
was patience. "I stood there for about half an hour until the woman parked
herself in the right spot. She didn't move an inch for a couple of minutes, so
I could shoot continuously until she left. Then I could pick the final shot
with the best crowd movement. I took about 15 to 20 captures to get this
one."
Get
started today...
Find a good location for your shoot.
Railway stations are perfect for this set-up because there are usually plenty
of people around. However, remember that you may need to seek permission before
you start shooting.
Set up your camera on a tripod and switch
to Manual exposure mode. Set the shutter speed to 6 secs and the aperture to
f/8. Tweak these settings if the lighting conditions vary.
For a classic documentary feel, try using
Photoshop to convert your image to black and white at the editing stage.
5. Factory settings
Capture the beauty of industrial scenes when
night falls.
You can approach shooting an industrial
landscape in a number of ways, but for the very best results when shooting at
night, professional photographer Simon Butterworth says that timing is key.
"There's a window of opportunity after
the sun has set and before the dark creeps in when the sky has a blue tint,"
Simon says. "This is when you want to be taking your industrial landscape
shot. These impressive landmarks are lit up at night and the results you can
get in the right conditions are incredible."

Capture
the beauty of industrial scenes when night falls.
To add another interesting element to his
image, Simon used a slow shutter speed of 15 seconds to blur the gentle
movement of the smoke across the night sky.
Simon packs a variety of lenses so he can
get a range of images from each night shoot. "I like to use a wide-angle
lens to capture the entire scene, but you can use a telephoto zoom lens to get
in close to the structure. You can also take a more abstract approach to this
genre if you want. Just see what works."
To ensure you're getting the most from the
scene, its best to do a recce of the location in the daylight, Simon advises.
"Having patience and perseverance and doing your research thoroughly will
pay off in the end!"
Get
started today...
Choose the location you'd like to shoot.
Power stations, bridges, cranes, boat yards - there are all sorts of industrial
locations you can photograph.
Set up your camera on a tripod and select
the Manual shooting mode. Select a narrow aperture setting of around f/11 to
keep the entire frame sharp from front to back, and try a shutter speed of
around 15 seconds.
Make use of your camera's Mirror Lock-up
function and a remote release in order to minimise any vibrations and obtain
super-sharp results.
6. Take natural mono portraits
Go back to basics to create people shots
that shine.
Professional photographer Robert Wilson
captured this image of his son Tom when on holiday. "Tom had just emerged
from the sea when I got him to pose looking straight at the camera without
smiling," he tells us.

By
taking control of how colours are converted, you can make selected areas stand
out.
Using only the ambient natural light,
Robert set the aperture on his 100mm lens to f/2.8 to blur the background.
"It was later on in the day," Robert remembers. 'The sun had nearly
disappeared, so the light was much flatter."
As for editing advice, Robert recommends
shooting in the raw quality mode. 'That way you can control how you want the
colours to be translated to black and white. For instance, in this portrait of
Tom the blue colour in the image has been kept as a very light tone when
converted to mono. That's why his blue eyes stand out so much."
Get
started today...
Get friends or family to pose for you, but
keep poses relaxed by catching them as they concentrate on another activity,
rather than grinning unnaturally into the lens.
Keep the focus locked on the eyes, because
that's the key to a striking shot like this.