To tie in with our feature, we show you how
to boost tones and add motion blur

Add
blur to rivers and waterfalls
What you’ll need
Photoshop CS3 or above
What you’ll learn
How to process raw files to improve image
detail, use the Smudge tool and filters to blur moving water and confine the
effect with Layer Masks
It only takes
20 minutes
We all have defining moments throughout our
love affair with photography, when it becomes more than just a means for capturing
a scene, when we realize that different combinations of shutter speed and
aperture can open up endless creative possibilities.
For many, the moment you first capture
motion becomes a lasting memory. Whether it’s traffic trails after dark, the
motion of running water, panning with a moving subject, or star trails at
night, capturing motion isn’t just great fun, it’s a key skill serious
photographers should master.
The good news is it’s also fairly easy
grasp, usually requiring just a tripod and a long shutter speed. But achieving
a long shutter speed can be tricky, particularly if you’re shooting in bright
light. Take our scene here. With the camera set to ISO100 and the lens set to
the smallest aperture (f/22), the longest possible shutter speed was 1/20 sec,
which wasn’t nearly slow enough to give the running water an attractive blur.
The ideal solution would be to use polarizer or Neutral Density filter to limit
the light. But if you don’t have a filter, there’s little you can do to record
blurred water.
The answer is to apply the motion blur in
Photoshop. Here, we’ll show you how to make selective adjustments in Adobe
Camera Raw to improve the tones, before using the Smudge tool and filters to
add realistic motion to the water.
1. Open in Adobe Camera Raw
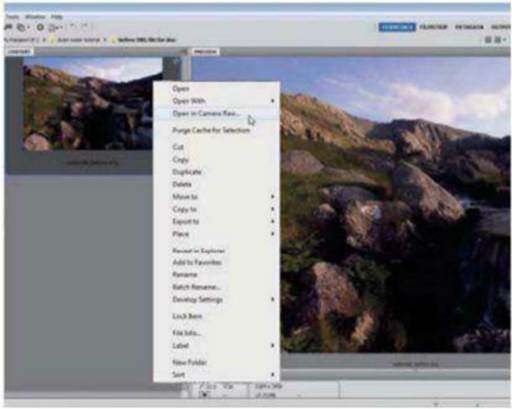
Click on the link (below) download the
Advanced folder. Navigate to waterfall_before.dng in Bridge, then right-click
it and choose ‘Open in Camera Raw’. Although we’re using a raw file here, you
can open JPEGs and TIFFs in ACR in exactly the same way.
2. Improve the tones

Go to the Basic panel and use the sliders
to set Temperature to 6300 and Tint to +29 to warm the colours and remove the
magenta. Next, set Exposure to +1.10, Contrast to +35, Shadows to +46, Whites
to -29, Blacks to +8, Clarity to +18 and Vibrance to +13.
3. Fix noise and sharpening
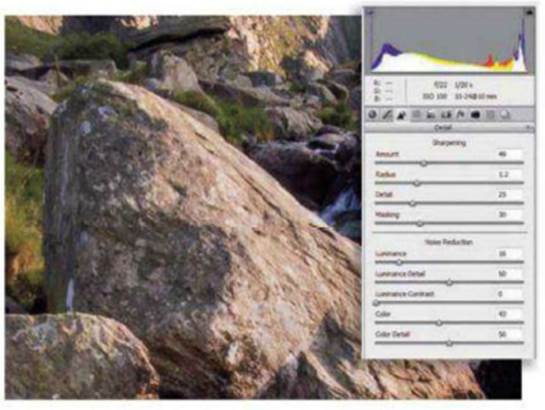
Double-click on the Zoom tool to view the
image at 100%, the click on the Detail panel. Set Sharpening Amount to 48,
Radius to 1.2 and Masking to 30. Next, set Noise Luminace to 16 and Colour to
43. Double-click the Hand tool to zoom black out.
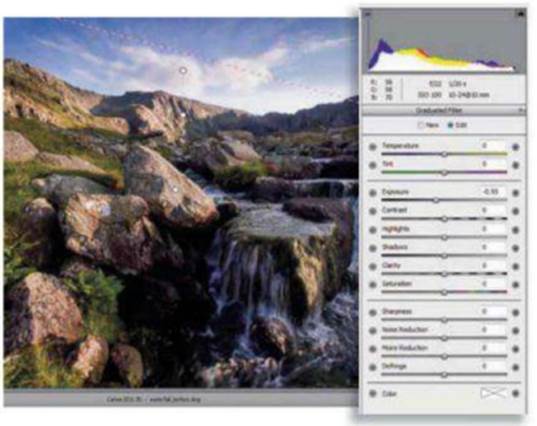
4. Balance the exposure
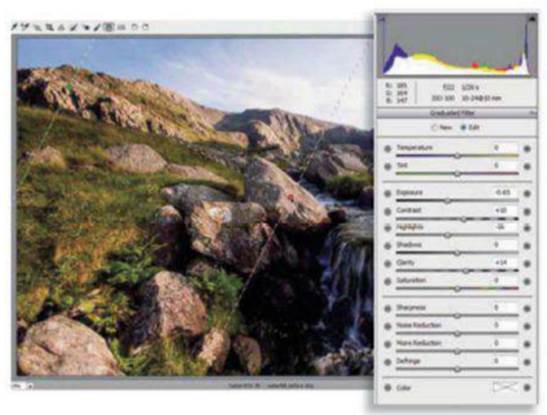
Select the Granduated Filter tool and set
Exposure to -0.65. Drag from near the top-left corner of the image towards the
central rocks to darken the left side. Set Highlights to -16 and Clarity to +14.
Double-click on the other slider to return them to their default values.
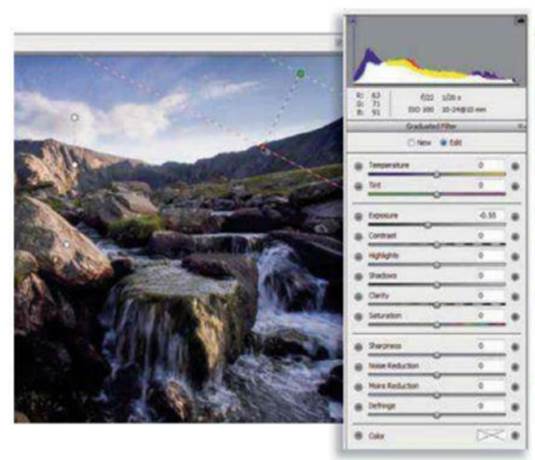
5. Boost the sky
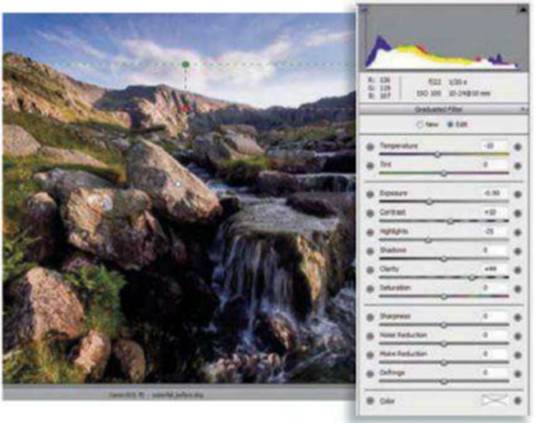
Hold down Shift, then drag another line
from the middle of the sky towards the mountains. Double-click on each tonal
slider to reset them to their default values, then set Temperature to -10,
Exposure to -0.90, Contrast to +10, Highlights to -25 and Clarity to +44.
6. Darken the top-right corner
Drag one more short line from the top-right
corner that’s angled down towards the middle of the image. Double-click all the
sliders again to reset them, then set Exposure to -55. Next, grab the
Adjustment Brush from the toolbar at the top of the interface.
7. Warm the right side
Set Size to 10 and Feather to 100. Click
over the grass on the right of the stream to set a pin. Paint over the area
(check ‘Show Mask’ to see where you’re painted). Reset the sliders to their
defaults, then set Temperature to +22, Clarity to +30 and Saturation to +10.
8. Correct chromatic aberration
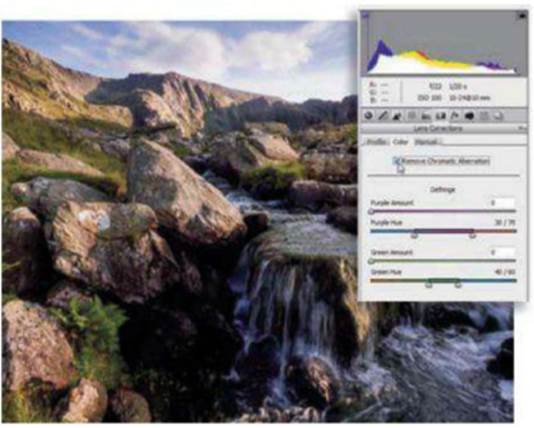
There’s colour fringing in high-contrast
areas, so click back on the Zoom tool to exit the Adjustment Brush settings,
then click on the Lens Correction panel. Check the Remove Chromatic Aberration
box. To finish editing in Camera Raw, click on Open Image.
9. Apply some motion blur
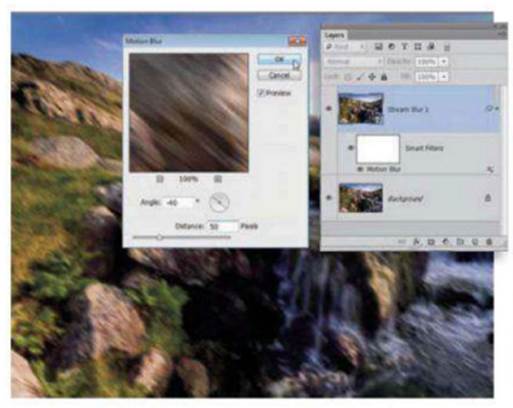
Go to Window>Layers, then then hit
Cmd/Ctrl+J to duplicate the Background layer. Double-click the layer name and
rename it Stream Blur. Right-click the layer and choose Convert to Smart
Object. Go to Filter>Blur>Motion Blur, set Angle to 40 and Distance to
50px.
10. Add a full
mask
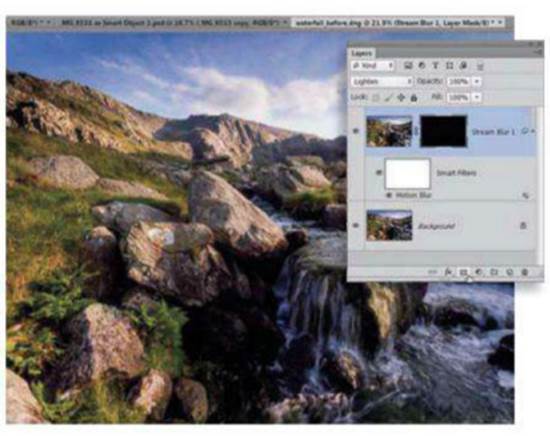
Click on the Blending Mode drop-down at the
top of the Layers palette and choose Lighten. Next, hold Alt and click the Add
Layer Mask icon at the bottom of the Layers palette to add a full black Layer
Mask that completely hides the blurred layer.
11. Paint to reveal
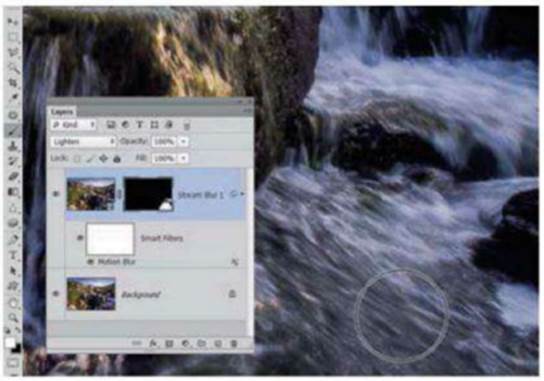
Grab the Brush tool, then click the Brush
Preset picker and choose a soft circular brush tip. Zoom in to the bottom right
corner of the image, then paint with white over the lowest part of the stream
below the waterfall to reveal the blur effect in this area.
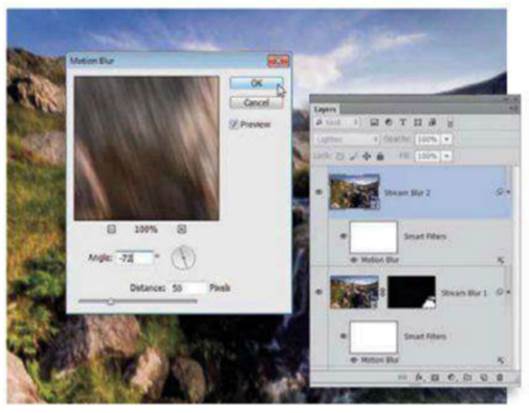
12. Change the
blur angle
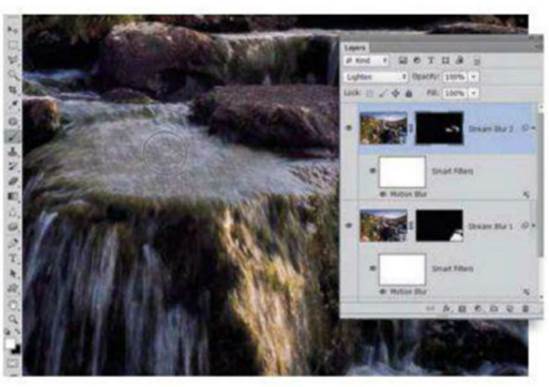
Press Cmd/Ctrl+J to duplicate the Stream
Blur 1 layer and rename it Stream Blur 2, then right-click over the Layer Mask
thumbnail and choose Delete Layer Mask. Double-click the Motion Blur words on
the layer, then change Angle to -72 and hit OK.
13. Reveal
the blur
Hold down the Alt key and click the Add
Layer Mask icon again to add a full mask. Next, grab the Brush tool again and
paint with white over the pool above the waterfall and further up the stream to
reveal the blur effect in those areas.
14. Create a
new layer
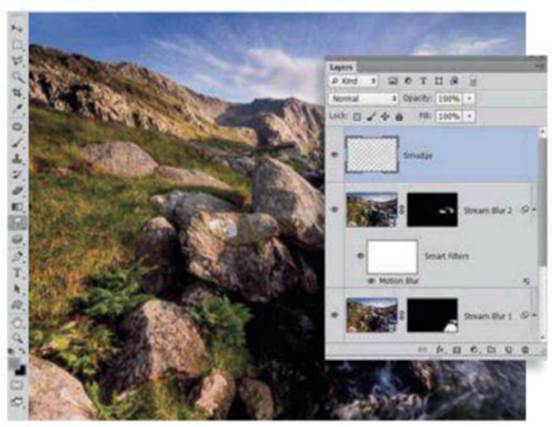
Click the Create New Layer icon at the
bottom right of the Layers palette to add a new layer. Name the layer Smudge,
then grab the Smudge tool. Go to the options bar at the top of the screen,
check Sample All Layers, then set Strength to 20%.
15. Smudge the
water

Zoom in to the waterfall, then paint along
the lines of the water to smudge the tones and lengthen the drops. Build up the
strokes gradually and blur in the direction the water is travelling. If you go
wrong, use the Eraser tool to remove the strokes.
16. Lighten
the smudge
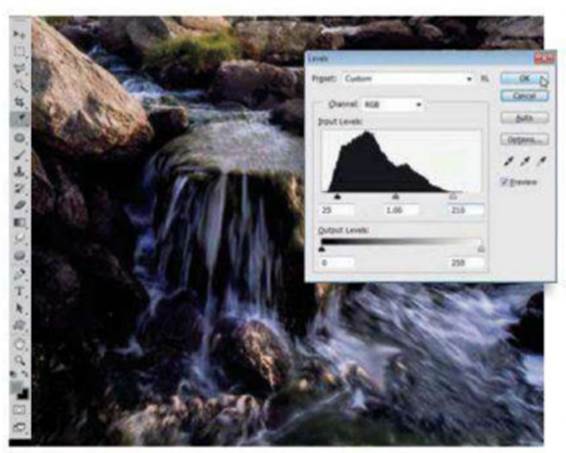
Continue smudging the water along the lines
of spray and make spiraling curls of blur in the pool at the bottom. When
you’re happy with the effect, go to Image>Adjustment>Levels. Set the
white arrow to 210 and the black arrow to 25, then hit OK.
17. Merge a
copy

Set the Blending Mode to Lighten. Press
Cmd/Ctrl+Shift+Alt+E to create a new layer that’s a merged copy of the layers
below it. Rename it Glow. Hit D to reset the colours to black and white.
Right-click the new layer and choose Convert to Smart Object.
18. Glowing
water
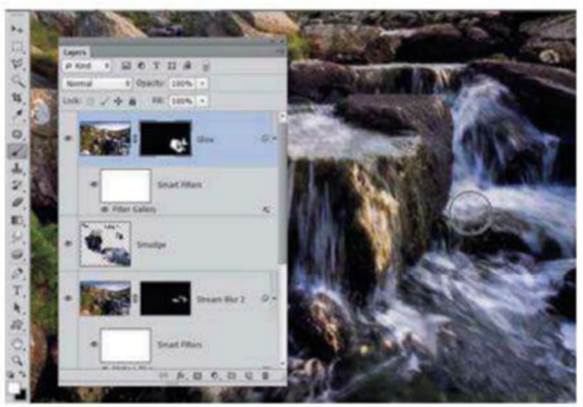
Finally, go to Filter>Filter Gallery.
Select Distort>Diffuse Glow, then set Graininess to 0, Glow Amount to 3,
Clear Amount to 14 and hit OK. Alt-click on the Add Layer Mask icon to mask the
glow, then paint with white to reveal it over the water.
Expert tip
“The Adjustment Brush allows you to Camera
Raw, then use the slides to tweak the tones. Each adjustment is controlled by a
different pin. You can set new pins for different tweaks by checking New, and then
change or remove them at any time. It’s one of the most powerful ways to make
selective adjustments to your raw images”.
Did you know?
Shadow
and Highlights in ACR7
The Shadows and Highlights sliders in Adobe
Camera Raw 7 have replaced the old Recovery and Fill sliders found in earlier
versions. While similar, the new sliders are more powerful. It’s now very easy
to improve tonal range and rescue blow-out highlights or under-exposed details.
Simply hold down Alt while dragging either slider for a temporary greyscale
view of any clipped pixels.
Learn the lingo
The
Smudge tool
The Smudge tool can be found in the Tools
palette alongside the Blur and Sharpen tools. It works by pushing and blending
pixels. The strength setting at the top determines how far pixels can be
pushed. As well as the option to Sample All Layers, there’s also a fun Finger
Painting checkbox at the top of the screen, which loads each brush stroke with
a dab of your current foreground colour.