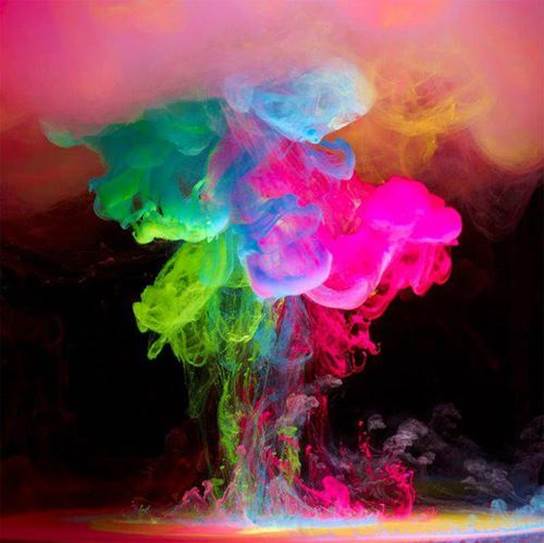
Create an explosion of color
Learn how to capture dramatic
abstract images of food coloring at home, with minimal mess!
Let’s start with a word of warning – this
technique is addictive: once you start it’s difficult to stop. It’s one of
those projects where you can while away the hours on a rainy day, and
appreciate having something fun to do in the warmth and comfort of your home.
With the help of a couple of flashguns, a
fish tank and food coloring, you can capture stunning shots of color exploding
in water. At times, the results are wonderfully abstract, at others you can
identify shapes – but you’ll never end up with the same image twice. It’s very
easy to keep shooting, just to see what happens next. Alongside the fish tank,
you’ll need a lens with a short minimum focusing distance (a dedicated macro
lens is best), a tripod, remote release and at least one flashgun, although two
or three are preferred. You’ll also need wireless triggers or a sync cable to
fire each flash.
It’s
very easy to keep shooting, just to see what happens next
Set-up Set
your camera up on a tripod in front of a surface that you can rets the fish
tank on. Fix a piece of black card or foam board onto the back wall of the tank
and fill it with water. Place one flashgun pointing into the side of the tank,
and your second if available, above the tank and pointing downwards towards
where the drop will land. If you have a third flashgun, place it at the
opposite end of the tank to the first – if not, you can use a reflector or a
piece of white card on the opposite side of the tank to bounce back some of the
light, as I have done here.
In separate pots, mix food coloring with
cream or full0fat milk to achieve the colors that you are happy with. As an
alternative, you could try using ink or acrylic paint, or just the food
coloring by itself, minus the cream – although the clouds of color won’t be as
thick or textured. You can either use pipettes or small syringes to pick up
each color load up two or three colors and you’re good to go.
Exposure Use
manual mode and ISO 100. Choose the maximum sync speed for your camera –
usually between 1/160sec and 1/250sec. Select an aperture between f/16 and f/22
for maximum depth-of-field and set your flashguns to 1/64th power. Submerge a
pencil into the water at the point where the drop will enter and focus the
camera on the pencil before switching to manual focus. Take a test shot and, if
required, increase your flash power until you’re happy with the exposure.
Landscape silhouettes
Photographing silhouettes can be one
of the most rewarding projects to shoot. Follow these pro tips for striking
images
Typical subjects for silhouettes include
trees, people, boats and famous buildings – but anything with a recognizable
outline will do. In fact, even subjects normally considered eyesores could work
well, such as these pylons and cables; their lines and structure actually make
for a very graphic and prominent silhouette. Look for the less obvious subjects
to shoot against the sun and give thought to the following four factors to
produce truly eye-catching results…

Photographing
silhouettes can be one of the most rewarding projects to shoot
Shoot into the light Sunrise and sunset are great times of day to try this technique as
you get the extra benefit of a low sun to shoot against and exquisite color
range. You want to pick or place your subject between you and the sun so the
extreme backlighting renders your subject as a shadow.
Metering and exposure When capturing a silhouette, you want the tones to be darker than
your average scene, and that’s quite easy to do. Start by setting your camera
to aperture-priority mod. Quite often, when it comes to backlit scenes with a
lot of sky, multi-zone metering will do a decent job of underexposing the
subject to a silhouette. But if the subject fills a lot of frame, you may need
to consider dialing in one or two stops of negative exposure compensation to
give it a helping hand. Alternatively, use spot metering and take an exposure
reading from a bright part of the scene as this will force the camera into
underexposure.
Highlight warning Depending on how bright the sunlight is, a DSLR may struggle to
cope with the extreme dynamic range and as a result ‘clip’ highlights, leaving
white areas devoid of detail. Turn on your histogram and its highlight warning
to help you judge the scene. You may need to angle yourself so that the subject
blocks the sun’s orb or wait until the sun drops below the horizon before
taking the shot. Don’t forget your lens hood, either, to minimize lens flare.
Focus and compose Use single-point autofocus, or manual focus, and focus on the
silhouette to ensure a crisp outline. To create a more interesting image, avoid
placing your subject or horizon central in the frame and decide whether you’re
to place emphasis on the sky or silhouette.
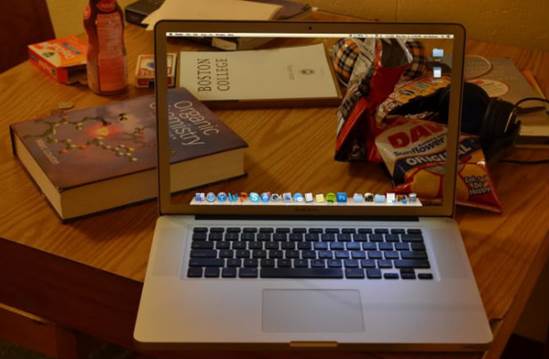
See through a screen
Try out this simple but fun optical
illusion and trick people into thinking that you own a piece of futuristic
technology
Do you spend so much time editing images
that your partner asks if you ever take your eyes off the computer screen –
well now you don’t have to. We see it all the time in blockbuster sci-fi
movies, from Star Trek to The Minority Report: semi-translucent
computer screens that allow you to keep one eye on the world as well as on the
monitor. While Photoshop’s tools are powerful, they don’t quite offer the
facility to transform your home or office into the Starship Enterprise – but
you can have a bit of fun creating a seemingly transparent screen on your own
computer.
Semi-translucent
computer screens that allow you to keep one eye on the world as well as on the
monitor
This technique is easier to carry out with
a laptop than it is with a desktop monitor, although the latter is possible,
providing you mark the exact position and angle of your monitor in between
shots so that you can return it to the same place for the final effect. You can
even try it with your phone or tablet computer, too – any device that allows
you to change its desktop or home-screen background.
Choose a position This technique tends to look more interesting if it’s obvious to
the viewer that the screen is transparent when they look at the final image –
if there’s a blank wall behind your screen then the effect is going to be
wasted, so position your computer so there’s something to look at behind it.
Shoot the scene Lock your camera on a tripod, choose aperture-priority mode and
select an aperture of around f/8. Focus on your screen and take one shot with
your screen in place and a second shot with your screen closed or removed.
Leave your camera in the same position; you’ll need it again later.
Select the screen Import both of you images into Photoshop. On the image with the
screen open, go to Select > All and on the image with the screen
closed, go to Edit > Paste. Select the Polygonal Lasso Tool
and make a selection around the edges of the screen area on the layer that has
the image with the screen open.

This
technique tends to look more interesting if it’s obvious to the viewer that the
screen is transparent when they look at the final image
Create a new document With your selection made, click on the eye icon next to it
in the Layers palette to hide the screen layer. Then select the layer with the
screen closed and go to Edit > Copy. Click on File > New
and click OK without changing any of the parameters. On this new
document, go to Edit > Paste.
Distort the image Your screen selection will most likely not be square at this point
of the process. Go to Edit > Transform > Distort and use the
anchor points around the bounding box to manipulate the image so that it fills
the document. Once you’re finished, go to File > Save As and save
your image as a JPEG.
Set a new background Set the image as your desktop background. If you are using Windows,
right-click on your desktop and select Properties or Personalize
and set your new files as your desktop using ‘Stretch’ as your Position.
If you are on a Mac, simply right-click on your file and choose Set Desktop
Picture.

