Setting them up is a pain, but custom
colors can give instant impact
Print design work is almost always output
in CMYK, the four-color process that creates full color on the page through
visual mixing of cyan, magenta and yellow halftone dots. Black is really just
there to add neutral depth; doesn’t affect hue. If you’re using an inkjet
printer, you may have extra inks to make the full-spectrum simulation more
accurate – light cyan and light magenta, maybe others. But it’s all about
simulating colors with dotty mixes. If you want a true, flat custom color, you
have to specify spot color inks.
You may want to use a two-color press for
convenience or cost reasons; you may want to use four (or more) custom colors
rather than the regular process color set; you may be preparing artwork for
screen printing, and so on. Whatever the reasons rather than process colors in
your layouts, so the artwork separations for the printing plates or screens
will be built with one for each individual color.

Print
design work is almost always output in CMYK, the four-color process that
creates full color on the page through visual mixing of cyan, magenta and
yellow halftone dots
But how the hell do you get this working
when you’re making graphics in Illustrator for final use in pages in InDesign
or QuarkXPress? What about bitmap images? How can you make Photoshop, a
resolutely RGB/CMYK environment, speak spot color? Well, it’s all doable, but
some of the solutions are just a little convoluted.
Start with the basic. First, make sure the
colors you use are spot rather than process. In InDesign and Illustrator’s New
Swatch dialog, set the Color Type to Spot Color. In QuarkXPress’s Edit Color
dialog, click the Spot Color checkbox. Now any artwork element made with those
colors will separate out property. Better still, when an Illustrator graphic
with these spot colors in imported to a DTP layout, those are added to the
Swatches list (InDesign) or Colors list (QuarkXPress).
Working with bitmaps is a little different.
Greyscale images can be colored up in the page, but only if they’re saved in
TIFF format; JPEG or native Photoshop won’t do. Simply select the image in your
layout and click the right fill color in the list and the job’s done: it’s now
to be printed with that ink.
Don’t, however, confuse this with duotones.
That’s where a greyscale image is set to be printed with two different inks,
generally worth some adjustments that make one ink (usually black) stronger in
the shadows and the other (a color) stronger in the mid and light tones
instead. A duotone image has a single image channel; it’s just output multiple
times when separated, normally with different tonal adjustments for each ink.
Go to Image > Mode > Duotone to open the Options dialog, then select Type
> Duotone.

Dynamic
duotones: Duotones are greyscale images printed with two different links,
normally black and a color. Adjust the ink curves to control the two inks in
the different brightness areas of the image
You can click the second color chip, click
Color Libraries, choose a Pantone ‘book’ and find your chosen spot color. If
it’s not a light shade, you’ll need to adjust the ink’s curves settings: click
the thumbnail next to the color chip and play with the line. You’re limited in
the kind of formats you can save these as: native Photoshop is best with
InDesign, while Photoshop EPS and PDF are best for QuarkXPress.
The biggest challenge when working with
custom inks is producing realistic color in photographic content. The problem
is simple: imagine you need to use a spot color or two in a design to get a
specific color match, you have a photo to include in the artwork and you have
to use no more than four inks for the press because a six-color press is too
expensive.
This may sound unlikely, but it’s not that
uncommon for packaging work. As long as the custom colors are somewhat like
those of the CMYK set (say, Pantone 032C red instead of magenta), this isn’t
that hard just a little fiddly. First, covert the image to CMYK (Image >Mode
> CMYK Color), then convert the image to ‘multichannel’ (Image > Mode
> Multichannel) and look in the Channels panel.

Channel
crossing: Start with a CMYK photo that can handle some color changes. When it’s
converted to Multichannel it won’t look any different - yet
At the moment they’re still the CMYK set,
but if you double-click the thumbnail for one of these channels, you can change
it. Click the color chip in the Spot Channel Options dialog that’s now open,
click to go to the Libraries list, and then choose your replacement color.
You’ll need to make some adjustments to counteract the effects of your chosen
new inks.
Need to use just three inks rather than
four? No problem. Or rather, it’s possible, but first Photoshop’s CMYK
generation settings need changing so that RGB is converted to CMY with no K.
choose Edit > Color Settings and choose Custom CMYK from the CMYK working
spaces list. Change Black Generation to None, and you’re done.
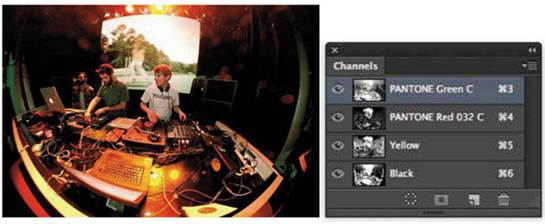
Keep
a level head: Converting the cyan and magenta channels to Pantone Green and 032
Red changes the look, but some work levels keeps it under control
Now a CMYK conversion (Image > Mode >
CMYK Color creates something with nothing at all in the black (K) channel. Turn
it to Multichannel, delete the redundant channel, set the custom channel
colors, and play with the levels for each channel. Oh, and when you’re done,
don’t forget to change the CMYK generation settings back to a more normal
choice before you forget.
(Prefer just two channels? Oh, good grief!
Okay, get to Multichannel mode, delete the channels that look weakest and start
playing with image levels, but don’t expect most things to look realistic).

Two’s
company: Using just green and red to render the photo causes some changes, but
it’s still recognizable and even more striking
The list of formats when saving a
multichannel image isn’t long and there’s only one that works in InDesign:
Photoshop DCS 2.0, an EPS format. It’s also not possible to import these to a
QuarkXPress layout. It still works when turned into color separations, but it’s
not practical to work blind.
Remember to export the final designs to PDF
using settings that don’t convert colors. Use High Quality Print from InDesign
or Illustrator, or one of the PDF/X presets in QuarkXPress, or whatever output
options you like as long as the document colors aren’t converted to process.

