SketchUp is one of the most popular 3D modeling tools, and
extremely useful for you just to see how your arrangements in the attic will
look like.
SketchUp was Google’s product far until now; it is a part of
Trimbe. The ownership belongs to Google, beside a free version that has become
well known among million users. Fortunately, the free version is still
available.
Though powerful, SketchUp is easy to use. You can use it to
create 3D home structures, interiors or almost everything – even 2D projects.
We could only scratch the surface of SketchUp’s abilities
here but, with equipment of basic knowledge of using essential tools, you will
be quickly able to draw objects to scale in real-life dimension.
Although you can use SketchUp on laptop (with medium
requirement), you really need a proper mouse with a scroll wheel for effecting
clicking and working, especially moving around models. Otherwise, you will be
repeatedly clicking on tools, like zoom, pan and orbit, to move around and
resize models.
One essential thing that needs learning is to use a keyboard
to draw a line or a rectangle according to a specific length or size. When starting
drawing toward a particular direction, you just need to type its length,
“0.62m” for instance then press Enter. Or you can type “0.62” if you have
chosen a template with unit set in meters. You also can type “62cm” or “620mm”
to get a line having the same length.
If you follow these instructions, you will end up with a
basic model with a house. You can add more structures by using Paint Bucket
tool, and then choose from many materials, such as brick or roofing. In case of
using textures, you need to draw the model to actual size unless the brick will
look too small or too large.
To start, download and install SketchUp from sketchup.com. Click
on Download SkethcUp button then choose the download link.
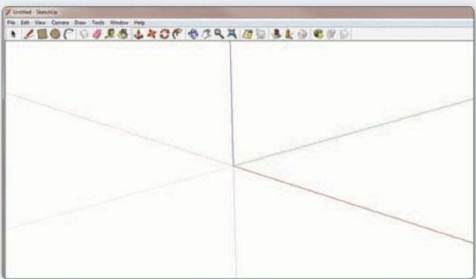
Step 1
Launch SketchUp and press Choose Template on welcome screen.
Select “Architecture Design – Millimeters” and choose “Start using SketchUp”.
The main app will be loaded with a 3D overview.
Step 1
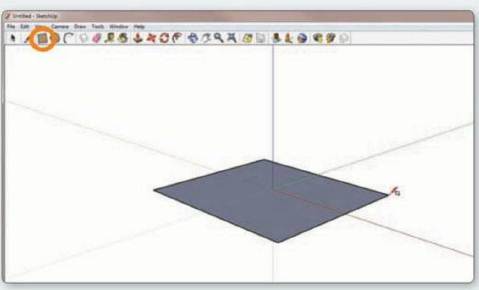
Step 2
Click on Camera, Standard Views, Iso, then choose Rectangle
tool (the third one from the left). Click onto the screen, move mouse to draw a
rectangle then re-click to finish. Most tools in SketchUp work in this way – it
is simply drag and drop.
Step 2
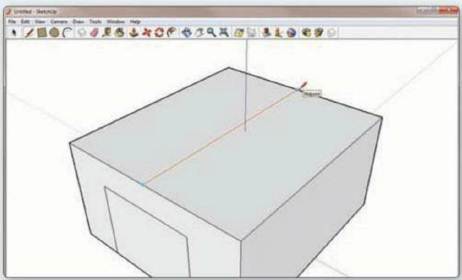
Step 3
Choose Push/Pull tool (press P key) and click into your
rectangle. Move the mouse upward for “pulling” the surface and create a 3D box.
You also can create objects with specific size by starting to draw then type in
a number and press Enter.

Step 3
Step 4
Use the Rectangle tool (press R), draw another rectangle
inside one of the box’s surfaces, SketchUp will automatically snap to edges and
endpoints, helping you to easily arrange elements. You can find a line’s
midpoint by moving the cursor nearby.

Step 4
Step 5
To look around the model, use tools: Orbit, Pan and Zoom. Instead
of selecting them from the toolbar, click on the scroll wheel to orbit your
model, scroll the wheel to zoom in/out, and click on the wheel while holding
Shift key then drag to pan.

Step 5
Step 6
SketchUp will automatically snap to 3 axes (red, green or
blue) to help you draw precisely. Choose Line tool (press L) and orbit the
model for a better view of the top. Draw a line between two midpoints to divide
it in half.
Step 6
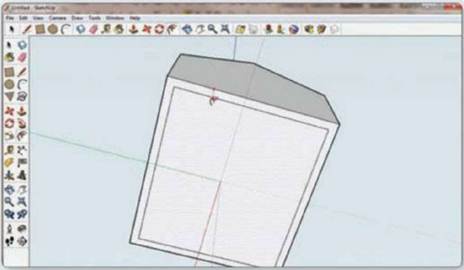
Step 7
Highlight the light by using Select tool (press Space) and
use Move (press M) to create the roof. Make sure the line snapping to blue axis
to ensure that the apex is still lying in the middle, rather than being skewed
to one side.

Step 7
Step 8
The Offset tool is the most powerful. Orbit the model to
view it from the bottom and use Offset tool (press F) to create an offset from
the edges. With Push/Pull tool (press P), push the offset upward below the
roofline to create an overhang.
Step 8
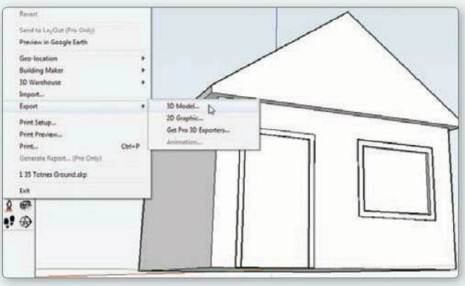
Step 9
You can use tools: Pencil, Rectangle, Offset and Push/Pull –
to create windows and doors. When finishing, save your model. You can export it
by entering menu: File > Export. People commonly export 3D models up to
Google Earth.
Step 9