Getting a new Mac is a wonderful
experience.
The pristine packaging. The smell of
freshly milled aluminum.You know every penny spent has been worthwhile.
But now what do you do with the old
one?
It’s no secret that Macs retain their value
better than most computers. Not only do their simple, stylish designs age less
quickly, but Apple’s attention to build quality means even very old Macs feel
sturdy, and the lack of ‘budget’ options in the range means their
specifications won’t soon age. This means you have two good options when
replacing a machine: you can eke more life out of it in a new role, or get back
a decent proportion of your investment on the used market.

What
to do with an old Mac
Of course, it’s easy to decide you’re going
to sell your Mac, but a little more complicated to actually do it, preferably
without selling yourself short, spending months waiting for a buyer, getting
stung by time wasters and scammers, or handing over your most private files to
the new owner. Although it’s easy to list an item on eBay, a bit of extra
effort will maximize the returns and minimize the hassle.
There are right and wrong ways to list
items for sale, and following a simple process will help to ensure potential
buyers feel more comfortable bidding and bidding a little bit more while
weeding out those who plan to take advantage of the service’s loopholes to rip
you off.
Once you do have a buyer, it’s also vital
to ensure your bank details, logins, family photos, work files and emails are
removed completely from the Mac before you ship it out by securely erasing the
hard disk.
We’ll take you through all of these steps,
but the very first is to work out whether selling your Mac is going to be worth
your while. Fairly recent machines can fetch very decent prices, as we’ll see.
But a 2001 ‘Dalmatian’ iMac, for example, despite being a unique product of its
era, will be of largely academic interest now until its components notably the
bulky CRT screen inevitably pack up, and is unlikely to go for more than a
tenner.
Even the more popular vintage designs, such
as 1990s PowerBooks and the G4 Cube, will only sell for three figures if
they’re in near mint condition, ideally with the original packaging.
In general, anything pre-Intel is going to
be hard to shift to someone who wants a Mac to use, rather than to add to their
personal museum. An early Intel Mac (the transition from PowerPC began in 2006)
should still be quite usable, ideally upgraded to OS X 10.6 Snow Leopard or if
possible 10.7 Lion, but it won’t sell for a substantial part of the cost of a
new system, so you might be better off making use of it yourself. A Mac that
you bought in the last couple of years, especially if it wasn’t
bottom-of-the-range, should be well worth putting up for sale.
How do you know what your Mac should sell
for? If it’s recent from 2010 onwards - one way to establish a maximum price is
to look in the refurb and clearance section of the Apple Store (store.apple.
com/uk/browse/home/spedaldeals/mac) for a similar spec. There’s a regular
turnover of stock here, so if buyers are prepared to pay Apple’s price, they
won’t be looking elsewhere. Knock off at least another 15% for a realistic
target.
eBay is, inevitably, where the largest
volume of sales takes place. Go to ebay.co.uk (or whatever your local domain
is) and search for the appropriate model in the Computers category, without
being overly specific. You can then refine your search if necessary using the
options that appear halfway down the left column. But don’t waste your time
scrolling through all the results yet, because there’s no way of knowing what
the closing prices of the current listings will be; a machine that has no bids
higher than $39.5 a few hours before the end of its listing might end up at
$788.5 or more as buyers race to the finish.

Advantage
Browsing eBay will give you a good idea of how much you might get for your Mac
and what kind of pictures are likely to catch potential buyers’ eyes.
Instead, make sure you’re logged in (create
an account if necessary), then, with search results displayed, scroll down and
click ‘More refinements’ in the left column. At the bottom of the list of
options that appears, click ‘Show only’, then tick ‘Completed listings’. Click
Go and you’re now seeing all the auctions that have recently completed, with
the price that was actually paid for the item, if it sold. Browse through a few
results for the kind of spec you’re selling, and you should get a good idea of
what’s realistic.
Having decided the likely cash return is
worth the legwork, you’ll need to make sure you have all your personal and work
files, folders, photos and other stuff backed up and ready to move to your next
Mac. The simplest method is to use Time Machine to create a backup for you. If
you use Time Machine as a matter of course to keep a backup, you’re already
sorted; just click the Time Machine icon at the top right of the screen to
check the last backup is up to date. If you haven’t had Time Machine running,
all you need is an external hard disk that’s the same size as or larger than
the one in your Mac (you can get away with smaller if the drive isn’t full) and
a cable to connect it. You could borrow a drive just for the transfer, but
frankly you’re crazy if you’re not keeping backed up with Time Machine, which
takes no effort at all, and it’ s well worth investing in a drive purely for
this purpose. Aim for one with the fastest interface your Mac supports;
Thunderbolt drives are still rather pricey, though, so USB 3 is a good
alternative with a recent Mac (only the very latest support it), or FireWire
800 with an older one. USB 2 will work, but you’ll wait longer for your backup.

All
In one Time Machine makes it easy to keep a backup from which you can restore
individual files or your whole system at any time
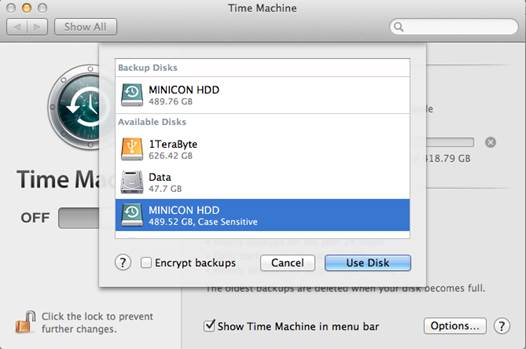
With the hard drive attached, all you need
to do is launch Time Machine from Apple menu > System Preferences and click
Select Disk to start a new backup. The more data you have, the longer the
process will take, and you’ll need to allow hours for a big drive, but you can
get on with other work at the same time. Once the backup is finished, you’ll
have a perfect copy of your files, apps and settings ready to restore to your
shiny new Mac.
How can you be sure your backup is OK? If
you’re using a network attached disk - one that’s connected over Wi-Fi or
Ethernet, including Apple’s Time Capsule you can Alt-click the Time Machine
menu bar icon and choose Verify Backups. This is no more than a simple check to
ensure the data exists, however, not to identify if it may be corrupted in some
subtle way. You could use software such as TechTool Pro to check the digital
and physical integrity of your backup disk. But you’ll only really be sure your
backup is complete and free of errors after you successfully restore it to
another Mac.

Multiple
choice If you don’t already have a Time Machine backup, you can create one now.
If you have spare drives available, you can even set it to back up to more than
one at the same time
Do remember that it screwing up this
process could leave you bereft of your digital life. A potential pitfall is
that what you’re thinking of as a backup is only a backup as long as you still
have the original. If you’re planning to erase your old Mac before copying
everything off your backup onto a new one, you should backup the backup (one
way to do this is to select more than one disk in Time Machine). Better to get
your new machine ready beforehand and restore your backup to it while the old
one is still there with all your data intact.
Nowadays there are plenty of belts you can
add to your braces to avoid losing data even if Time Machine lets you down.
Tools like SuperDuper or Carbon Copy Cloner will make an exact copy of a hard
disk. Compared to Time Machine, using these third-party backup utilities is a
bit more involved, but both are free and have proved incredibly reliable over
the years. Essentially, the process for making a one-off backup is the same as
with Time Machine: plug in an empty hard disk and leave the backup to run its
course.
With the rise of online storage, or ‘the
cloud’ as we now have to call it, there are further alternatives for backing up
your Mac. You could use a service like CrashPlan to make a full or partial
backup of your system to a remote server. The downside of an offsite backup is
that it’ll take ages (likely days rather than hours) even on a fast broadband
connection, and your connection will need to be unlimited. Again, if this is
something you’re already doing as a matter of course topping up the backup with
changed files is much quicker than making the initial upload - you’re already
sorted, as long as the offsite backup is OK.