Thermaltake is one of the oldest case manufacturers
still staying strong on the market. Every day, the company is offering the
products which are suitable for everyone’s budget; from the primary to the most
advanced and sophisticated products. Today, we will talk about the products
from other price baskets, including: Commander MS-I with affordable price, MS-II
and MS-III, Level 10 GTS and an advanced model which is Armor Revo.
We will review 5 case models of Thermaltake
today. 3 of which represent the MS Commander basic family, the fourth one is
the decisive version of Level 10,
and the last one is a successful product with Armor, which used to be a
widespread product at the high-end segment.
Level 10 GTS costs almost twice compared to
the (MS-I, MS-II and MS-II) models, but still much cheaper than Armor Revo.
The differences in price don’t stop us from
reviewing these products because we want to know the differences in the ability
given by the primary, basic and high-end computer cases.
Product participating in the test
Thermaltake
Commander MS-I
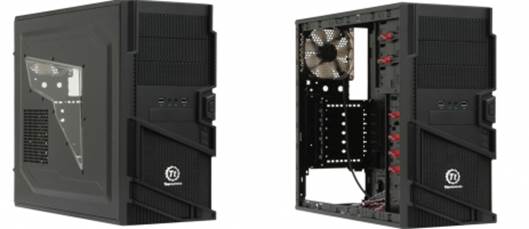
Despite having the same name, MS-I is
designed differently from the other 2 models in the Commander family.
Thermaltake
Commander MS-I
This model can be identified by the side
window (which is not a signature feature of the products at basic level) and
the asymmetric configuration at the middle of the product’s front cover.
There’re just some accessories coming with
this computer case. Besides the user manual and the screws for setting up (4 long
screws are used to tighten the front fan), you can only find one PC speaker
here.
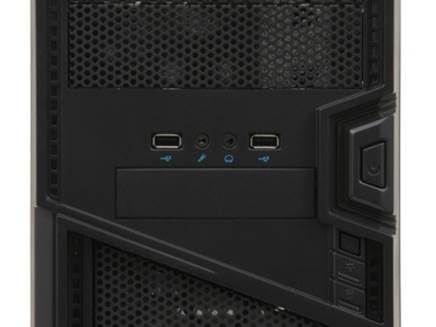
Similar to any regular computer case, MS-I has
Power and Reset button as well as the indicators for the Power and Disk button,
too. Reset button can easily pressed by 1 finger, but you can barely hit it
accidentally because it is placed separately from the Power button and
protected by the quite complex projection of the product’s front.
The indicator LEDs are reasonably bright
and don’t cause uncomfortable.
The
rear connectors
Choosing the I/O connectors is the typical
of the primary products: 2 USB 2.0 ports, headphone jack and microphone slot.
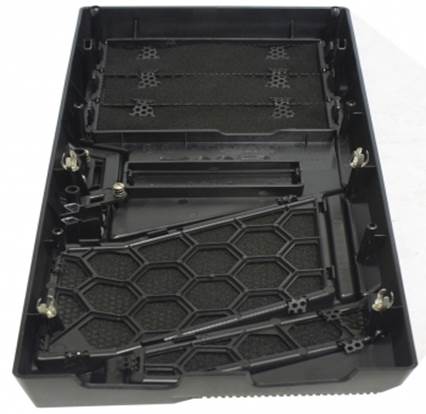
The underside of the product is modernly
designed with a cable compartment behind the shield of the motherboard, the
screws for quickly fastening the peripherals, and there’s a for the portable
dust filter in the PSU slot.
PSU dust filter is placed in the chassis in
a removable plastic frame, which means that you have to remove PSU to be able
to clean the filter.
PSU
dust filter
Though, the filter itself is perfect. The
good mesh is not enough to resist the air flow full of dust and keep the dust
outside effectively.
However, with the modern design, MS-I doesn’t
let out the sign of cost cutting anywhere. The metal plate of the case is thin.
Though the chassis is sturdy, the thin pieces of steel don’t help to block the
noise when the components inside the computer work.
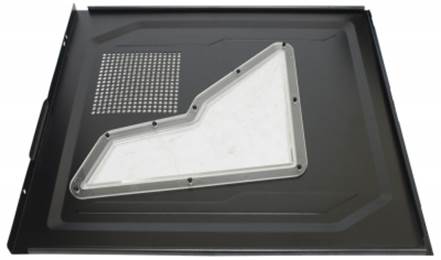
Thin
plates of steel forming the case
The back and bottom frames can be reused
whereas the other 5 products can’t.
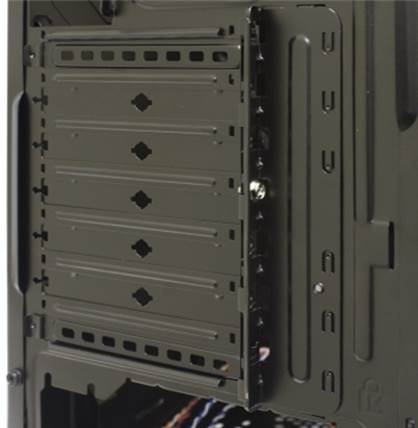
All the back steel plates are covered with
a special metal panel which is fastened by the screws. We don’t think that it
will help improving the mounting process of the expansion cards while the
ability to lower the price is very obvious: however, you need to buy other
screws and this makes the cheap case becomes slightly more expensive.
The covers of the top of the liquid cooling
system’s pipes can’t be reused. They lack rubber borders which are almost
similar to the top of the brackets in the motherboard.
The plastic stand is not as solid as on the
regular cases at the same price, but the composite stand has flexibility along
with the ability to absorb the vibrations in any matter will be much better
than other solid stands.
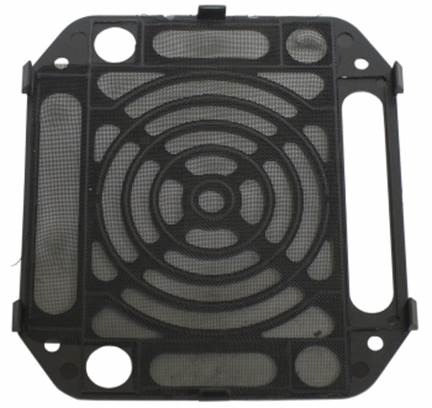
Dust-filter
As a special trait for the cheap products,
the dust-filter for the custom fans on the front is fitted as a sheet of foam
rubber, which can’t avoid weakening the air flows.
The screws on the front are designed as the
metal petals in the primary Thermaltake cases (we want to allude to MS-II and
MS-III) and work well. It’s easy to remove the metal panels on the front and
put it back to their positions, and there’s no vacillation after that process.

Crews
for quick fastening
The screws for quick fastening are
primitively designed and are another example for the intention of cutting cost
of the maker’s drive: though MS-I is made for 5 internal 3.5-inch drives,
there’s only 3 set of screws for them.
There’s also a place for the internal
2.5-inch drive. You can fit it on the bottom panel right under the rack of the
3.5-inch drives.

Fitting
up the testing configuration
He had no serious problem during the
process of installing our testing configuration into this case. We just want to
recommend that you should use the good old screws instead of the unreliable
screws for quick fastening if you don’t want to change your drive regularly.
The images above show that MS-I can contain
up to 7 internal 3.5-inch drives. Apart from 5 slots for the 3.5-inch drives (3
ones on the bottom are not described in the image above), they can be fitted in
the 2 compartments for the external drives (by using the set of quick-fastening
screws if you want). Considering that the front panel is only designed for a
3.5 inch device, you can easily install about 6 internal drives (as well as a
2.5-inch SSD drive under them) without sacrificing any function.
MS-I supports up to 25cm-long expansion
card which is right opposite the positions where the hard drives are installed
and connected. If there’s no drive opposite to the cards, the allowed length
increases up to 32 cm. in other words, this case can hold any modern graphics
card.
It’s easy to place the cable neatly thanks to
the availably dedicated cable compartment.
The
side of the case
The sides are easy to install because they
don’t have many points to fix, you just need to arrange the top and the bottom
part to have the balance.
Anyhow, the cable compartment is not pretty
deep. That’s the reason why the both sides of the case correspondently protrude
under the pressure of the cables.

The
position of the CPU cooler
The cut-out part of the CPU cooler in the
mounting side with the motherboard turns out to be not large enough in some
cases.
There’s a small cut-out for the CPU’s
cables to hide their end behind the motherboard. It will be much easier to
place the cables before tightening them with the motherboard. If you don’t do
that, you won’t be able to put the 8-pin connector through the opening part.

The
photo of the case’s fan
MS-I is cooled off by the single default
120mm fan with the outstanding blue color. It sits on the rear. When our
motherboard is set to silent mode, the fan speed is only 630 RPM. Indeed, its
operations are incredibly smooth, but not very efficient in terms of
ventilation.
Despite that, you can also place about 6
120mm fan into MS-I: 2 on the upper side (but a large CPU cooler may have
conflict with them), 2 on the front (the top of the upper fan will be covered
with the I/O connector shield), one on the bottom and one on the side.

The
photo of a complete product
The way to fit MS-I looks appealing.
|
Advantages
·
Reasonable price
·
Stunning appearance
·
Surprisingly solid chassis
·
Can contain a lot of hard drive
·
Provides a lot of different place for placing
the fans.
·
Easy to install
Disadvantages
·
Kind of thin metal cover
·
Small cable compartment (it makes the control
panel protrude to its sides)
·
Only one default fan (but it highlights the
case system)
Thermaltake Commander MS-I‘s technical standards
·
Dimension, mm: 282x95x388
·
Compatibility: Mini-ITX
·
External slots: 1x5.25”; 1x3.5”
·
Internal slots: 1x3.5”
·
Outer ports: 2 x USB 2.0; 2 audio jacks
·
Fan: 1x80 mm
|