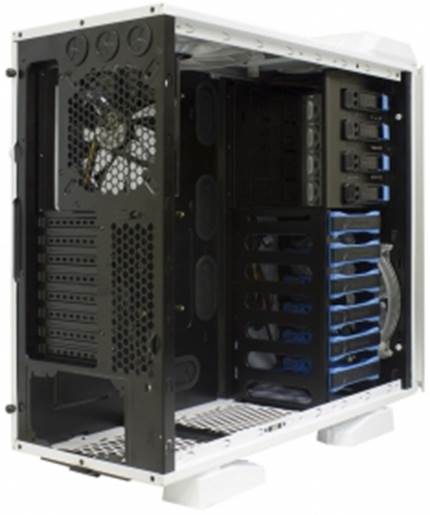
The inside is pretty spacious compared to
the products mentioned above because it’s a tower-shape computer case. It has
hard drive slots with large enough space between each. There’s a space of up to
330 mm ensured for the expansion cards. There are 8 expansion slots at the back
of the case, which is very important if you want to build a configuration with
lots of GPUs besides 3 high-end graphics cards.
HDD
slots
There’s a 3-pin connector at the bottom of
the chassis.

Side-fan
connection
It’s in charge of providing power to the
side fan. It’s a useful solution that helps to protect the connectors and the
cables of the fan against any damage when users remove the side panel.
Similar to this method, we have seen the
type of side-fan connection at Element G
model with the more affordable price than of Thermaltake.
The side panels can be closed easily.
The disk slot is compatible to both 3.5-inch
and 2.5-inch devices.

Slots
and hard drive
However, unlike the disk slots of the
aforementioned computer cases, the disk slots of Armor Revo are reasonably
cooled off. The bottom of each bay contacts to each other while the sides only
take half the height of a 3.5-inch drive.
The quick-fastening screws for the 5.25-inch
devices on the expansion slots seem efficient and a little more reliable than
the products mentioned above.
If you want to fasten your connection
device as tight as you want, you can use the screws for both of its sides. You
can even use the quick-fastening screws for this process.

PSU
position
PSU can be fixed by a metal plate at the
bottom of the case.
The dedicated cable compartment is deep.
The side of the case can easily close even on a heap of cables.

The
position of the CPU cooler
The cut-out part for the CPU cooler is the
largest among the computer cases we discussed today. It will certainly be
spacious enough regardless of where the CPU socket of the motherboard sits.
The opening for the CPU power cable is big,
but this cable itself can be stuck in the blades of the fan which sits on the
top.
It’s pretty easy to install a computer
configuration into an Armor Revo except for the opening which was mentioned
before about the CPU power cable.
The ventilation outside the box is the most
innovated point among the product mentioned in this review. It includes 3 200mm
fans (an exhaust one on the roof of the case, and intake ones at the front and
side) and an exhaust 140mm fan on the back. The front and top fan have
prominent blue and can be deactivate.
The 200mm fan is connected to a separate
system where its outstanding speed and system are controlled by buttons on the
front panel. At low mode the 200mm fan rotates at the speed of 580-640 RPM. Their
high speeds are 770-840 RPM, depending on the specialized fans.
Connected to the motherboard at silent
mode, the 140mm fan works at 800 RPM.
Armor Revo operates silently at low fan
speed, but they start emitting sound when they rotate at high speed. The fans
won’t remember the final speed level which they’re controlled and always start
up at low speed.
The default ventilation system advanced
enough, but it can be enhanced more by installing a 120mm fan at the bottom of
the chassis and a 140mm fan on the top. You can also place a heatsink of the
liquid cooling system on the top, instead of the fan.

Image
of completely installed product
The installing method of Armor Revo seems
imposing, but the silver wings don’t seem suitable for the white color of the
body. The black version of this product, in which the wings have the same color
as the body, looks more harmonious.
Advantages
·
Stunning exterior appearance
·
Easy to install
·
Good dust-resistant ability
·
The ventilation system outside the box works
effectively
·
The stops for the 2.5 and 3.5-inch drives
·
USB 3.0.
Disadvantages
·
The colors of the decorative wings don’t match
the color of the body on the white version of the product.
·
Not optimized for the installing position on the
desk
·
Noisy front fan
Thermaltake
Armor Revo’s technical specs
·
Dimensions, mm: 254x586x552
·
Compatibility: ATX, microATX, Mini-ITX
·
Exterior slots: 4x5.25”
·
Interior slots: 6x3.5”/2.5”
·
External ports: 2x USB
3.0; 2x USB 2.0; 1x eSATA; 2 audio jacks; 2.5”/3.5” docking station
·
Fan: 3x200 mm; 1x140 mm
Test and testing method
We tested the system cases which are
installed at unchanged environment temperature of 23°C and maintained by an air
conditioner. Because we suppose that most of computer users prefer lower noise
level, we set the CPU and system fan speed (connecting through a 3-pin
connector of the motherboard) at silent mode (the quietest mode in BIOS of the
motherboard). If a system case has its own speed controller, we will also
adjust it to the min speed. We don’t change the default configuration of the
air flows which are decided by the design of the system case.
The following accessories are fitted into
each system case:
·
Intel Core 2 Duo E6850 (3.00 GHz) processor
·
Zalman CNPS9500 AT cooler
·
ASUS P5E Socket 775(Intel X38) motherboard
·
Western Digital Raptor WD740GD hard drive (74
GB, 3.5”, 10,000 RPM, SATA)
·
3 Western Digital Raptor WD740ADFD hard drive
(3.5”, 10,000 RPM, SATA)
·
2GB DDR2-800 SDRAM Patriot PDC24G6400LLK memory
(PC6400, 800 MHz, CL4)
·
HIS HD 3870 IceQ3 Turbo H387Q512NP graphics
card(Radeon HD 3870)
·
OCZ OCZ-ZS550W (550 W)
·
Microsoft Windows 7 Home Premium 32-bit SP1 OS
We test the
system cases with the attached power supply, if any. If there’s no other
regulations, the hard drives are listed in the order of their positions from
the top hard drive slot downward without having any gap.
The CPU temperature is measured by Core
Temp 0.99.8. The HDD, GPU and motherboard temperatures are measured by CPUID
Hardware Monitor. The fan speed is measured by a Velleman DTO2234 optical
tachometer. There are the testing modes as follows:
·
Idle
·
IOMeter (IOMeter’s Access Time test running on
all the HDDs to load them fully)
·
Linpack (Linpack-based Intel Burn Test 2.5 runs
in the stress test mode, loading both CPU cores; we show you the peak
temperature of the hottest CPU core in the diagrams)
·
MSI Kombustor (full-screen mode, DirectX 9
rendering, 1280x1024 with 8x MSAA, Xtreme burn-in; we show you the peak
temperature of the hottest CPU core in the diagrams)
Each level of
temperature is recorded after the system has been working for half an hour at
current testing mode. The following table shows the temperature of the
components if the system is installed without the partition ("opening
testing system ").

Recorded
temperatures of the components
The noise level is subjectively reviewed.