Essential knowledge for anyone who
wants to be Mac-Savvy
Finder
9 things you can do with a Finder Info
Window

9
things you can do with a Finder Info Window
Click an icon in the Finder, and press z-I, and
you’ll be presented with the associated item’s Info window. There you can
perform a number of useful chores, including the following nine.
- Change the file’s icon Copy an image into your Mac’s Clipboard, select the icon in
the Info window’s top-left corner, and choose Edit ð Paste.
- Add keywords to Spotlight Comments Enter keywords in the Spotlight Comments area such as Awesome,
Business, and Yum; afterward, you can use these keywords to
search for files with Spotlight.
- Create stationery pads Turn the file into a stationery pad. These elements behave
much like templates: When you open a file that you’ve designated as a
stationery pad, you’ll be working with a copy of the document, rather than
with the original. To turn a file into a stationery pad, enable the Stationery
Pad option.
- Lock a file To make a file un-editable, enable the Locked option in the
General area of the Info window.
- Learn more about the file Click the More Info triangle for details about the file – a
lot or a little, depending on the kind of file. Choose an image file, for
example, and this section will list its dimensions and (if available) some
of the image’s EXIF data (camera model, focal length, f-stop, and exposure
time).
- Rename the file In the Name & Extension area, you can rename your file, and
you can choose to show or hide its extension.

In
the Preview area of the Info window, you can play music and video files
- Open the file with a different
application Occasionally you may want to open
HTML files with a text editor instead of using a browser. Go to the Open
With area, and select the app you want to use to open that file; if you
want to use that app for all files of the same type, click Change All.
- Preview your file In the Preview area of the Info window, you can play music and
video files, and see thumbnail images of graphics and text files.
- Change permissions At the bottom of the Info window, you’ll find the Sharing
& Permissions area, where you can specify the privileges a user must
have in order to access and edit a file or the contents of a folder. To
alter the permissions settings, click the lock icon, enter your username
and password, and then click in the Privilege column to change an access
setting – from ‘Read & Write’ to ‘Read only’, for example. To add
other user accounts or groups, click the plus (+) button, choose a user or
group, and then click Select.
If you’ve chosen to change a folder’s
permissions, you can apply the revised permissions to the items within the
folder by choosing Apply to enclosed Items from the Tools menu.
2 ways to change your account’s short
username

You
may someday want to change your short username
For whatever reason – maybe you were in a
rush when you first set up your Mac, maybe your name has changed – you may
someday want to change your short username. (That’s the one that gives a name
to your home folder in the Finder – the no-spaces name that you use in various
places in OS X, not the longer username found in the Users & Groups pane of
System Preferences). Here are two effective ways to change the shorter
username.
- Use an alias This method will work if you want to be able to enter a
shorter name in name/password dialog box fields or when logging in to your
account. So if your name is Englebert Rumplestiltskin, and the OS X Setup
Assistant kindly made your short username ‘englebertrumplestiltskin’, you
can create an account alias of ‘rumple’; thenceforth, whenever you would
normally type ‘englebertrumplestiltskin’, you can type ‘rumple’ instead.
Open the Users
& Groups pane of System Preferences from any administrator account. If the
lock icon in the lower-left of the window is locked, click it and provide an
administrator username and password. In the list of accounts on the left,
right-click or <Control>-click the name of the account that you want to
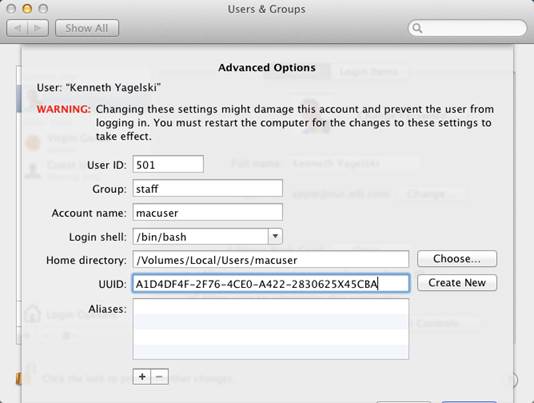
modify, and then choose Advanced Options. In the Advanced Options screen, click
the plus (+) button under Aliases and then type your desired account alias.
(Don’t make any other changes.) Click OK, and restart your Mac.
- Change your actual short username If an alias isn’t enough – if, for example, you want to change
the name of your home folder and your short username – you can change the
actual name. A couple of caveats: First, some apps and services store
settings based on your short username or on the path to your home
directory (/Users/username); if you change that username, those
apps or services may get confused. Second, because OS X’s Time Machine
tracks files based on paths, if you change the name of your home folder,
Time Machine may conclude that it needs to back up everything again. That
said, here’s how to proceed with the alteration.

You
can change the short account name in the Users & Groups preferences
Disable Automatic Login (in the
Users & Groups pane of System Preferences) for the account you’re
modifying, if it’s currently enabled. Log out of the account that you want to
modify, and then log in as a different user who has administrative access. (If
you don’t have an extra administrator account, you can create one in the Users
& Groups pane.)
Open the Users & Groups pane. If
the lock icon in the lower-left of the window is locked, click it and provide
an administrator username and a password. In the list of accounts on the left,
right-click or <Control>-click the name of the account you want to
modify; then select Advanced Options from the resulting menu. In the
Advanced Options screen, delete the account’s current short username in the
Account Name field, and type in the new one. Change /Users/oldusername
in the Home Directory field to /Users/newusername. Make note of the original
and new paths, and then click OK and close System Preferences.
Next, open Terminal, type the following
text on a single line, and press <Return>:
sudo mv
/Users/oldusername
/Users/newusername
When prompted, provide the password of the
administrator account you’re using, and press <Return> again.
Now restart your Mac. Once you’ve done so,
your short username and your home folder name will be changed. If you find
yourself forgetting your new name and typing the old one, you can create a new
alias, using your old name as an alias to the new one.