Our Apple-loving experts answer your
burning hardware and software questions
Getting the iMessage
I have an iPhone 5, and have iMessage
turned on; however, when I send a message, sometimes the iMessages are switched
over to texts even though I have the “Send as SMS" setting turned off in
Messages settings.
To avoid your iPhone using SMS when you
wish to send an iMessage, you will want to be sure that a few items are set
correctly in Settings > Messages.
First, you’ll want to check that iMessage
is turned on, and confirm that your iCIoud account and receiving addresses are
correctly set in the ‘‘Send & Receive” section. Also, you’ll want to set
"Send as SMS” to Off.

When
sending a message, a blue send button in the Message app denotes the message
will be sent via iMessage; a green button denotes SMS or MMS.
To ensure that all of your messages are
ever sent through the iMessage network, consider sending iMessages only to the
email address of the iMessage recipient instead of their iPhone phone number.
Finally, iMessage does have a tendency to
go offline on occasion. You can keep a track of when iMessage is experiencing
an outage by bookmarking this support page on Apple’s website:
bit.ly/ml_status.

Try
sending iMessages to recipients’ email addresses instead of their phone numbers
to avoid potential SMS messaging charges.
Purchase-screen problems
I have an iPhone 4S 64GB model that has
425MBs of storage freely available. When I go to the App Store > Updates
> Purchased to see the items that I have purchased, the spinner goes around
on the screen showing that it’s "searching,” but nothing ever appears on
the screen, and the app quits and goes back to my Home Screen.
After iOS 6 was released, some iTunes
accounts experienced this issue of having a crash when trying to load the
Purchased tab on iPad, or the Updates > Purchased view on iPhone.
Fortunately, a new update for iOS 6 has solved the issue and made the Purchase
history viewable in the App Store once again.

iOS
gets updates frequently to fix issues with built-in apps and general OS
features.
To download the new update, visit Settings
> General > Software Update. If an update is available, you will be
guided through the process to install the update directly to your device
without connecting to your computer and iTunes.
If, after updating, you are still having
issues, you may consider contacting iTunes Support and letting them know the
problem is happening with your account. You can do this by going to bit.ly/ml_itunessupport.
Automatically opening iTunes Redux
I would like to automatically have iTunes
11 launch when I connect my device to my computer. Currently, only iPhoto
opens, and I would like to disable this functionality so that only iTunes 11
will open when my iPhone, iPad, or iPod is connected.
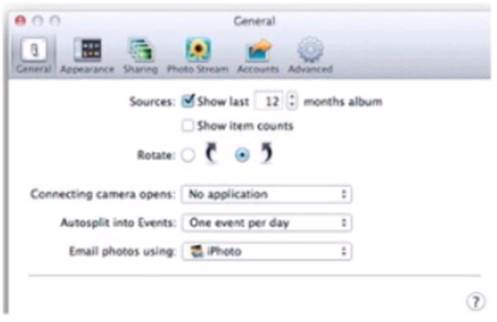
The first step to this solution is to open
iPhoto and click iPhoto > Preferences (or press Command +, [comma]). Go to
the General tab, and select "No application" from the drop-down menu
for the "Connecting camera opens" option. This ensures that your
iPhone, iPad, or iPod will not open iPhoto when connected to your Mac.

Ensure
that "No application" is selected for launching when a camera is
connected to your computer.
Next, you’ll need to connect your device(s)
to your computer and open iTunes 11. Select View > Show Sidebar in iTunes,
and then click on your iOS device in the "Devices" section of the
sidebar.
After clicking on your device, select the
Summary tab, and scroll down to the "Options" section. Check the box
labeled "Open iTunes when this [iPad/iPhone/iPod] is connected." When
you sync these new preferences over to your device, connecting it to your
computer will launch iTunes 11.

Be
sure to sync your device to carry this preference over.
Think outside the mbox
I followed your tips on how to retrieve
mail from my Time Machine backup from a previous article
(bit.ly/ml_mailrestore), but when selecting "Files in mbox format"
for the import type, I’m getting the error message, “No valid mbox files were
found."
Instead of selecting "Files in mbox
format," select the "Apple Mail" format option for importing the
mbox files that are created by OS X Mail. When you click Continue, you’ll be
prompted to select the location of where the mbox files are located, and be
guided through the rest of the process to import the mbox files. Only select
the "Files in mbox format" option if you are importing mbox files
created using a different email client.

Choose
the "Apple Mail" import format if the mbox files were created inside
of Apple’s Mail application.
Out with the Old, In with the New
I have many years of AppleWorks files,
mostly word processing and spreadsheets, that I must keep. I use a G5 - still
going strong with OS X 10.5.8. But now the latest Macs no longer support
PowerPC files. What is the easiest way to convert my important old files into
something that’s current and can be used on newer systems?
When dealing with older file formats, we
recommend that you right-click on the file in OS X and take a look at the
"Open With..." menu. Chances are, there’s an application that will
work with your older file formats.
In this instance, Apple’s own Pages and
Numbers (both of the iWork suite of apps) will import and allow you to save
AppleWorks documents and spreadsheets to newer file formats, including
Pages/Numbers formats and Word/Excel formats. Pages and Numbers can be picked
up individually in the Mac App Store for $19.99 each.

Always
check the "Open With..." menu to see if existing apps can open older file
formats.
For future-proofing your files (as best as
possible), we’d recommend that you save your text documents as RTFs (rich-text
format) and spreadsheets as CSVs (comma-separated values). These generic
formats are supported by just about every major application on the Mac (and
other operating systems), and will make sure that you can still access your
data should proprietary formats bite the dust.
Databases are a bit trickier, however, due
to the way data is stored. If you used AppleWorks database files, then you can
easily import them into the latest version of FileMaker Bento (bit.ly/ml_bento)
using the following steps:
1. Save your AppleWorks database files in a TSV format for use in
Bento. (You can do this by opening your files in AppleWorks and selecting Save
As; enter a filename with a .tsv extension, then choose "ASCII Text"
from the file-format drop-down menu.)
2. Launch Bento and select File > Import > File.
3. Choose your AppleWorks database TSV file, and the database will be
imported.
Moving mail made easy
Is there a way to select several emails and
drag them into a folder on the iPad? It seems that I can copy them only one by
one.
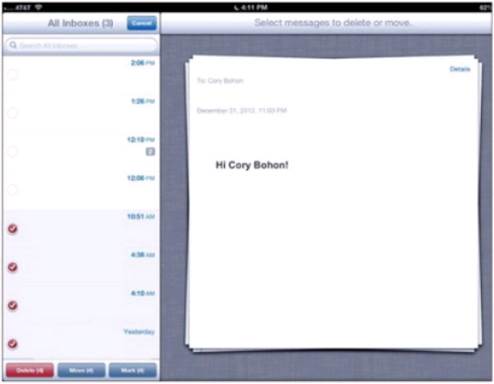
Absolutely, there’s a way! Simply load up
the Inbox that you wish to manage in the iOS Mail app. and tap on the Edit button
in the left-hand Inbox pane. The view will change so that you can tap on
multiple emails to select them.

iOS
Mail lets you use multiple selection techniques to better organize your email
inbox.
After tapping on multiple messages to move
or delete, tap on the Delete, Move, or Mark button. Tapping on Delete will
delete the selected messages: tapping on Move will let you choose another
folder to move the selected messages to; tapping on Mark will let you tag the
selected messages as read or flagged.