Just because your PC is infected
doesn’t mean you have to reinstall everything. We show you how to create a free
boot disk to remove malware.
Whether you run anti-virus software or not,
your PC may still get infected with malware such as a virus or Trojan. Certain
types of threat are capable of hiding, thwarting the efforts of internet
security programs. They do this by compromising Windows at a very low level. A
sensible way to fix the problem is to boot from removable media such as a USB
drive or CD, so you can clean the system without loading Windows. Many of the
main anti-virus companies provide the means to do this, and Microsoft has
joined their ranks with Windows Defender Online.
Whether
you run anti-virus software or not, your PC may still get infected with malware
such as a virus or Trojan
This software is available for both 32- and
64-bit versions of Windows; download the version you need from http://tinurl.com/mswfo. Bear in mind that
you need the version that corresponds to the system you want to rescue. This
does not need to be the same type of system that you are using to create the
boot disk.
For example, if you are running a healthy
Windows 7 64-bit PC, but want to rescue a Windows 7 32-bit system, you’ll want
to download the 32-bit version of the software. Before you start, ensure that
you have a USB flash drive with a capacity of at least 256MB, or a blank
writable CD or DVD. The USB drive will be wiped of any previous data.
Run the tool, accept the license conditions
and then choose which type of drive you want to create. We’re going to turn a
USB drive into a rescue disk, but if you want to create a recue CD or DVD, you
just have to choose the right menu option.
1. Once the disk has been created, you’ll be prompted to plug it into
the damaged PC and boot from it. Ensure that your BIOS is set to boot from USB
if you are following our instructions. Otherwise, set it to boot from the
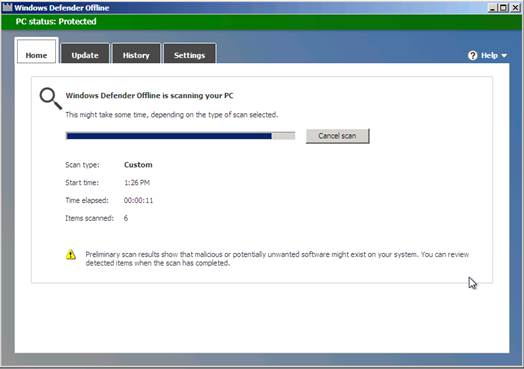
CD/DVD drive. Once booted, your screen will show what looks like Microsoft
Security Essentials or, if you have started using Windows 8, Windows Defender.
The program will scan for malware in the same way as either program.
The
program will scan for malware in the same way as either program
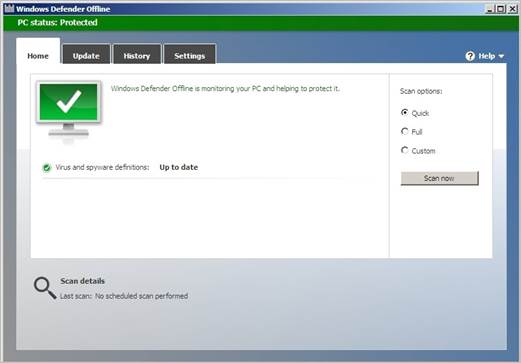
2. You can speed up the process by excluding certain folders. In the
example, we’ve instructed the scanner to ignore the My Pictures folder. You can
specify folders by clicking the Browse button and navigating to the appropriate
location.
If the software
fails to find any threats and you are sure that the computer is infected, allow
it to scan the entire disk. This can take a long time, so you may want to run
it overnight.
3. If Windows Defender Offline detects a threat, it offers a few
options. You can have it remove the threat or save it to a quarantine area.
Quarantining the threat is wise, in case the anti-virus program incorrectly
identifies some important files as being malicious.
Your
system should now be cleansed of malware
4. In our case, the anti-virus program has detected a threat. Click the
Clean PC button to remove it. This brings up another window with a drop-down
menu. We selected the Recommended action of Remove.
5. After the threat is removed, turn off the PC and remove the USB
drive. You may decide to change the boot order so that the PC won’t boot from
any other USB drives that you leave plugged in. in this case, turn the system
back on but enter the BIOS before the operating system boots. Make any
necessary changes and reboot.
Your system should now be cleansed of
malware.