Our experts solve your computer,
software & internet problems
How do I get a calendar on my iPad’s lock screen?
Question
Is it possible to get a working calendar to
appear on an Apple iPad’s lock screen? On my previous desktop PC I had Date-wise,
a calendar program that appeared on the Windows Desktop every time I switched
on the power. This was a blessing as it reminded me to pay bills on specific
days. Having bought an iPad, I no longer use the PC every day. Instead I’m
always using the iPad and I miss this feature. The current lock screen seems to
have little purpose, but a calendar would make it a valuable asset. Do you have
a solution?
Answer
You probably already know and understand
that Apple controls its devices and software very tightly. As such it isn’t
currently possible to have a fully functioning calendar on the iPad’s lock
screen, at least without jail breaking the device - and that’s really something
only expert users should dabble in.

Set
up notifications to receive calendar alerts on the iPad lock screen
However, assuming that your iPad is running
iOS 5 or later, then it’s possible to have calendar notifications displayed on
the lock screen. While this isn’t quite the same as having instant access to an
editable schedule, enabling the Calendar app to display alerts lets you view
reminders of pending events without having to unlock the iPad.
First, check that your iPad has iOS 5 or
later. Tap Settings followed by General. If you see a Software Update option,
then your iPad is running at least iOS 5, so you’re good to proceed with
setting up notifications. Otherwise, you’ll need to connect the device to a
computer running iTunes. When it’s connected, iTunes will offer to update the
iPad to the latest available version of iOS, so just follow the prompts to do
this.
Next, set up Calendar app notifications.
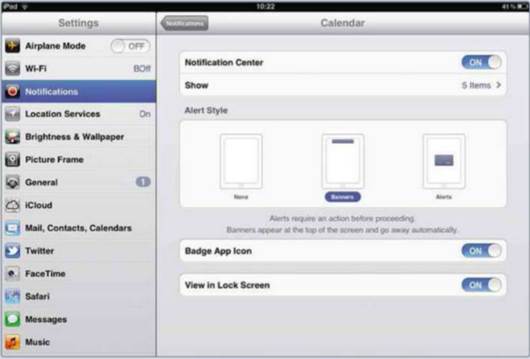
Tap Settings followed by Notifications, then tap Calendar under the In
Notifications Center heading. Swipe the Notification Center switch to On,
select an Alert Style (Banners is a good choice for the lock screen), then
slide the ‘View in Lock Screen’ switch to On. Note that Show is currently set
to ‘5 Items’ - we’ll refer back to this shortly.
Finally, you need to set up some events in
the Calendar app. Tap Calendar, then tap and hold a date or time slot to set an
event. Fill in the relevant details then tap Alert. Choose when you would like
the alert to appear (‘At time of event’, for example) then tap Done. Tap Done
again to save and set the event. Now lock your iPad in the usual way.
The alert will appear on the lock screen at
the time you set. If several alerts trigger before you next look at your iPad,
then the lock screen will display their banners too - up to the maximum set in
the Show option mentioned earlier. To jump straight to an event’s entry in the
Calendar app, just swipe across the relevant lock-screen banner alert (instead
of the ‘Slide to unlock’ switch). Once unlocked, notifications can be viewed by
swiping your finger down from the top of the screen, which opens the
Notifications Center.
Where is my Mac’s hash key?
Question
I recently signed up for a Twitter (www.twitter.com)
account to see what it’s all about. I’m getting the hang of things, but am
stumped when it comes to writing ‘hashtags’ because my MacBook doesn’t
seem to have a hash key! I’ve looked and looked and I simply cannot see the
hash symbol anywhere. Am I going blind? I’ve taken to copying hash symbols from
other people’s feeds so I can paste them into mine, which is a real pain.
Answer
No, you’re not going blind - the hash
symbol can be a little elusive on some Mac keyboards. At some point in the past
Apple decided that on UK keyboard the hash symbol had to make way for the pound
(£) sign, above the 3 key. This makes some sense, of course, because the hash
symbol was previously little used - but Twitter has given it a new lease of
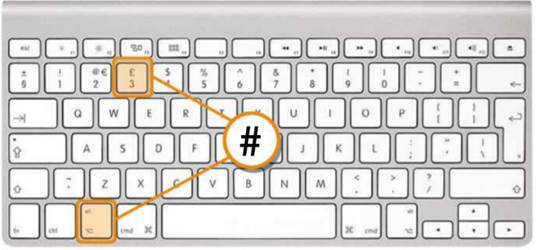
life. Fortunately, there’s an easy way to type a hash symbol: just hold down
the Alt key and tap the 3 key.

UK
Mac keyboards have a pound sign instead of a hash key, but Alt and 3 will type
a hash symbol
Can I get my emails redirected?
Question
If I get a new email address, can the
emails that go to an old email address be redirected to my new email address?
Rather like what the Royal Mail does with your post when you move home.
Answer
It is an interesting question, but the
Royal Mail analogy doesn’t quite work. The Royal Mail delivers post to you,
through your letterbox. So, when you move house, if you tell the Royal Mail and
pay for the redirection service, then your post will be filtered at the sorting
office and redirected to your new address.
But email doesn’t work like this. While you
may think of email messages as being ‘delivered’ to your inbox, it’s more
accurate to say that your computer ‘collects’ them from an electronic sorting
office - a server computer somewhere on the internet. So, all that matters is
that you can continue to collect your email messages from the relevant server.
Whether or not that is possible depends on
who provides your existing email address and the basis on which they do so. If
it’s an email address provided by an internet service provider, for example,
then it will almost certainly be attached to a subscription (ie, paid-for)
account - and the ability for your email program to access the email server may
stop when your payments cease. However, some providers are more understanding:
BT, for instance, allows departing subscribers to continue accessing their
email accounts for 90 days. After this time, BT will charge for continued
access - £1.60 a month (see www.snipca.com/8808 for details).

You
can redirect emails using forwarding, though it isn’t usually necessary
When it comes to free email services, such
as Gmail or Outlook.com (previously Hotmail), then an email account may
‘expire’ if not accessed within a certain period - 270 days, with Outlook.com,
for example (though you’d need to log in only once during this period to reset
the clock). Here, it’s feasible to set up the equivalent of a Royal Mail
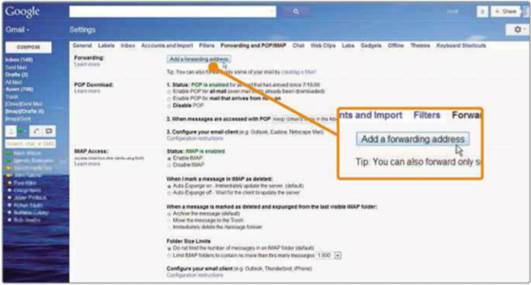
redirection, if that’s what you really want to do. In Gmail, for example, click
the top-right cog icon and choose Settings. Now click the ‘Forwarding and
POP/IMAP’ link at the top followed by the ‘Add a forwarding address’ button in
the Forwarding section. Type the new email address, click Next then Proceed. A
confirmation email will be sent to the new email address - click the link this
contains. Finally, return to the Gmail window, select the ‘Forward a copy of
incoming mail to’ radio button and Gmail will begin forwarding emails to this
new address.