FreeNAS can be configured to inherit users
from an Active Directory or LDAP, but I’m assuming that this device will be
used in an unmanaged home network, so we’ll assign users with the same names as
the Windows login names they use, per FreeNAS’s instructions.
I’ve created a user named Nathan (for
myself), and selected “Create a new primary group for the user,” which will let
me fine-tune permissions. I set my home directory to the dataset I created
earlier, i.e., /mnt/mpcstore/nedstore.
Configure permissions
GO BACK into Volumes and find the dataset
you created earlier - in my case, that’s nedstore. Click Change Permissions
and select the user you just created. Here you can control which users and
groups have read/write access to the dataset (image C). Repeat the dataset,
user, and permission steps for any users you create.

image
C
Set up a Media Share
I’m going to set up a media dataset so i
can share my music and movies with the rest of the Windows computers in my network.
Follow the procedure above for setting up a new dataset (I called it Media),
then browse in the navigation pane to Sharing > Windows (CIFS) > Add
Windows (CIFS) Share. Create a new share and point it to the dataset you’ve
just created (image D). You can either restrict it to specific users or groups,
or enable an anonymous Guest Mode. If you have Apple computers on your network,
you should also turn on AFP; if you have Linux, enable NFS. You can also enable
SSH, rsync (for replication), iSCSI, and more, all from the Services panel.

image
D
Map the drive
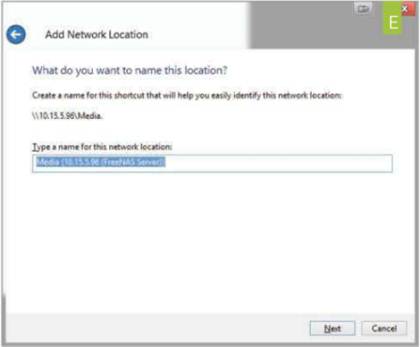
Now you can map the Windows share you’ve
just created. Go to My Computer, right-click, and select Add Network Location.
Plug in the IP [the same one in your web console) and share name, as shown in
the image (image E). Give it a fancy name. Note that you’ll have to configure
permissions so that users have write access if you want to be able to add files
and folders via Explorer.

image
E
Set up the plugins jail
Earlier versions of FreeNAS contained
robust streaming options, such as iTunes, uPnP, and BitTorrent clients. FreeNAS
version 8.2 restored that functionality via the use of plugins. The word
‘plugin," however, dramatically overstates the ease of using these. To
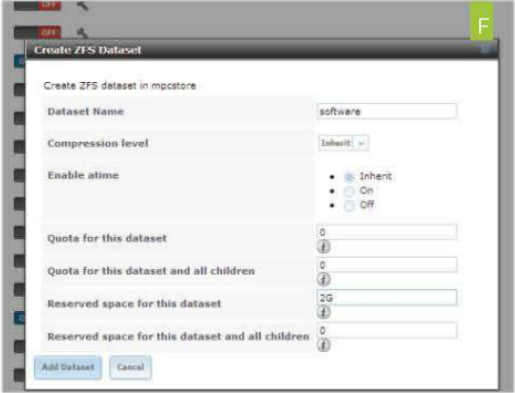
install and set up these plugins, first go to your storage volume and create
two ZFS datasets, one of at least 2GB called Jail and another called Software
(image F). The plugin system basically creates a virtualized FreeBSD system
inside your FreeNAS system, and by this point if you’re tearing your hair out,
you’re not alone.

image
F
Next, go back to SourceForge and find the
plugins_Jail.pbi file for the release you’re running. In our case, that’s at
http://sourceforqe.net/proiects/freenas/files/FreeNAS-8.2.0/
RELEASE/x64/pluqins/. Download the PBI file to your computer. Now click the
little wrench icon next to Plugins in the Services menu. That’ll put you
through a three-part setup screen. The first one will give you a temporary
place to store the PBI you’re about to upload. I just used the root of my
mpcstore. The second lets you set up the paths to your jail and software
datasets. Point the plugins jail path to the jail dataset and the archive path
to the software dataset (image G). The third step is to upload the plugins jail
PBI file from your desktop.

image
G
You’ll also need to create a separate
pingable IP address for the software jail, distinct from your FreeNAS IP
address (image H).

image
H
Install plugins
Now you should be able to slide the Plugins
slider to On and click the Plugins menu at the top. Go back to SourceForge and
download the PBI files for the plugins you want to install. Right now the ones
available are Transmission (a BitTorrent client), MiniDLNA (a, yes, DLNA
client), and Firefly, a no-longer-maintained iTunes-library service. Once
you’ve downloaded them, hit the Install Plugin button and browse to the PBI
file and upload it. You’ll see it appear in the Plugins list, with service
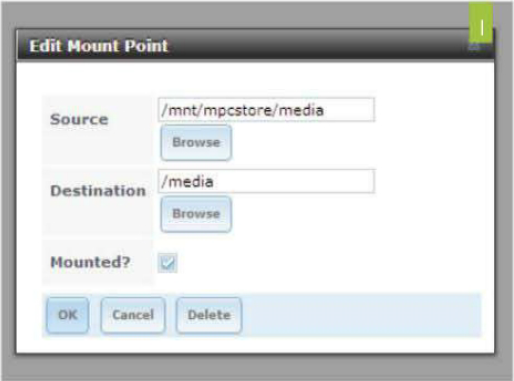
status set to Off. Create a mount point within the jail pointing to a
folder outside the jail (image I). I directed it to the same dataset I’m
using for my Windows share, so I can drag-and-drop media that can then be
broadcast over MiniDLNA and Firefly. Easy, right?

image
I
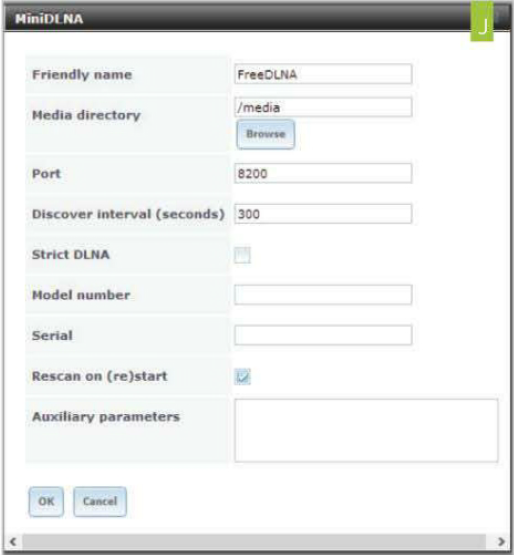
Now go to the left-side navigation tree and
go to Services > Plugins, and select the plugin you just installed. I’ll use
MiniDLNA as an example. Give it a friendly name and a media directory. Note
that your media directory should use a relative path within your software jail,
so it’s best to just type it in manually. I used /media again (image J). Save
your changes and turn the plugin on. Make sure the IP address you picked for
your software jail is working and you should see the DLNA server show up in
your list of UPnP devices (I used VLC to check).

image
J
Paddling in the shallow end
So now you know how to set up users,
groups, datasets, and sharing, and you’ve got your plugins ready to go. We’ve
only scratched the surface of what FreeNAS has to offer. Fortunately, there’s a
robust community that loves documentation and has its own forum with discussions
and FAQs for every part of the FreeNAS experience, from hardware to software to
plugins to fine-tuning, and more (bit.lv/OosiiB).
One note: Be sure to back up your NAS data
to an external drive. Even with two-disk loss tolerance, you never know when
disaster will strike. You can use FreeNAS’s built-in rsync to make sure you
have all your data synched to an external drive.
As for the specific hardware I used, it’s
probably overkill for most home users. It did enable large-file read and write
speeds of over 90MB/s, which is quite nice.
FreeNAS’s greatest strength is also its
greatest weakness: It’s incredibly complex and granular, with myriad
configuration options, plugins, services, and so forth. The average home user
may be better off buying an off-the-shelf NAS from Qnap or Sinology, which are
easier to configure and often include mobile access apps. But if you have the
patience and the inclination, there’s nothing like building your own.