SSDs look great out of their shells. Antony
Leather shows you how to create a clear 2.5in enclosure and turn it into a
super-fast USB 3 drive
There are plenty of USB 32.5in external
enclosures around, but they rarely look particularly eye catching and, more
importantly, they never allow you to see the sexy piece of kit inside the chips
and PCB of the solid state drive itself.
In this guide, we show you how to create
your own completely transparent external 2.5in enclosure, which will be strong
enough to withstand years of bumps and knocks too.
All you need is a Dremel, mounting tape,
some acrylic and a cheap, third-party enclosure to modify. With decent SSDs
available for just $75, this is a relatively inexpensive project that takes
just a couple of hours to complete, while also providing a perfect home for an
old SSD if you have one.
1. Remove outer case

Nearly all 2.5in SSDs are housed in a
two-piece case that can be dismantled by removing a few screws. Don’t worry
about damaging your SSD by doing this – there are no moving parts, and it’s
easy to put back together again. Go ahead and remove the casing.
2. Dismantle external enclosure

You’ll need to remove the USB 3 to SATA
adaptor that’s located inside the donor enclosure, usually found at one end of
the device. It may be secured using screws, which will make removing it easy.
If not, you’ll probably have to prize the case apart using a small screwdriver.
3. Fit USB 3 to SATA adaptor

The adaptor has a USB 3 connector at one
end, and SATA data and power connectors at the other. Connect the adaptor to
your SSD and check that it works by connecting it to a PC. Sadly, few are
illuminated, so you won’t see an access LED flickering.
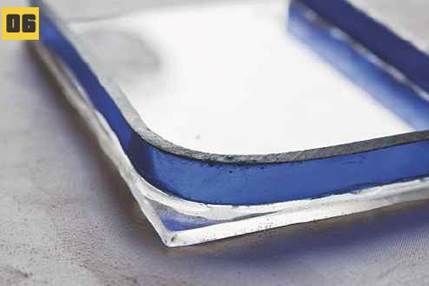
4. Mark up acrylic

Now it’s time to start making the enclosure.
We aimed to make it as small as possible, so we marked up the acrylic with
cutting guides only a few millimeters larger than the SSD itself. Rather than
opt for a bland box, we decided to create a curved edge by heating and blending
a band of acrylic.
5. Cut and blend acrylic

We used a gas hob to create our curved
edge, as we were only dealing with a small section move it slowly above the
flames but not so slowly that it burns. It will only require a few seconds of
heating before it can be bent to shape. You can then cut out the rest of the
acrylic – we used a Dremel and cutting disc for this job.
6. Attach edge section
Sand the sections to ensure they’re flat,
using a file or low-grit sandpaper. If you want, you can also flame-polish the
edges them by holding them in a gas hob for a few seconds. This melts the
acrylic, creating a shiny edge. We then used a small amount of epoxy to glue
the sections together.
7. Mount SSD and LID section

We wanted to avoid using screws and, since
we had no plans to remove our SSD from the enclosure, we attached 3M mounting
tape to the SSD’s underside to secure it to the acrylic. This is strong stuff,
so double-check that you know where the SSD needs to be mounted first. You can
then attach the lid section using epoxy.
8. Create end section

Our USB 3 connector didn’t slot all the way
into the adaptor; this gave us room to fit an end section to our enclosure and
cut a small hole for the cable. We used a Dremel to cut the section to size so
that it fitted neatly over the rest of the enclosure.
9. Cut cable hole and attach end section

We used routing attachment for our Dremel
to cut and shape the hole for the USB 3 connector into an oval. Using clear
acrylic meant that lining up the hole with the connector on the SSD was simple.
We then used a tiny amount of epoxy to glue the end section to the rest of the
enclosure.
10. You’re finished

Leave the epoxy to set for a few hours
before you put the enclosure under too much stress. You can then use a Stanley blade to trim away excess epoxy. If you’re feeling adventurous, you could also
spray – paint the enclosure and use edging tape to create some fancy designs,
while still allowing you to see the SSD inside.