We carried out all the tests built with the
following components:
·
Mainboard: MSI Z77 MPOWER, MS-7751 ver.4.1 (LGA
1155, Intel Z77 Express, BIOS version 17.5B7)
·
Intel Core i5-3570K CPU (3.6-3.8 GHz, 4 cores,
Ivy Bridge rev.E1, 22nm, 77 W, 1.05 V, LGA 1155)
·
2 x 4 GB DDR3 SDRAM Corsair Vengeance
CMZ16GX3M4X1866C9R (1866 MHz, 9-10-9-27 timings, 1.5 V voltage)
·
Gigabyte GV-T797OC-3GD (AMD Radeon HD 7970,
Tahiti, 28 nm, 1000/5500 MHz, 384-bit GDDR5 3072 MB)
·
Crucial m4 SSD (CT256M4SSD2, 256 GB, SATA 6
Gbps)
·
Scythe Mugen 3 Revision B (SCMG-3100) CPU cooler
·
ARCTIC MX-2 thermal interface
·
Enermax NAXN ENM850EWT PSU
·
Open test-bed built using Antec Skeleton system
case
We used Microsoft
Windows 7 Ultimate SP1 64 bit (Microsoft Windows, Version 6.1, Build 7601:
Service Pack 1) OS, Intel Chipset Software Installation Utility ver.
9.3.0.1020, AMD Catalyst graphic card driver ver. 12.4.
Install basic program and restore BIOS
All of the most convenient functions and
well-treated design of mainboards are considered as reason that makes assembly test
system based on them easily. MSI Z&& MPOWER mainboard is not an
exception: we assembled the system very fast and it operated fully at first
start. However, a short time later we faced various challenges. First, after
initial effort of re-installing BIOS, one of BIOS chips failed. Here, we must
point out BIOS re-installation was performed with slightly adjusted M-Flash. Earlier,
there was a single parameter offering you to select a BIOS file. Now, there is
a second parameter which allows simultaneous updates for BIOS and ME (Intel
Management Engine). We selected the second option, as the list of changes
introduced in the newest BIOS version 17.4, which we were going to re-install
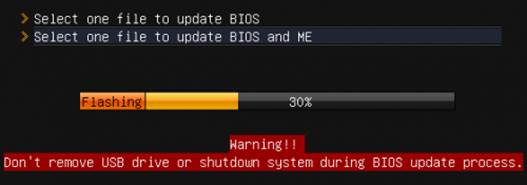
with, including “Update ME firmware”. Everything started well. We got warning
about the importance of uninterrupted re-flashing process, and a continuous
progress report in percent.

Uninterrupted
re-flashing process
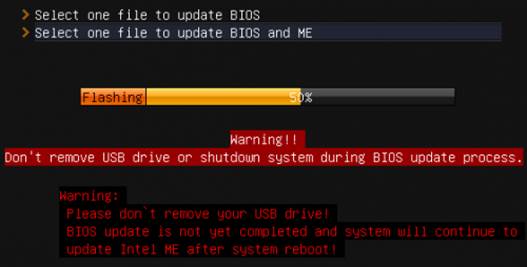
However, right after we reached 50% of the
process, another warning appeared to remind us of not moving the drive with
BIOS file, because Intel ME would be updated after the system reboot.

Another
warning popup
After the system reboot, the process
continued and we finally got a success confirmation.

A
success confirmation
I have to mention that we went through a similar
two-step re-flashing process on other manufacturers’ boards, Asus, for
instance. However, there’re some crucial differences among them. First, user
doesn’t have to choose between two options that eliminate each other – update
for BIOS or for BIOS and ME. There is only one option – BIOS update. In this
case, BIOS performed update as usual, and if the profile also contains Intel ME
update, it will do it right after system reboot. The second crucial difference
is after the first successful step, you can remove USB drive, as BIOS update
file has been backed up in the memory and the process would continue without
any interruption. However, you can easily ignore the second warning on MSI
mainboard at 50% mark. The only way to keep an eye on it is to watch the status
bar continuously. I can easily imagine a situation when the user walks away
from the system for a minute and then comes back when it has already rebooted.
He or she may guess that the re-flashing has been completed and remove the USB
drive, which will result in a failure and leave the user with a non-operational
system. In our opinion, the new BIOS updating process on Micro-Star mainboards
is quite confusing, with higher risk of error caused by users.
However, a non-functional BIOS chip doesn’t
mean the world’s end since we have a spare which could help to restore the primary
one. Description of BIOS restoration is quite simple and visual. Using changes
in the board to choose the operating BIOS chip, reboot the system, and if
necessary, save the image of running BIOS in a USB flash drive. Then, switch to
the non-functional chip and restore it.

Description
of BIOS restoration
Everything is simple, but unfortunately, it
was not effective. If we chose “Update BIOS” option, the process was completed
but the board didn’t start. If we chose “Update BIOS and ME” parameter, the
first step finished well but after the system reboot, the board couldn’t complete
the second step. Seemingly, BIOS restoration process of MSI continued to fail. Previously,
we had problem with two BIOS chips on MSI X79A-GS (8D), as you can remember in
our review.
However, we didn’t lose hope. We still had an
operational back-up BIOS chip which we can still use. And we were right not to
give up: the latest BIOS version was ready at the timing of the review, 17.4,
we successfully re-flashed, and we continued to research on mainboard’s
functions. Nevertheless, we still got stuck with other challenges. First, we
had difficulty saving BIOS configuration in the profile with numbers, although
this time was different from the last one. As you might remember, when
reviewing MSI Big Bang XPower II and MSI X79A-GD65 (8D), we were confused when
realizing that configuration saved even in profile had just disappeared after
the system reboot. This time, the profile was there but the system was frozen after
our effort of restoring the second installation profile, and in case of the
fourth profile, the setup restored differently from what we had saved.

The
system was frozen.
Semi-operational setting profile system is
an issue, but not a large one for studying the mainboard’s functionality. Unluckily,
we soon discovered a more serious problem: the first graphic card slot didn’t
work properly. The card inserted into it could work but with low productivity, and
it was sometimes half as slow as usual. The second slot worked well, but it was
designed for a second slot, meaning that it had half of the number of the pins.
As a result, a single card installed in the second slot could work only at PCI
Express 3.0 x8 speed, making direct comparison with other boards unfair. Thus, we
had to report the problem to MSI until we managed to find a solution.
Thanks to fast and active response from MSI
team, we soon managed to restore the non-operational BIOS chip with the help of
Intel Flash Programming Tool. We even re-flashed a beta version (17.5B7) of the
BIOS. But the recovery process was a little complex (we had to save the unique
ID of our network card before the process), it wasn’t difficult at all

Restoring
non-operational BIOS chip
It turned out that the beta BIOS version
didn’t have any matter involving setting profile and the first graphic card
slot worked well once again. We confirmed that there was no physical problem with
the card slot by switching to the backup BIOS chip with version 17.4, when we
once again witnessed a low graphic performance. Now with BIOS perfectly
corrected, we finally could carry out the tests with the real performance of
efficiency of the mainboard.