Recently, Sony has officially introduced
their newest product of mirror-less series: NEX-F3. This camera has far more
improvements, in both specs and design, than its predecessor: NEX-C3.

Sony
NEX-F3 review
This is also the biggest model in NEX
series, not including NEX-7. On the other hand, it feels fit as well as
comfortable in palm. Besides, NEX-F3, the second NEX compact, comes with built-in
flash to enhance capturing versatility. Image quality and low-lighting capture appear
good while manual modes come in variety, to satisfying different purposes of
users. Switching between modes is still NEX-F3’s weak point, similar to other
NEX models, due to limited amount of buttons.
Design and appearance
If you used to experience previous NEX
models, asides from NEX-7, you first feeling for F3 will be very different. The
camera is bigger, heavier and not as slim plus light as its predecessors. Particularly,
NEX-F3 comes in 117x67x42mm size and 314g weight, a bit higher than NEX-C3’s
figure (110x60x33mm and 225g). However, this difference is not much troublesome
yet we felt like holding it very much. Though, our hand got a little tired in
long use.

The
camera looks professional and nice but still compact.
Our NEX-F3 is white-colored, nice-looking
and fashionable. Obviously, like other NEX models, it still appeared hi-class and
gave lots of inspiration for capturing. The model looked more regular in shape
than NEX-C3, shown in from corner to stock.

Big
and curve stock can be held firmly, giving comfortable feeling, when used.
The biggest difference between NEX-F3 and NEX-3/C3
is that the newer model’s stock is bigger and more curved, helping user to hold
the camera more firmly and giving no hindrance like either NEX-5 or NEX-C3 did
during long use. Though my hand was quite big, I still felt very comfortable
when using NEX-F3 for 3 hour using. There was a hump on the top right of the stock
enabling middle finger to be placed more comfortably and index finger to get
ready to press capture button at any time. Improving the stock of NEX-F3 is
highly appreciated. It is surfaced with a rough finish preventing the compact
from slipping.
NEX-F3 in comparison with NEX-5
NEX-F3 is the second NEX that has been
integrated with built-in flash by Sony. Previous NEX’s 3 and 5 series had to
use external flash joined by specialized connectors, which made the compact much
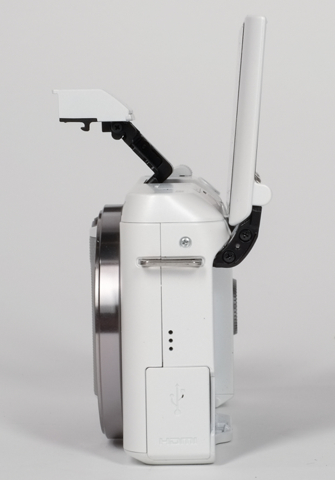
bulkier. For NEX-F3, this flash can be tidily folded into the case. When we
pressed flash button, this flash bounced powerfully and if you don’t get used
to it, you may be a little afraid. This flash’s structure is complicated but
firm. After pulled out, this flash is placed at quite high position so when we
used hood for 18-55mm zooms, there was no sight of dark shade like in other
DSLRs.

Built-in
flash is placed in high position
It is interesting that this built-in
flash’s angle is adjustable. It is not the manufacturer’s purpose but you can
take advantage of it when capturing images with NEX-F3. Before shooting, just use
index finger to carefully raise the flash until it reached your favorite angle then
push capture button. Light will be spread all over your space due to reflection
from surrounding surface, instead of direct flashing.
Despite built-in flash, Sony still retains flash
connector that only appeared in previous NEX models. Thanks to this, you can
use flash having higher power flash like Sony HVLF20S did or combine with Sony
FDA-EV1A view finder in case you prefer focus via Viewfinder to LCD.

The
left image was shot with direct flashing and the right showed image captured when
built-in flash was slightly raised.
Screen
NEX-F3’s display is 3inch LCD plus
921,600pixel resolution. With such resolution, you can focus and view images
with considerable sharpness, which is uncomplaining. This has been retained by
Sony from NEX-3 that was released long times ago. However, in comparison with
older NEX compacts, NEX-F3 becomes different due to the swivel display. This
screen can be turned over by 180 degrees to view directly to photographer in
case user would like to shoot portrait. This comes really handy and interesting
because previous NEX models weren’t able to. When turned over, the screen can
only be swiveled within a small angle, unlike NEX-C3 and NEX-5N that own larger
angles (NEX-F3’s angle is 13 degrees while NEX-C3’s one is 45 degrees). It’s
inconvenient for us if we want to hold the camera in high position. The
screen’s raising mechanism is still limited thus in first use, you would be a
little afraid when turn the screen over yet through times you will get
accustomed to it. Sadly, NEX-F3’s display isn’t touch-sensitive like NEX-5N’s
one but this doesn’t affect user much.
180
degree upward swiveling

13
degrees downward swiveling