NEX-F3 is very funny because it provides us
with a lot of interesting and versatile capture modes. Beside manual mode, such
as M, S, A, P, there are:
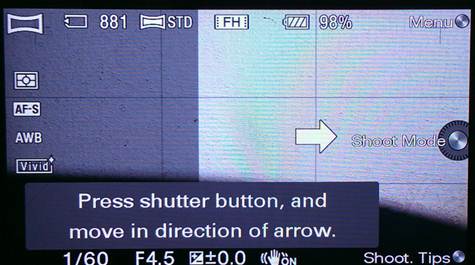
3D Sweep
Panorama and Sweep Panorama
I often use this feature because it can
save time doing complicated adjustment and process for a satisfying panorama
photo. You just need to select Sweep Panorama then start casting your camera to
capture panoramic scenes. 3D mode is, specifically, seen on 3D TVs and its
effects can’t be displayed on NEX-F3’s LCD screen. In some tests, I realized
that this mode was more sensitive than NEX-5’s one. With such fast capturing
speed, for NEX-5 I was able to finish my photo though for NEX-F3, I did cast my
camera too fast that I had to start all over.
3D
Sweep Panorama and Sweep Panorama
Anti-Motion
Blur
This feature reduces shake and blur in
low-lighting or telephotographing. This mode first captures 6 images instantly
then processes them all to create the best one.
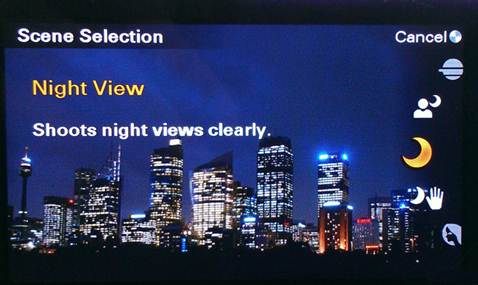
Scene
Selection
You have many capture modes: night scene,
portrait, sunrise, quick-motion, macro… The most impressive among them is Hand-held
Twilight which comes effective in capturing night scene. This feature is not
new and it has already appeared in previous models of Sony. Like Anti-Motion
Blur, it captures many photos at the same time but appears more effective in
low-lighting.
Scene
Selection
Intelligent
Auto
This mode will automatically detect your
scene and adjust appropriate parameters. If you are a newbie, it’s recommended
to use iAuto to watch and learn how the camera measures brightness, aperture,
speed, ISO and EV.
Superior
Auto
A new feature has appeared in NEX-3 series
(NEX-F3 has this one while NEX-C3 doesn’t). With this mode, you can adjust more
parameters than iAuto. Particularly, we will use the wheel to blur the
background behind our object (Defocus), adjust Brightness, Color, and Vividness
and apply Picture Effects. These effects are completely similar to those of
previous NEX models. You can view some effected photos in below Galleria. Besides,
Superior Auto helps us to activate Auto HDR and autofocus without manual
adjustment.
Auto
Portrait Framing
In fact, this is not a capture mode but a
technology which can be turned on/off in the camera’s menu. If you capture an
image in which the camera detect a face, it will try to crop that image in
golden ratio (1/3) to produce the best-quality image right at the time the eye
looks directly into the camera. Cropped image will be processed by Sony’s Super
Resolution to enhance resolution.
Clear
Image Zoom
This is not a separate mode but a digital
zooming feature of NEX-F3. I hardly use this type of zoom as it gives low
visual quality plus noise. For NEX-F3, it’s a completely different experience. When
Clear Image Zoom is activated, image would be enlarged without noise and loss
of sharpness. Sony provides us with various zooming levels, in which the
largest one is 4X. Clear Image Zoom’s zoom range is from 1X to 1.8X. To adjust
zooming level, we can use the wheel.
Clear Image Zoom is good at recording
videos. You can easily enlarge the frame regardless of shaking the camera
because you don’t have to revolve the lens. This feature, during recording, can
reach 2.5X zoom. Beyond this level, image quality begins to decrease. Below are
some image processed by Clear Image Zoom.
Image quality
NEX-F3 uses a brand-new 16MP sensor which delivers
accurate colors and sharpness. In standard lighting, captured image is very
good and able to preserves details when enlarged. Colors are vivid and
eye-catching. However, in some cases, LCD’s display is nice but PC’s display is
a little faded.
NEX-F3’s capturing in low-lighting is as
good as that of DSLR and mirror-less compact in the same price range. At ISO
800, you can feel free shooting photos without worry for noise. At 1600, noise
starts appearing thinly, not too much, not too little yet acceptable. At ISO
3200, more noise shows up, object’s lines begin being faded, which only can be
seen when you enlarge your image. At 6400 and 12800, noise is clearly seeable
in dark areas but we seldom use this ISO level. In case you are mostly
interested in shooting for sharing photos online with your friends, NEX-F3
low-lighting capture best suits.
Test images were captured in low-lighting
condition plus 1600-16000 ISO, at 1/50 second speed and without +/- EV. RAW
images were converted into JPEG formats by Sony Image Date Converter (plus no
adjustment).
Recording
NEX-F3 can record videos at maximal Full-HD
1920x1080 resolution at 60i frame rate. This proves to be a power of NEX-3
models when compared with NEX-C3 as these predecessors could only capture
videos at HD 720p resolution. Now, NEX-F3 (though its bit rate – 60i/24Mbps –
is lower than NEX-5N’s one – 60i/29Mbps) rivals NEX-5N.
User can select between MP4 and AVCHD
format like they often do with other Alpha models. While recording, you can
adjust speed, aperture, EV, ISO, focus point and even digital zooming. It’s
really impressive that we would flexibly configure aperture’s speed, improving our
creativity. Some cameras don’t allow us to configure these parameters, yet they
automatically set them up and impose considerable restrictions on advanced
photographers.
With reference to movie’s quality, colors
are accurately reproduced with no dilution as well as saturation. If the movie
is recorded outdoor, its quality will be higher. Additionally, sound is clear
and loud. For common and half-professional users, NEX-F3’s recording surely satisfies
them.
Runtime
According to Sony, the camera can capture
400 shots per charging but in practical test, the figure was lower. After 100%
fully recharged and 170 shots, 10% of which used flash while the rest were
normally captured with continuously lit LCD screen. There was 68% battery left.
To use up battery’s capacity per one recharging, I did shoot 370 photos at the
above setting. This was quite considerable result because NEX-F3 didn’t have
viewfinder so I had to do everything manually.
Conclusion
NEX-F3 is good with innovative technologies
thus it can give you nice images easily. For those who desire high-quality in a
compact camera, NEX-F3 is the best choice. Though, it is bigger and heavier
than previous NEX models yet it feels sturdy and comfortable. Custom setting is
quite complicated and slow but during long use, user will get accustomed to it.
Overall, NEX-F3 is very flexible and sure to satisfy many people for its
600-dollar price and 18-55m kit lens.
Good
Big and comfortable stock
Built-in flash
Swivel display
Micro-USB assisting charging
Full-HD recording
Good low-lighting capture
Nice and clear image captured
Superior Auto and Focus Peaking modes
A bunch of auto shooting features
Fast and accurate Object Tracking
Bad
Inaccurate focus in low lighting
Complicated control
Pricey lens with few options
Low downward swiveling angle
Unsmooth swiveling joint
Hard to press capture button