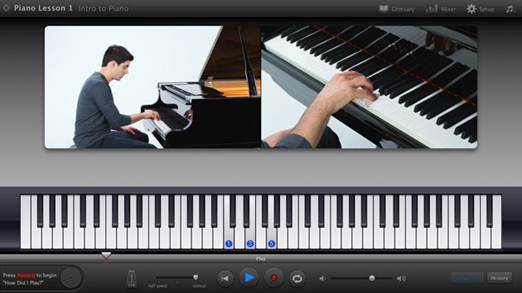
How to Record A Keyboard
1. Piano man
Select File> New and choose Piano from
the New Project screen. Click Choose and Create. If you’ve got a USB keyboard
plugged in, you can play the Grand Piano. If you haven’t. go to Window Musical
Typing for an on-screen keyboard.
2. Play away
Ensure Control > Count In and Control
> Metronome are ticked. Click Record and you’ll be counted in. Start playing
on your real or virtual-keyboard, and your input will be recorded in digital
format. When finished, click . Record again to stop recording.
3. Change of tune
Double-click Grand Piano in the Tracks pane
for the Software Instrument selection. Navigate to Organs > Jazz Organ,
rewind your track and play it. The notes and timing you just recorded remain,
but the instrument has been changed entirely!
How
to Record A Keyboard
How To Edit Recorded Audio
1. Edit a track
Following on from the previous guide,
double-click the recorded audio region in the timeline to access the Track
Editor. Select one note or several. Drag them to change their position or move
your cursor to their edge and drag to change their lengths.
2. Better timing
Select an audio region and use the Auto
Quantize menu to quantise your notes, aligning them rigidly to a timing grid.
Select Notes and adjust their velocity to affect the volume and, in some cases,
the sound of your chosen digital instruments.
3. Write a song
You can compose from scratch in the Track
Editor. C -click the track timeline to create a region and double-click it to
view it. C -click to add new notes or O drag selections to duplicate. This is
great if you’re a budding songwriter but poor at playing instruments.
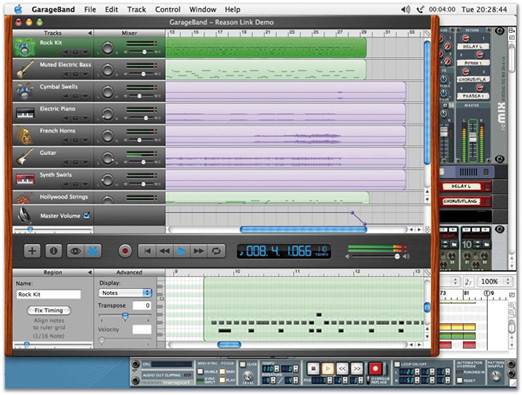
Mix And Arrange
Refine your sound using GarageBand’s
Mixing Tools
Mixing is the act of getting the various
components of your song working together, and making everything sound as good
as possible. Arranging is the order of components In a piece of music. In pop
songs, this centres on intros, verses, choruses and bridges.
Experimenting with arrangements in GarageBand
is made easier by the Arrange Bar, which enables you to define arrange regions
and drag them about and duplicate them, making it a cinch to reorder song
components.
Refine
your sound using GarageBand’s Mixing Tools
Mixing is a different story. It would be
unfair to claim that GarageBand makes mixing as easy as child’s play, since
mixing is something of an art. However, it is safe to say that if you look at a
chart- topping album, the mixing part of the project is often the lengthiest,
as engineers and producers strive to perfect every element. GarageBand offers
features that can get you started, though, including song-wide effects and
controls that enable you to tweak and fine-tune individual tracks.
Make sure that all the elements within the
mix are distinct — vocals in particular are often mixed too low. And take
advantage of one freely available resource.., friends and family. After all,
several pairs of ears are better than one!
How To Master Basic Track Control
1. Header controls
Each track header has a set of controls.
Under the track’s name (amended by double- clicking and typing) is a set of
buttons. Mute (the right-facing speaker icon) can be used to mute the track
Solo (headphones Icon) mutes tracks that are not Solo. This enables you to
concentrate on specific tracks while mixing.
2. Turn it up
At the far right of each track header is a
level indicator and volume slider. The former provides an indication of a
track’s level as it plays — avoid red warning indicators! The slider enables
you to adjust the volume of the track; as the slider control is dragged, the dB
level is shown as a tooltip.
3. Stereo pan
Between the buttons and levels is the pan
control. Panning determines where the track Sits in the mix: drag it up or left
to rotate the dial left, and down or right to rotate it right. You can make
instruments stand out by changing their positions. After adjusting the panning,
you may need to tweak the volume.
4. Volume control
Click the View automation button at the right
of the volume slider and click the box to the left of the Track Volume menu to
enable this option. You can then set points on the curve. If you click Track
Volume and select Add Automation, you can define automations for track effects
and panning.
Quick Tip Mix The Mix
With software such as GarageBand, it’s
tempting to make continual tweaks while mixing, but constant changes don’t
enable you to get a feel for your piece. Export a stereo master at some point
and listen to that. Make notes of things that need amending, then go back to
GarageBand, tweak the mix, export and repeat.
Don’t just listen to your work through
expensive headphones. They generally make panning more apparent and tend to
boost frequencies in the upper-mid range. Lisien to your mixes on a range of
devices, including iPod headphones or a car stereo, and make relevant mix
judgements You can’t make assumptions about where people will hear your music.
Also, don’t listen with customized EQ. II you have the bass on your amp turned
up, your mix will end up bass-light and will appear thin. Ensure that your amps
are at default settings. The same is true of software: if you have a custom EQ
setting in iTunes that you use while listening to songs, turn the Equaliser off
via Window > Equaliser.
Make
notes of things that need amending, then go back to GarageBand, tweak the mix,
export and repeat.
How To Get To Grips With Mixing
1. Arrange track
GarageBand enables you to rapidly duplicate
completed components, rather than messing about selecting audio regions across
dozens of tracks. Open a completed Apple Loops song and then choose Track >
Show Arrangement Track.
2. Add an arrangement
Well treat the first four bars as the intro
and the next four as a verse. Click the + button next to Arrangement. Drag the
new arrange region’s right edge to the left until the region is four bars wide.
Double-click Untitled to rename it.
3. Rearrange
Add another region and make it span the
second four bars. Name It Verse then O-drag the Verse region to the right;
you’ll get a copy of the region’s content. To see how easy it is to rearrange a
song, drag the intro region between the two verses. .
4. Two inputs
To Record a live performance but still
control the mixing and effects, connect a guitar and a microphone to your Mac,
each via it’s own interface input. Now proceed to set up a real instrument
track for the vocals and a guitar track for the guitar.
5. Record
To record go to Track > Enable
Multitrack Recording. Now, check the instrument inpu levels. Press Record in
each track’s header, then master Record. You’ll be counted in and vocals and
guitars will be recorded to separate tracks.
6. Fade away
Open the song created above. Choose
Track> Show Master Track. Anything applied here affects the entire song. At
bar 7, click on the master volume curve at 0dB. At bar 9, drag the control
point to the bottom. You’ve created a track fade.
7. Handle with care
Unless your recording is simple, avoid
adding effects such as reverb to the Master Track, or your track will turn into
a muddy mess. However sometimes adjusting its EQ can banish annoying booming
bass or irritating and tinny high-end noise.
8. Save it
If you regularly apply the same Master
Track settings, click the Browse tab in the Master Track’s Track Info pane,
click Save Master and name your setting. To apply the setting to a different
song, select it from the drop-down menu and double-click.
Quick Tip Don’t Distort
Keep an eye on the level Indicators in the
toolbar. If your mix becomes loud enough to distort, the two circular red LEDs
will remain on and the play head will turn red. If this happens, amend the mix
or work with peak limiting and compression.